Vue Deployment on App Service Linux
This section provides information for creating, configuring, and deploying a Vue application on App Service Linux.
Local Development
Create an Vue app
-
Setup a local environment starting with the Vue CLI:
npm install -g @vue/cli -
Create a new folder if desired, navigate to the created folder, then run:
vue create newprojectIt will prompt for either Vue 2 or 3, choose your preference.
-
Once the installation is done, cd into projectname folder and then start the server using:
yarn serve(alternatively you can usenpminstead ofyarnas your package manager, later in this postnpmis used - but either can be chosen)This will compile and build the site:
    $ yarn serve
    yarn run v1.22.15
    $ vue-cli-service serve
    INFO  Starting development server...
    98% after emitting CopyPlugin

    DONE  Compiled successfully in 21351ms                                                                                                                                                                          8:28:47 PM


    App running at:
    - Local:   http://localhost:8080/
    - Network: http://192.168.86.97:8080/

    Note that the development build is not optimized.
    To create a production build, run yarn build.
-
Browse the site by navigating to
http://localhost:8080.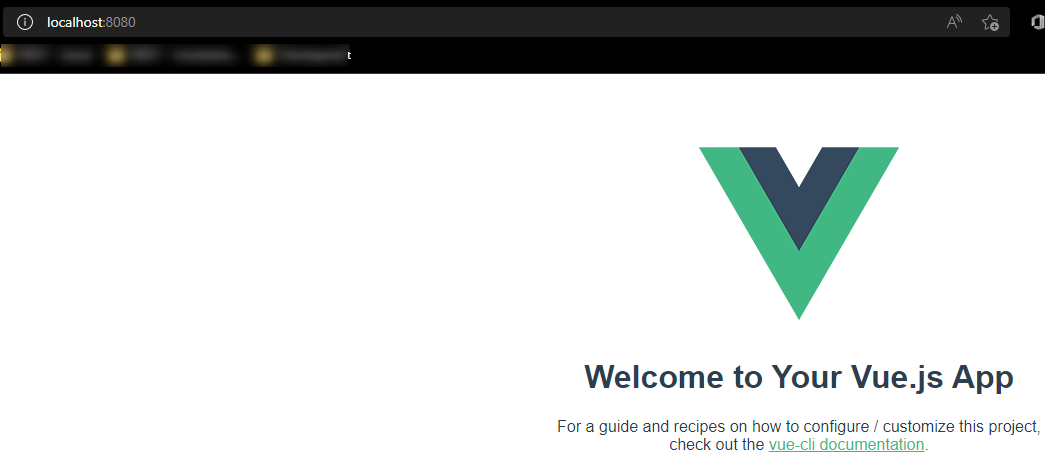
-
To create a production build you can run:
yarn build(ornpm run buildif usingnpm)This will create a
distfolder with your static files.
Deployment Options
There are multiple deployment options in App Service Linux as Continuous Deployment(GitHub/GitHub Actions, Bitbucket, Azure Repos, External Git, Local Git), ZipDeploy, Run from Package, FTP, etc. We’ll be covering 3 of these methods below.
Local Git
When using Local Git, you are using App Service Build Service also named as (Oryx) to build your application.
To setup this option and deploy a Vue application follow the below:
NOTE: Deploying from Local Git will likely prompt you for your Git credentials for the Azure Application. You can find it under the FTPS Credentials tab in the screenshot below.
-
Navigate to your Web App and select
Deployment Centerand then click onLocal Gitand then click onSave.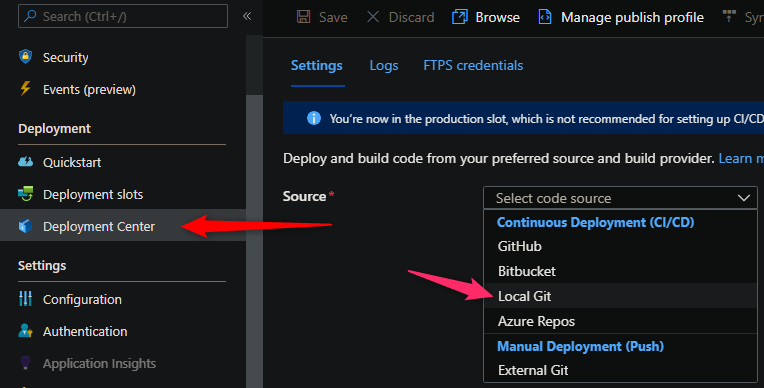
-
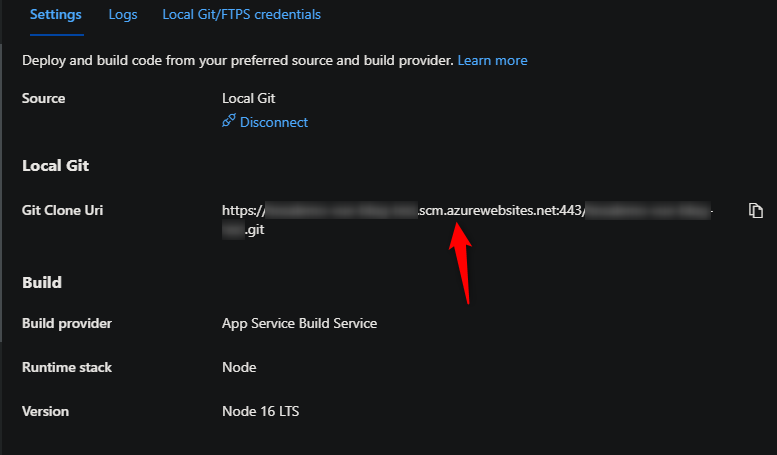
Copy the remote git repository from Azure Portal.
- In your local terminal run the following commands in order:
git add . git commit -m "initial commit" git remote add azure https://<sitename>.scm.azurewebsites.net:443/<sitename>.git git push azure master - Then Oryx will build the application:
Enumerating objects: 5, done. Counting objects: 100% (5/5), done. Delta compression using up to 8 threads Compressing objects: 100% (3/3), done. Writing objects: 100% (3/3), 248.13 KiB | 7.30 MiB/s, done. Total 3 (delta 1), reused 0 (delta 0), pack-reused 0 remote: Deploy Async remote: Updating branch 'master'. remote: Updating submodules. remote: Preparing deployment for commit id '9581478599'. remote: Repository path is /home/site/repository remote: Running oryx build... remote: . remote: Operation performed by Microsoft Oryx, https://github.com/Microsoft/Oryx remote: You can report issues at https://github.com/Microsoft/Oryx/issues remote: remote: Oryx Version: 0.2.20210826.1, Commit: f8651349d0c78259bb199593b526450568c2f94a, ReleaseTagName: 20210826.1 remote: remote: Build Operation ID: |1x/pFDEehL8=.9dacccf1_ remote: Repository Commit : 958147859957fbb7b52165a29bbfe9e535149bd6 remote: remote: Detecting platforms... remote: Detected following platforms: remote: nodejs: 16.13.2 remote: remote: Using intermediate directory '/tmp/8d9ebe42a41a06a'. remote: remote: Copying files to the intermediate directory... remote: Done in 1 sec(s). remote: remote: Source directory : /tmp/8d9ebe42a41a06a remote: Destination directory: /home/site/wwwroot remote: remote: Removing existing manifest file remote: Creating directory for command manifest file if it doesnot exist remote: Creating a manifest file... remote: Node Build Command Manifest file created. remote: remote: Using Node version: remote: v16.13.2 remote: remote: Using Npm version: remote: 8.1.2 remote: remote: Running 'npm install --unsafe-perm'... remote: remote: ........................................ remote: npm WARN deprecated source-map-url@0.4.1: See https://github.com/lydell/source-map-url#deprecated remote: npm WARN deprecated @hapi/topo@3.1.6: This version has been deprecated and is no longer supported or maintained remote: npm WARN deprecated @hapi/bourne@1.3.2: This version has been deprecated and is no longer supported or maintained remote: npm WARN deprecated urix@0.1.0: Please see https://github.com/lydell/urix#deprecated remote: npm WARN deprecated har-validator@5.1.5: this library is no longer supported remote: npm WARN deprecated eslint-loader@2.2.1: This loader has been deprecated. Please use eslint-webpack-plugin remote: npm WARN deprecated resolve-url@0.2.1: https://github.com/lydell/resolve-url#deprecated remote: npm WARN deprecated source-map-resolve@0.5.3: See https://github.com/lydell/source-map-resolve#deprecated remote: npm WARN deprecated chokidar@2.1.8: Chokidar 2 does not receive security updates since 2019. Upgrade to chokidar 3 with 15x fewer dependencies remote: npm WARN deprecated chokidar@2.1.8: Chokidar 2 does not receive security updates since 2019. Upgrade to chokidar 3 with 15x fewer dependencies remote: npm WARN deprecated querystring@0.2.0: The querystring API is considered Legacy. new code should use the URLSearchParams API instead. remote: npm WARN deprecated html-webpack-plugin@3.2.0: 3.x is no longer supported remote: npm WARN deprecated babel-eslint@10.1.0: babel-eslint is now @babel/eslint-parser. This package will no longer receive updates. remote: npm WARN deprecated @hapi/address@2.1.4: Moved to 'npm install @sideway/address' remote: npm WARN deprecated uuid@3.4.0: Please upgrade to version 7 or higher. Older versions may use Math.random() in certain circumstances, which is known to be problematic. See https://v8.dev/blog/math-random for details. remote: npm WARN deprecated request@2.88.2: request has been deprecated, see https://github.com/request/request/issues/3142 remote: npm WARN deprecated @hapi/hoek@8.5.1: This version has been deprecated and is no longer supported or maintained remote: npm WARN deprecated @hapi/joi@15.1.1: Switch to 'npm install joi' remote: npm WARN deprecated svgo@1.3.2: This SVGO version is no longer supported. Upgrade to v2.x.x. remote: ............................. remote: remote: added 1354 packages, and audited 1355 packages in 2m remote: remote: 93 packages are looking for funding remote: run `npm fund` for details remote: remote: 72 vulnerabilities (61 moderate, 11 high) remote: remote: To address issues that do not require attention, run: remote: npm audit fix remote: remote: To address all issues (including breaking changes), run: remote: npm audit fix --force remote: remote: Run `npm audit` for details. remote: remote: Running 'npm run build'... remote: remote: remote: > azure-webapps-linux-node-vue-blogpost@0.1.0 build remote: > vue-cli-service build remote: remote: ...... remote: remote: - Building for production... remote: .................................................. remote: DONE Compiled successfully in 41959ms3:55:29 PM remote: remote: File Size Gzipped remote: remote: dist/js/chunk-vendors.584be8e5.js 89.85 KiB 33.54 KiB remote: dist/js/app.3660a455.js 4.48 KiB 1.63 KiB remote: dist/css/app.fb0c6e1c.css 0.33 KiB 0.23 KiB remote: remote: Images and other types of assets omitted. remote: remote: DONE Build complete. The dist directory is ready to be deployed. remote: INFO Check out deployment instructions at https://cli.vuejs.org/guide/deployment.html remote: remote: remote: Zipping existing node_modules folder... remote: .............................................................................. remote: Done in 83 sec(s). remote: Preparing output... remote: remote: Copying files to destination directory '/home/site/wwwroot'... remote: Done in 2 sec(s). remote: remote: Removing existing manifest file remote: Creating a manifest file... remote: Manifest file created. remote: remote: Done in 263 sec(s). remote: Running post deployment command(s)... remote: Triggering recycle (preview mode disabled). remote: Deployment successful. -
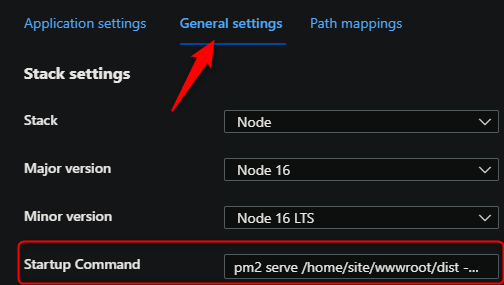
Add a startup command:
pm2 serve /home/site/wwwroot/dist --no-daemon --spawhereprojectnameis the name of your project.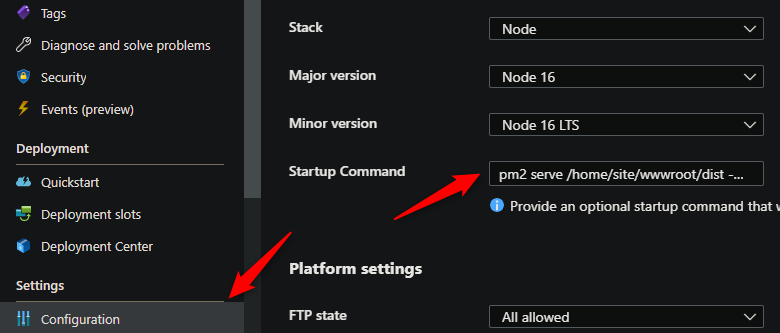
NOTE: This method of serving static files from the build folder produced named ‘dist’ is the recommended approach for Vue. Most SPA’s follow this same approach. Read more here for Vue.
GitHub Actions
You can quickly get started with GitHub Actions by using the App Service Deployment Center. This will automatically generate a workflow file based on your application stack and commit it to your GitHub repository in the correct directory. You can deploy a workflow manually using deployment credentials.
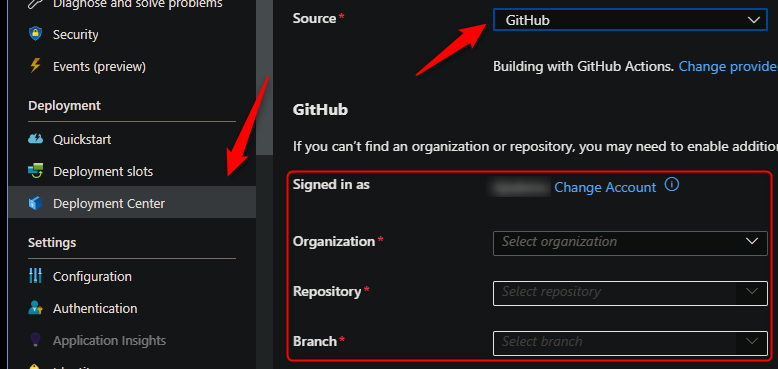
NOTE: If you have numerious repositories that appear in the dropdown, you can search by typing within the text field/dropdown.
You can find more details about these steps documented here:
For Vue deployments it is recommended to modify the default template with the following changes:
- Just upload the production build folder.
- Remove any npm or yarn run test if neccesary.
- Validate current nodejs version.
Here is an example with recommendations:
NOTE The below .yaml is used from the default generated template when selecting Github Actions, however - some slight changes have been made for recommendations
name: Build and deploy Node.js app to Azure Web App - ansalemo-vue-blog-test

on:
  push:
    branches:
      - main
  workflow_dispatch:

jobs:
  build:
    runs-on: ubuntu-latest

    steps:
      - uses: actions/checkout@v2

      - name: Set up Node.js version
        uses: actions/setup-node@v1
        with:
          node-version: '16.x'

      - name: npm install, build, and test
        run: |
          npm install
          npm run build --if-present

      - name: Upload artifact for deployment job
        uses: actions/upload-artifact@v2
        with:
          name: node-app
          path: dist/

  deploy:
    runs-on: ubuntu-latest
    needs: build
    environment:
      name: 'Production'
      url: $

    steps:
      - name: Download artifact from build job
        uses: actions/download-artifact@v2
        with:
          name: node-app

      - name: 'Deploy to Azure Web App'
        id: deploy-to-webapp
        uses: azure/webapps-deploy@v2
        with:
          app-name: 'replacewithyourappservicename'
          slot-name: 'Production'
          publish-profile: $
          package: .
After the deployment, then add a startup command startup command: pm2 serve /home/site/wwwroot --spa --no-daemon.
NOTE: This is done since we changed to deploy everything within the
distfolder and not thedistfolder itself.
Azure DevOps
You can use Azure Pipelines to build your Vue application. For Vue apps, you can still use your typical npm or yarn based commands. You can review more details here: Implement JavaScript frameworks.
Here is an example in how to implement Azure Pipelines with App Service Linux.
- Go to
Pipelinesand createNew pipeline. - Select
Azure Repos Git (YAML), there are other options as classic editor without YAML. - Select your code repository.
- Select
Node.js Express Web App to Linux on Azuretemplate. - Select the web app where you will deploy.
- Modify your current YAML and add the following points:
- Node.js version should match the same of your web app.
- Validate if you need
npm run test, if not remove it. -
Use npm or yarn commands to install needed packages and build for production
- script: | npm install npm run build displayName: 'npm install, build' -
Just include the production folder in
ArchiveFiles@2task:- task: ArchiveFiles@2 displayName: 'Archive files' inputs: rootFolderOrFile: '$(System.DefaultWorkingDirectory)/dist/' includeRootFolder: false archiveType: zip archiveFile: $(Build.ArtifactStagingDirectory)/$(Build.BuildId).zip replaceExistingArchive: true -
Add a startup command in the
AzureWebApp@1task and validate current nodejs version:- task: AzureWebApp@1 displayName: 'Azure Web App Deploy: sitename' inputs: azureSubscription: $(azureSubscription) appType: webAppLinux appName: $(webAppName) runtimeStack: 'NODE|16-lts' package: $(Pipeline.Workspace)/drop/$(Build.BuildId).zip startUpCommand: 'pm2 serve /home/site/wwwroot --spa --no-daemon'
- Save and
runthe pipeline.
Here is an example with recommendations:
trigger:
- main
variables:
# Azure Resource Manager connection created during pipeline creation
azureSubscription: 'replacewithsubscription'
# Web app name
webAppName: 'replacewithsitename'
# Environment name
environmentName: 'replacewithsitename'
# Agent VM image name
vmImageName: 'ubuntu-latest'
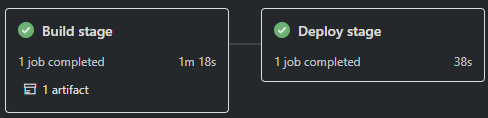
stages:
- stage: Build
displayName: Build stage
jobs:
- job: Build
displayName: Build
pool:
vmImage: $(vmImageName)
steps:
- task: NodeTool@0
inputs:
versionSpec: '16.x'
displayName: 'Install Node.js'
- script: |
npm install
npm run build
displayName: 'npm install, build'
      - task: ArchiveFiles@2
      displayName: 'Archive files'
      inputs:
          rootFolderOrFile: '$(System.DefaultWorkingDirectory)/dist/'
          includeRootFolder: false
          archiveType: zip
          archiveFile: $(Build.ArtifactStagingDirectory)/$(Build.BuildId).zip
          replaceExistingArchive: true
- upload: $(Build.ArtifactStagingDirectory)/$(Build.BuildId).zip
artifact: drop
- stage: Deploy
displayName: Deploy stage
dependsOn: Build
condition: succeeded()
jobs:
- deployment: Deploy
displayName: Deploy
environment: $(environmentName)
pool:
vmImage: $(vmImageName)
strategy:
runOnce:
deploy:
steps:
- task: AzureWebApp@1
displayName: 'Azure Web App Deploy: replacewithsitename'
inputs:
azureSubscription: $(azureSubscription)
appType: webAppLinux
appName: $(webAppName)
runtimeStack: 'NODE|16-lts'
package: $(Pipeline.Workspace)/drop/$(Build.BuildId).zip
startUpCommand: 'pm2 serve /home/site/wwwroot --spa --no-daemon'
NOTE: Depending on how you set up your pipeline, you may have to authorize permission for deployment. This is a one-time task, below is a screenshot of what you may see:

Troubleshooting
Container Doesn’t Start
- Attempting to start the application via Development Server.
By default Vue has the followingpackage.json:"scripts": { "serve": "vue-cli-service serve", "build": "vue-cli-service build", "lint": "vue-cli-service lint" },servewould start the Development Server. However, unknowingly one may change this tostartand try to run their application this way, based off of Oryx’s start logic. Doing this could lead to a few different issues such as:Error: Cannot find module '../package.json' Require stack: - /home/site/wwwroot/node_modules/.bin/vue-cli-serviceOr could cause issues such as slow startup, poor performance, or possibly
ENOSPC: System Limit for Number of File Watchers Reached.-
Resolution: Use PM2 to serve the production build
distfolder already built during the deployment process (ex. Oryx, Github Actions, DevOps, etc.). Since purely static files are being served, this would improve performance since the Development Server is not being used - a reminder that the Development Server is not recommended for production.This additionally would remove any possible
ENOSPC: System Limit for Number of File Watchers Reached.issues since the Development Server isn’t running.NOTE: Remember to take note of how you’re deploying your static content, if you’re deploying the entire
distfolder - usepm2 serve /home/site/wwwroot/dist --no-daemon --spa, or if you’re deploying what’s within dist and not the whole folder itself, usepm2 serve /home/site/wwwroot --no-daemon --spa
-
404 Not Found
Since Vue is a SPA (Single Page Application) you may possible get 404’s for certain routes, such as if you’re using Client Side routing through Vue. You need to redirect all queries to the index.html.
Resolution: Use a startup command passing --spa argument to PM2 as followed: pm2 serve /home/site/wwwroot/dist --no-daemon --spa or using a process file. Remember, if deploying the entire dist folder or just the content within, update the pm2 command appropriately
GitHub Actions Timeout and slow deployments
A normal deployment doesn’t need to take more than 5-15 mins. If the workflow is taking more than that then you might need to review current implementation. Here is a list of things to check:
-
Running tests. There are scenarios where GitHub Actions Agent takes more than 360 minutes (6 hrs) to give you a status and fails with:
The job running on runner Hosted Agent has exceeded the maximum execution time of 360 minutes.. If you havenpm run testdefined in yourpackage.json, this will be triggered by the workflow created from Azure App Service. The best option is to evaluate if this is required to be executed in the workflow since the majority of these tests will run Chrome browser, if this is not needed then it is better to remove it.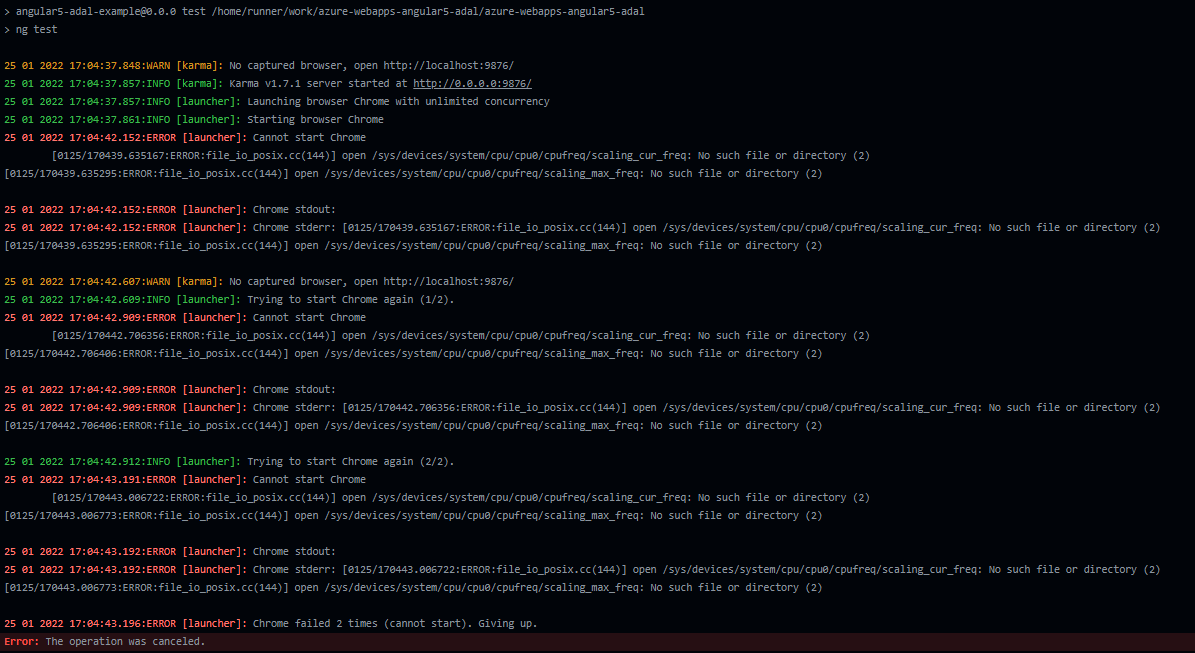
-
Too many files and slow deployments. Using
actions/upload-artifact@v2to allow sharing data between jobs and store data once the a workflow is complete, it will depend on the JavaScript framework but Angular/React/Vue applications tends to have more than 10,000 files when it is compiled including the node_modules folder, when this condition is met, it will trigger the following warningThere are over 10,000 files in this artifact, consider creating an archive before upload to improve the upload performance., this will delay your deployment by several mins or hours.
For those scenarios, you can implement the following alternatives:
-
Upload just production dist folder in
actions/upload-artifact@v2action:# Depending on JavaScript framework you can use dist or build. - name: Upload artifact for deployment job uses: actions/upload-artifact@v2 with: name: node-app path: dist/
-
Or Zip/unzip your application files between jobs.
build job:
 - name: Zip artifact for deployment
   run: zip release.zip ./* -qr

 - name: Upload artifact for deployment job
   uses: actions/upload-artifact@v2
   with:
     name: node-app
     path: release.zip
deploy job:
   deploy:
       runs-on: ubuntu-latest
       needs: build
       environment:
         name: 'Production'
         url: $

       steps:
         - name: Download artifact from build job
           uses: actions/download-artifact@v2
           with:
             name: node-app

         - name: 'Deploy to Azure Web App'
           id: deploy-to-webapp
           uses: azure/webapps-deploy@v2
           with:
             app-name: 'yoursitename'
             slot-name: 'Production'
             publish-profile: $
             package: release.zip
You could additionally extract the .zip, delete it and then deploy the files as normal:
               steps:
               - name: Download artifact from build job
                   uses: actions/download-artifact@v2
                   with:
                   name: node-app

               - name: Unzip files for App Service Deploy
                   run: unzip release.zip

               - name: Delete zip file
                   run: rm release.zip

               - name: 'Deploy to Azure Web App'
                   id: deploy-to-webapp
                   uses: azure/webapps-deploy@v2
                   with:
                   app-name: 'sitename'
                   slot-name: 'Production'
                   publish-profile: $
                   package: .
-
Deployments to Kudu timing out, or taking an extended amount of time, due to number of files
In your deployment task when using CI/CD (for either Azure Pipelines or Github Actions), you may notice occasional output showing the below:
Processed 38841 files...

Processed 39162 files...

Processed 39562 files...
Depending on the project, this can end up with upwards of 70k+ files. This is typically due to node_modules. The message shown in the deployment task that shows this is when the artifact is deployed to the Kudu site and is being handled by the deployment engine to extract the .zip deployed.
If this is a Vue application - in the sense it’s just client-side code, then as mentioned in the above section regarding GitHub and slow deployments - you should only deploy the /dist folder or just the contents within the folder. You should leave out all non-essential files - especially development-only related libraries and others.
This means that node_modules and potentially other irrelevant files for non-prod are left out - which could save tens of thousands of files that don’t need to be deployed - saving overall deployment time by tens of minutes.
In scenarios where SSR is used and /dist plus other server-side aspects are needing to be included - this may be more tricky. But, it is possible to ultimately pick and choose what your production build ends up like (meaning the files contained within the .zip) - still saving much needed deployment time.
In the event that none of above can truly be done - the App Setting SCM_DEPLOYMENT_TIMEOUT_MINS can be added to the App Service and increased by a value of minutes (eg., 80, 90). The default deployment timeout time is 40 minutes. However, a general best practice is to first try to reduce the overall size of the artifact first rather than immediately relying on this setting.
Environment variables are missing after deployment
If the application does not have access to the environment variables during build time or if the environment variable is not prefixed with VUE_APP_ they will appear as undefined.
Resolution:
- Syntax: Ensure the variable is prefixed with
VUE_APP_. Such asVUE_APP_MY_ENV_VARand not justMY_ENV_VAR. The variable can be accessed usingprocess.env.VUE_APP_MY_ENV_VAR. TheVUE_APP_prefix is specific to vue. - Oryx Build: If building the application with Oryx make sure to add the AppSetting for the environment variable first. This will make sure the environment variable is available during the build. If the application is deployed first without adding the AppSetting, add the AppSetting and then redeploy the application.
-
GitHub Actions: All the build process will happen on the GitHub Agent, so the environment variables will need to be added in the workflow.
You can add custom environment variables in the first level before jobs:
  on:
    push:
      branches:
        - main
    workflow_dispatch:

  env:
    VUE_APP_MY_TEST_VAR : $

  jobs:
    build:
      runs-on: ubuntu-latest
And then add these secrets in GitHub. This can be done going to your project -> Settings -> Secrets -> Actions.
Note: Since the build is done on the GitHub agent with the variables scoped to the Agent you do not need to re-add those AppSettings in the Azure Web App Portal.
-
Azure DevOps: Since the build will happen on the DevOps Agent, so the environment variables will need to be added in the pipeline.
This can be done by going to Pipeline -> Click on the Pipeline again -> Edit -> Variables.
After adding the needed environment variables in the pipeline trigger a build. The variables will now be replaced during the build.
Note: Since the build is done on the DevOps agent with the variables scoped to the Agent you do not need to re-add those AppSettings in the Azure Web App Portal.
Note: For more information on how Vue uses and expects environment variables click here.


