wSGI and aSGI Python Applications on Azure Functions
Azure Functions can support wSGI and aSGI frameworks with HTTP triggered Python Functions. This functionality is now provided by middleware that takes in the exposed wSGI or aSGI application which can help run the application.
Below are some frameworks that can be ran, used as a starting point. These examples are deployed to a Dedicated Plan for Azure Functions on Linux.
Prerequisites
Azure Function Core Tools
Install the Azure Function Core tools. Follow this link to download it.
Create a local Azure Function.
See this documentation on creating a local Azure Function. The examples below will be using HTTP trigger based functions. You can additionally follow this Quickstart on creating a Python function with Visual Studio Code.
wSGI frameworks
Flask
Create and configure
Create a Python HTTP based function for the Flask application, as explained above. In this example, we’ll name the function FlaskTrigger.
Add the below to your requirements.txt:
azure-functions
Flask
Make sure the Virtual Environment is activated. Next, run pip install -r requirements.txt in the same directory as your requirements.txt.
The FlaskTrigger directory This will come with an __init__.py file. Within it, add the following code to __init__.py:
import azure.functions as func
from flaskapp import app

def main(req: func.HttpRequest, context: func.Context) -> func.HttpResponse:
    return func.WsgiMiddleware(app.wsgi_app).handle(req, context)
Add the following to functions.json and specifically the bindings array:
"route": "{*route}"
For a full example:
{
  "scriptFile": "__init__.py",
  "bindings": [
    {
      "authLevel": "anonymous",
      "type": "httpTrigger",
      "direction": "in",
      "name": "req",
      "methods": [
        "get",
        "post"
      ],
      "route": "{*route}"
    },
    {
      "type": "http",
      "direction": "out",
      "name": "$return"
    }
  ]
}
Next, create a directory named flaskapp and within this, add a Python file named __init__.py. Add the following code to this file:
from flask import Flask, jsonify

app = Flask(__name__)

@app.route("/")
def index():
    return jsonify({ "message": "python-wsgi-function-samples-flask" })

@app.route("/hello/<name>")
def hello(name: str):
    return jsonify({ "message": f"Hello, {name} from python-wsgi-function-samples-flask" })
At this point, we created our wSGI callable named app and import that into our FlaskTrigger/__init__.py file to be handled by the wSGI middleware.
Add the below to the host.json file:
"extensions": {
    "http": {
        "routePrefix": ""
    }
  },
Run locally
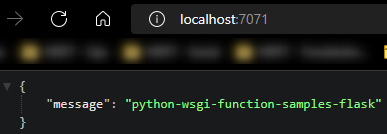
To run this locally, if using Visual Studio Code, use F5 (or Run -> Start Debugging) in the top toolbar. Additionally you can execute func start from the terminal.
The below should now be seen:
func start
Found Python version 3.9.5 (py).

Azure Functions Core Tools
Core Tools Version:       3.0.4585 Commit hash: N/A  (64-bit)
Function Runtime Version: 3.7.1.0


Functions:

        FlaskTrigger: [GET,POST] http://localhost:7071/{*route}

For detailed output, run func with --verbose flag.
[2022-06-20T17:59:51.000Z] Worker process started and initialized.
[2022-06-20T17:59:55.452Z] Host lock lease acquired by instance ID '00000000000000000000000042C502B8'.

Deploy
Create a Azure Python Function. This example was deployed to a Dedicated Plan (Linux). You can deploy this function following any of the methods described here.
In this example, we’ll use Visual Studio Code to deploy the Function App.
- First, install the Azure Functions Extension for Visual Studio Code
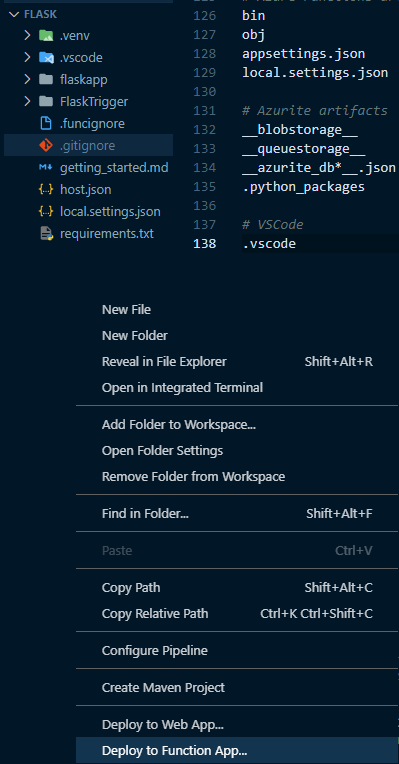
- Make sure you’re navigated to the project root and right click on the left-side pane that contains the project directory.
- Click, Deploy to Function App and follow the prompts.

- You should now be able to browse your wSGI based Function App

A full example can be found here
Falcon
Create and configure
NOTE: Creating and configuring for all other wSGI applications will largely be the same.
Create a Python HTTP based function for the Falcon function, as explained earlier. In this example, we’ll name the function FalconTrigger.
Add the below to your requirements.txt:
azure-functions
falcon
Make sure the Virtual Environment is activated. Next, run pip install -r requirements.txt in the same directory as your requirements.txt.
The FalconTrigger directory This will come with an __init__.py file. Within it, add the following code to __init__.py:
import azure.functions as func
from falconapp import app


def main(req: func.HttpRequest, context: func.Context) -> func.HttpResponse:
    return func.WsgiMiddleware(app).handle(req, context)
As explained earlier in the Flask example, add the following to your function.json under FalconTrigger:
"bindings": [
    {
      ...
      "methods": [
        ...
      ],
      "route": "/{*route}"
    },
    {
      ...
    }
  ]
Next, create a directory named falconapp and within this, add a Python file named __init__.py. Add the following code to this file:
import falcon

app = falcon.API()

class IndexResource:
    def on_get(self, req, resp):
        """Handle GET requests."""
        index = {
            'message': 'python-wsgi-function-samples-falcon',
        }

        resp.media = index

app.add_route('/', IndexResource())
At this point, we created our wSGI callable named app and import that into our FalconTrigger/__init__.py file to be handled by the wSGI middleware.
Add the below to the host.json file:
"extensions": {
    "http": {
        "routePrefix": ""
    }
  },
Run locally
To run this locally, if using Visual Studio Code, use F5 (or Run -> Start Debugging) in the top toolbar. Additionally you can execute func start from the terminal.
You should see the same output as here.
Deploy
Create a Azure Python Function. This example was deployed to a Dedicated Plan (Linux). You can deploy this function following any of the methods described here. Follow the same steps in the above Flask example for deployment.
A full example can be found here.
Bottle
Create and configure
Deploying a Bottle Function will be the same as the Flask and Falcon examples.
Create a Python HTTP based function for the Bottle function, as explained earlier. In this example, we’ll name the function BottleTrigger.
Create a requirements.txt with the following:
azure-functions
bottle
Add the following to your BottleTrigger/__init__.py:
import azure.functions as func

from bottleapp import app

def main(req: func.HttpRequest, context: func.Context) -> func.HttpResponse:
    return func.WsgiMiddleware(app.wsgi).handle(req, context)
Create a directory named bottleapp and a __init__.py file within it. bottleapp/__init__.py should contain the following:
from bottle import default_app, route

app = default_app()


@route('/')
def index():
    return { "message": "python-wsgi-function-samples-bottle" }

@route('/hello/<name>')
def index(name):
    return { "message": f"Hello {name}, from python-wsgi-function-samples-bottle." }
Add the following to your BottleTrigger/functions.json
"bindings": [
    {
      ...
      "methods": [
        ...
      ],
      "route": "/{*route}"
    },
    {
      ...
    }
  ]
Add the below to the host.json file:
"extensions": {
    "http": {
        "routePrefix": ""
    }
  },
Run locally
To run this locally, if using Visual Studio Code, use F5 (or Run -> Start Debugging) in the top toolbar. Additionally you can execute func start from the terminal.
You should see the same output as here.
Deploy
Create a Azure Python Function. This example was deployed to a Dedicated Plan (Linux). You can deploy this function following any of the methods described here.
Follow the same steps in the above Flask or Falcon example for deployment.
A full example can be found here.
aSGI frameworks
FastAPI
Create and configure
Like the above examples, create a Azure Python Function with an HTTP Function trigger. Name this function FastApiTrigger.
Create a requirements.txt with the following:
azure-functions
fastapi
nest_asyncio
Add the following to your FastApiTrigger/__init__.py:
import json

import azure.functions as func
import nest_asyncio
from fastapiapp import app

# This is important, or else your application may fail
nest_asyncio.apply()


async def main(req: func.HttpRequest, context: func.Context) -> func.HttpResponse:
    return func.AsgiMiddleware(app).handle(req, context)
NOTE: Take note of the change from
WsgiMiddlewarein earlier examples toAsgiMiddlewarenow.
Create a directory named fastapiapp and a __init__.py file within it. fastapiapp/__init__.py should contain the following:
import fastapi

app = fastapi.FastAPI()

@app.get("/")
async def index():
  return { "message": "python-wsgi-function-samples-fastapi" }

@app.get("/hello/{name}")
async def get_name(name: str):
  return { "message": f"Hello {name}, from python-wsgi-function-samples-fastapi" }
Add the following to your FastApiTrigger/functions.json
"bindings": [
    {
      ...
      "methods": [
        ...
      ],
      "route": "/{*route}"
    },
    {
      ...
    }
  ]
Add the below to the host.json file:
"extensions": {
    "http": {
        "routePrefix": ""
    }
  },
Run locally
To run this locally, if using Visual Studio Code, use F5 (or Run -> Start Debugging) in the top toolbar. Additionally you can execute func start from the terminal.
You should see the same output as here.
Deploy
Create a Azure Python Function. This example was deployed to a Dedicated Plan (Linux). You can deploy this function following any of the methods described here.
Follow the same steps in the above Flask, Bottle or Falcon example for deployment.
A full example can be found here.
Asynchronous behavior
Compared to the wSGI examples, the aSGI examples use nest_asyncio and nest_asyncio.apply().
If attempted to run an aSGI application without this, you may encounter the following:
Exception: RuntimeError: Cannot run the event loop while another loop is running
This helps nests the event loop the application is trying to run in. More on this module can be found here.


