Troubleshooting No space left on device
App Service on Linux uses two different types of storage:
-
File system storage: This is the file system storage that is included in the App Service Plan quota, it is a persistent storage for your Linux Web apps, Web app for Containers or Linux functions apps under
/home.For Windows it is rooted in
%HOME%directory.Storage will vary depending on the ASP selected and between Linux and Windows.
-
Host disk space or Temporary space: It is an assigned disk space for storing container images managed by the platform and custom containers deployed. This is a different storage from the File system storage and it is limited in size.
If you are experiencing any of the following errors when doing deployments or starting up your container (Web App for Containers, Function Custom Container):
/appsvctmp: no space left on device: unknown"OSError: [Errno 28] No space left on device
That means that the temporary host disk space is full. All the space used by a container to write files in addition to the read-only image layers, it is called the writable layer, if your application is designed to create logs or any files in the same container disk or you are deploying multiple custom containers with different base images and layers, then this can potentially fill the temporary disk space affecting the current container and any container hosted in the same App Service Plan.
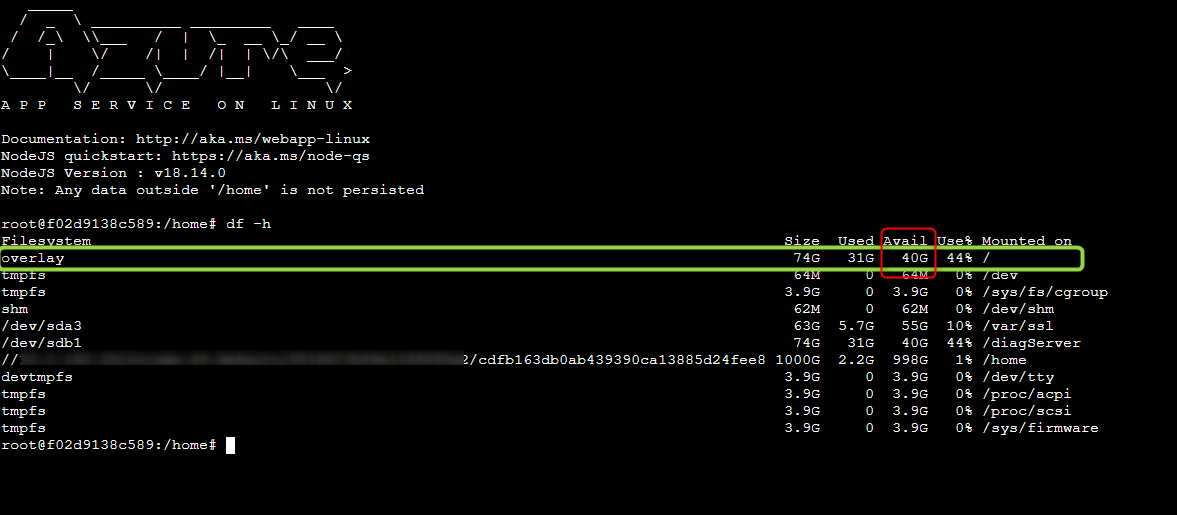
- You can SSH into the web app and run
df -hto check the Available space under/ -
The home storage will be mounted under
/home
Current temporary size available for Linux SKUs can varies depending in every blessed images updates.
Mitigations
- If your application is a small SKU, a quick mitigation will be to scale up to medium or large SKU (App Service Plan) to clean the space.
- Splitting the App Service Plan
- Avoid writing outside of
/homeor custom Mounted storage. - Reducing image size if a smaller base image can be used
- Leverage multi-stage builds
Best Practices
-
Use multi-stage builds - Whenever is possible use multi-stage and targets to match the right environment. Avoid having one big build stage when attempting to clean up sensitive data from it or dangling dependencies. Instead, use multi-stage Docker image builds and separate concerns between the build flow and the creation of a production base image. e.g.
# Stage 1 FROM node:14.17.5-slim AS builder WORKDIR /app COPY package*.json ./ RUN npm install COPY . /app RUN npm run build --prod # Stage 2 FROM nginx:1.21.1-alpine WORKDIR /usr/share/nginx/html RUN rm -rf ./* COPY --from=builder /app/dist/frontend-fruits . # Containers run nginx with global directives and daemon off ENTRYPOINT ["nginx", "-g", "daemon off;"] - Use Home storage or BYOS (Own storage) - If your application is writing files to disk, you can redirect those files to /home or any path mapping using custom storage. For custom containers you need to enable the home storage with this appsetting
WEBSITES_ENABLE_APP_SERVICE_STORAGE=trueor centralize the logs in a database or use any telemetry tool as Application insights. - Use .dockerignore - To ensure that any local artifacts aren’t copied into the container image. It is much cleaner to have small Docker base image without redundant and unnecessary files.
- Use compressed docker base tags - When writing a Docker file, use lighter tags as (“slim” or “alpine” if possible). You can compare the difference size and tools available in every tag for a better selection.


