Deploying JAR based Java applications with CI/CD (Azure DevOps) on App Service Windows
In this blog post we’ll cover some examples of how to deploy jar based applications to Windows App Service using Azure DevOps.
Overview
This section will cover CI/CD deployment for jar-based applications - this is for Blessed Tomcat images, which will act as our Web Container for our jar. With this image, you still have the option to choose your Java major version, as well as Apache Tomcat major and minor version - but the premise is that we’re deploying a jar file into a Tomcat container, which Tomcat itself will run.
Below is a configuration reference from the portal:
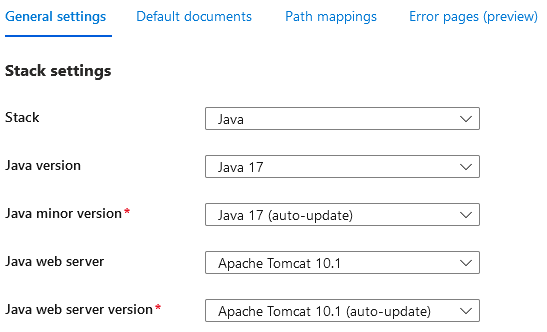
This is not the same as running a Java SE “Blessed” Image which requires this to be an executable jar with an embedded Web Server.
This post will also include deployment differences for Maven and Gradle.
Local Development
Configuring for Maven
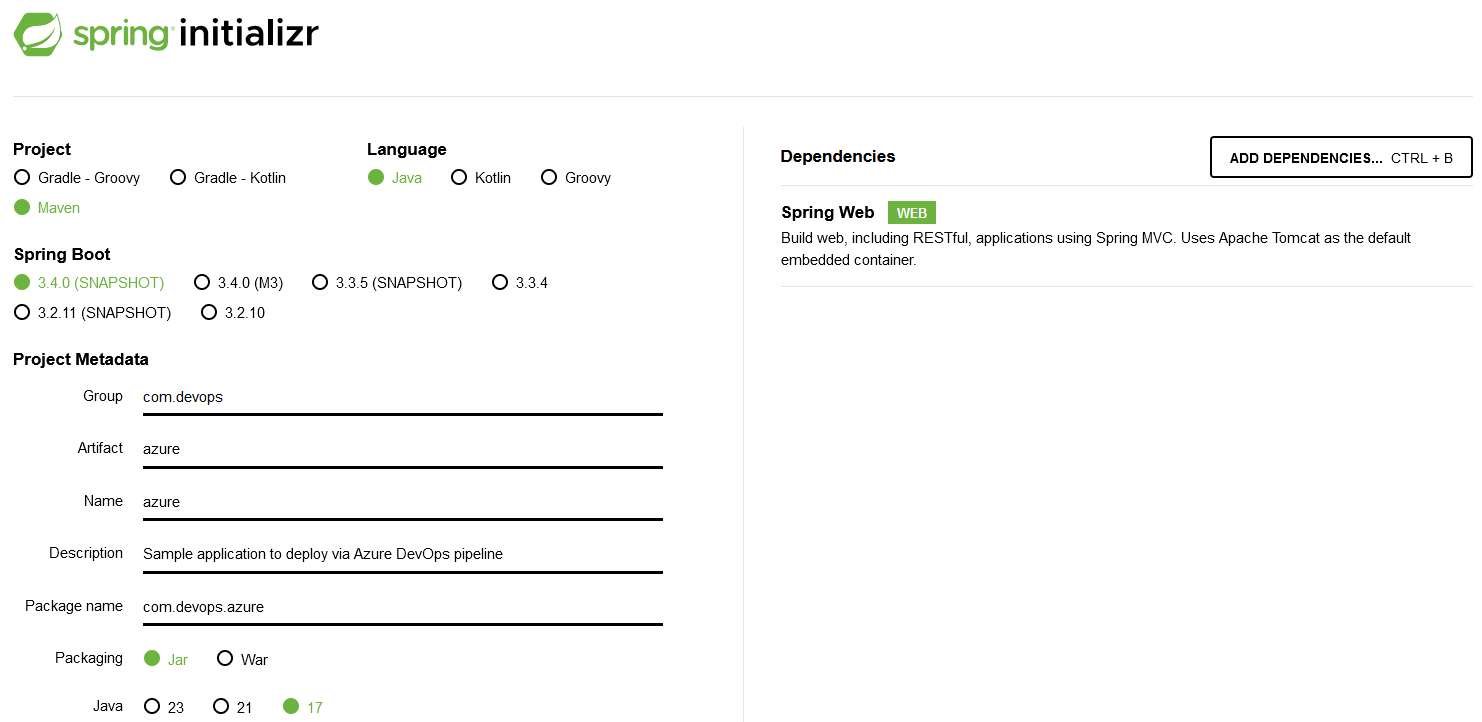
- Go to Spring Initializr and create the application with the following properties:
- Project: Maven
- Language: Java
- Spring Boot: 3.4.0 (SNAPSHOT)
- Project Metadata: Fill this as fits your needs
- Packaging: Jar
- Java: 17
For Dependencies, go to Add Dependencies and choose Spring Web. Click Generate after this, which will download a zip which we’ll extract into a project workspace.
- After downloading the zip, extract it on your local machine and cd into the folder with the source code.
- In a terminal, run either of the following:
- If Maven is on $PATH, run
mvn spring-boot:runrelative to thepom.xml. - If Maven is not on $PATH, run
./mvnw spring-boot:runrelative to thepom.xml
- If Maven is on $PATH, run
NOTE: This assumes you have Java 17 locally. Maven needs to point to a Java 17 installation as well. If you’re unsure to what Maven is using, use
mvn -v.
After running the above command, you should see some output like the below in your terminal:
2024-10-12T21:01:09.725-05:00  INFO 32184 --- [azure] [           main] o.apache.catalina.core.StandardService   : Starting service [Tomcat]
2024-10-12T21:01:09.728-05:00  INFO 32184 --- [azure] [           main] o.apache.catalina.core.StandardEngine    : Starting Servlet engine: [Apache Tomcat/10.1.30]
2024-10-12T21:01:09.814-05:00  INFO 32184 --- [azure] [           main] o.a.c.c.C.[Tomcat].[localhost].[/]       : Initializing Spring embedded WebApplicationContext
2024-10-12T21:01:09.815-05:00  INFO 32184 --- [azure] [           main] w.s.c.ServletWebServerApplicationContext : Root WebApplicationContext: initialization completed in 1263 ms
2024-10-12T21:01:10.166-05:00  INFO 32184 --- [azure] [           main] o.s.b.w.embedded.tomcat.TomcatWebServer  : Tomcat started on port 8080 (http) with context path '/'
2024-10-12T21:01:10.176-05:00  INFO 32184 --- [azure] [           main] com.devops.azure.AzureApplication        : Started AzureApplication in 2.367 seconds (process running for 2.876)
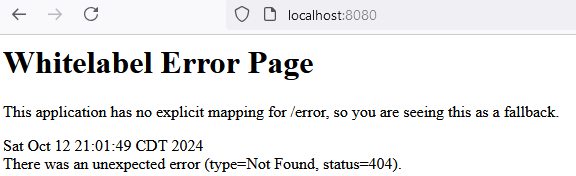
- Browsing to localhost:8080 should show a Whitelabel Error Page, which is expected, since we have no Controllers serving our root path.
- Let’s add a Controller and model to show at the REST URL when hitting /greeting. Under your project src, relative to your entrypoint
.javafile, create a controller and a model. Let’s name is GreetingController.java and Greeting.java. The project structure should look like this:
| - src
|   | - main
|       | - java
|           | - com
|               | - devops
|                   | - azure
|                       | GreetingController.java
|                       | Greeting.java
- Add the following code to GreetingController.java
package com.devops.azure;

import java.util.concurrent.atomic.AtomicLong;

import org.springframework.web.bind.annotation.GetMapping;
import org.springframework.web.bind.annotation.RequestParam;
import org.springframework.web.bind.annotation.RestController;

@RestController
public class GreetingController {

	private static final String template = "Hello, %s!";
	private final AtomicLong counter = new AtomicLong();

	@GetMapping("/greeting")
	public Greeting greeting(@RequestParam(value = "name", defaultValue = "World") String name) {
		return new Greeting(counter.incrementAndGet(), String.format(template, name));
	}
}
- Add the following code to Greeting.java
package com.devops.azure;

public record Greeting(long id, String content) { }
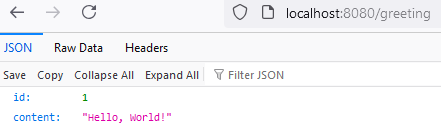
- Restart the application. Refresh the browser, we should now see the below output at /greeting:
- Push this code to a repository of your choosing to use later on for the DevOps section.
Configuring for Gradle
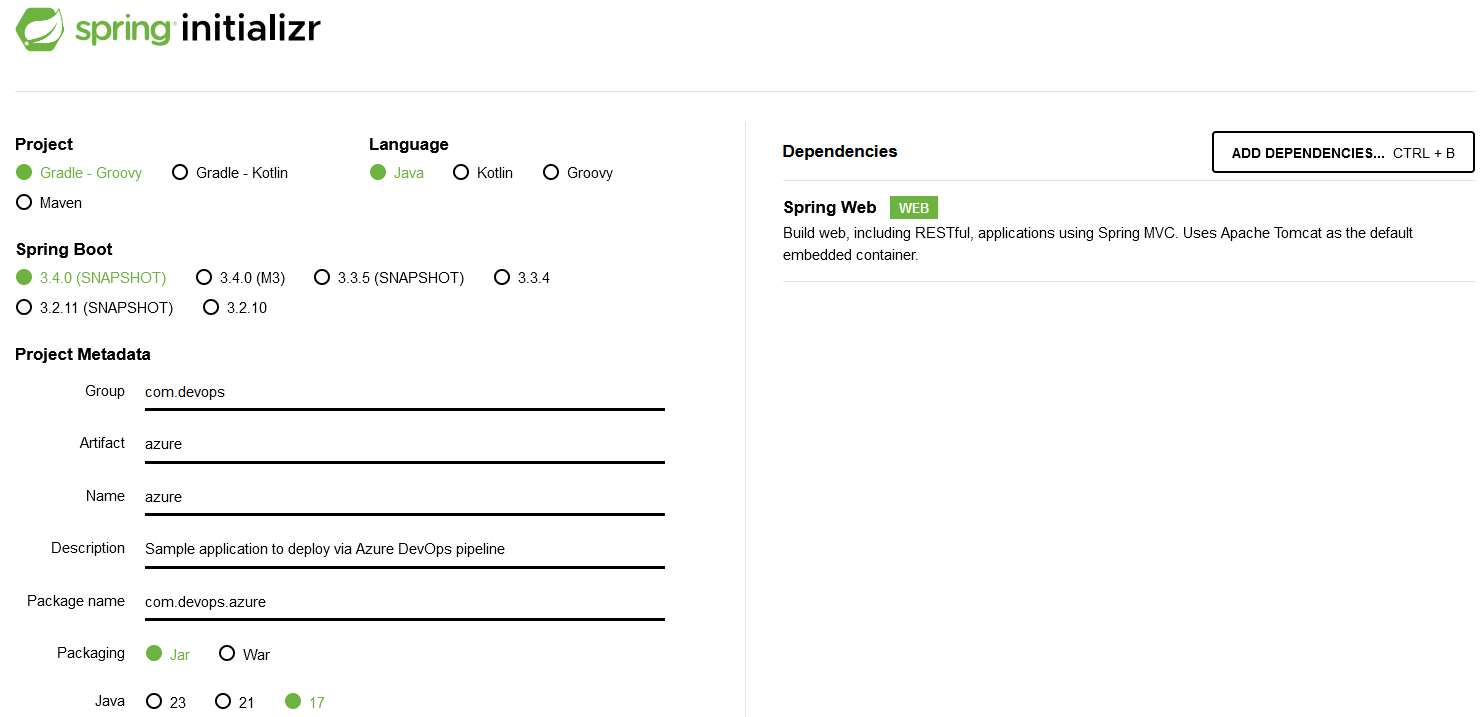
- Go to Spring Initializr and create the application with the following properties:
- Project: Gradle - Groovy / Gradle - Kotlin (I selected Gradle - Groovy)
- Language: Java
- Spring Boot: 3.4.0 (SNAPSHOT)
- Project Metadata: Fill this as fits your needs
- Packaging: Jar
- Java: 17
For Dependencies, go to Add Dependencies and choose Spring Web. Click Generate after this, which will download a zip which we’ll extract into a project workspace.
- After downloading the zip, extract it on your local machine and cd into the folder with the source code.
- In a terminal, run ./gradlew bootRun to start the Spring Boot application. You should see the same output above as discussed in th Maven section.
DevOps
Prerequisites:
- If not done so already, create an Azure DevOps Organization.
- Next, create a Azure DevOps Project to host our pipeline after this.
Creating the pipeline:
In your Azure DevOps project go to:
- Create azure-pipleines.yml
- Pipelines -> Pipelines -> New Pipeline -> Azure DevOps
- Select the repository that is hosting the code
- Select the classification (Production / Non-production) -> assign a service -> Configure Pipeline
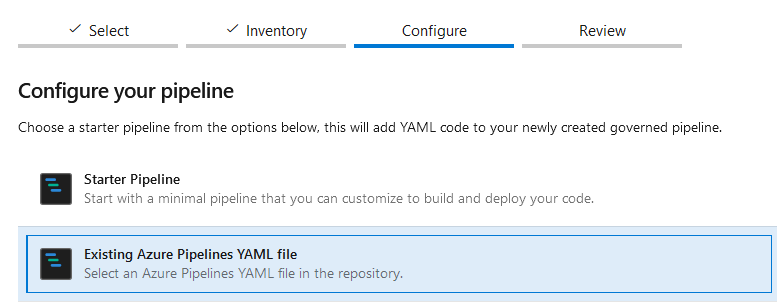
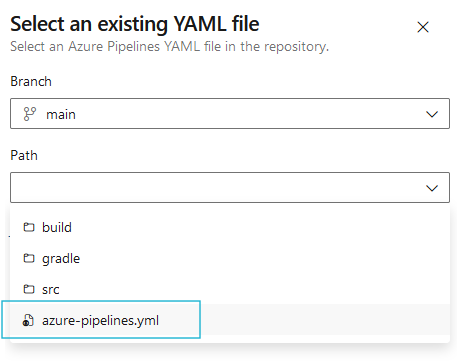
- Select the Existing Azure Pipelines YAML file and browse azure-pipelines.yml (use the templates provided in the following Maven / Gradle sections) from your project:
Maven
Below is the .yaml with the recommended changes. Replace $(JAR_NAME) with the name of your jar file.
# Maven package Java project Web App to Windows on Azure
# Build your Java project and deploy it to Azure as a Windows web app
# Add steps that analyze code, save build artifacts, deploy, and more:
# https://docs.microsoft.com/azure/devops/pipelines/languages/java

trigger:
- main

variables:

  # Azure Resource Manager connection created during pipeline creation
  azureSubscription: 'sc deploy to app service'

  # Web app name
  webAppName: 'myapp'

  # Environment name
  environmentName: 'myapp'

  # Agent VM image name
  vmImageName: 'ubuntu-latest'

stages:
- stage: Build
  displayName: Build stage
  jobs:
  - job: MavenPackageAndPublishArtifacts
    displayName: Maven Package and Publish Artifacts
    pool:
      vmImage: $(vmImageName)

    steps:
    - task: Maven@3
      displayName: 'Maven Package'
      inputs:
        mavenPomFile: 'pom.xml'
        jdkVersionOption: 1.17

    - task: CopyFiles@2
      displayName: 'Copy Files to artifact staging directory'
      inputs:
        SourceFolder: '$(System.DefaultWorkingDirectory)'
        # NOTE: You can use glob patterns to specify a jar, without having to explicitly name one
        # eg. like:
        # Contents: '**/target/*.jar'
        # Assuming that only one (1) jar exists or the glob pattern is specific to avoid passing multiple jars to the next stage
        # Which may fail
        Contents: '**/target/$(YOUR_JAR).jar'
        TargetFolder: $(Build.ArtifactStagingDirectory)

    - upload: $(Build.ArtifactStagingDirectory)
      artifact: drop

- stage: Deploy
  displayName: Deploy stage
  dependsOn: Build
  condition: succeeded()
  jobs:
  - deployment: DeployWebApp
    displayName: Deploy Windows Web App
    environment: $(environmentName)
    pool:
      vmImage: $(vmImageName)
    strategy:
      runOnce:
        deploy:
          steps:
          - task: AzureWebApp@1
            displayName: 'Azure Web App Deploy: myapp'
            inputs:
              azureSubscription: $(azureSubscription)
              appType: webApp
              appName: $(webAppName)
              package: '$(Pipeline.Workspace)/drop/**/target/*.?(war|jar)'
Note Make sure to Authorize the pipeline for deployment. Click into the pipeline to view and permit this. This should be a one time operation.
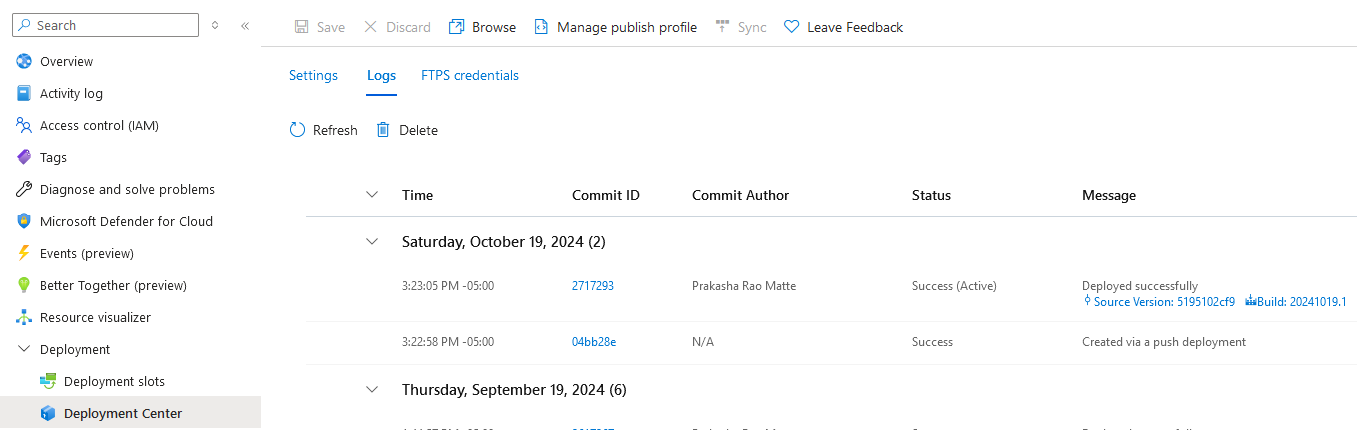
Once the build was succesful from Azure DevOps pipeline, you could validate the deployment at the following two places from App Service.
- Go to portal.azure.com -> App Service -> Deployment Center
- Go to portal.azure.com -> App Service -> Advanced Tools -> Debug Console -> CMD
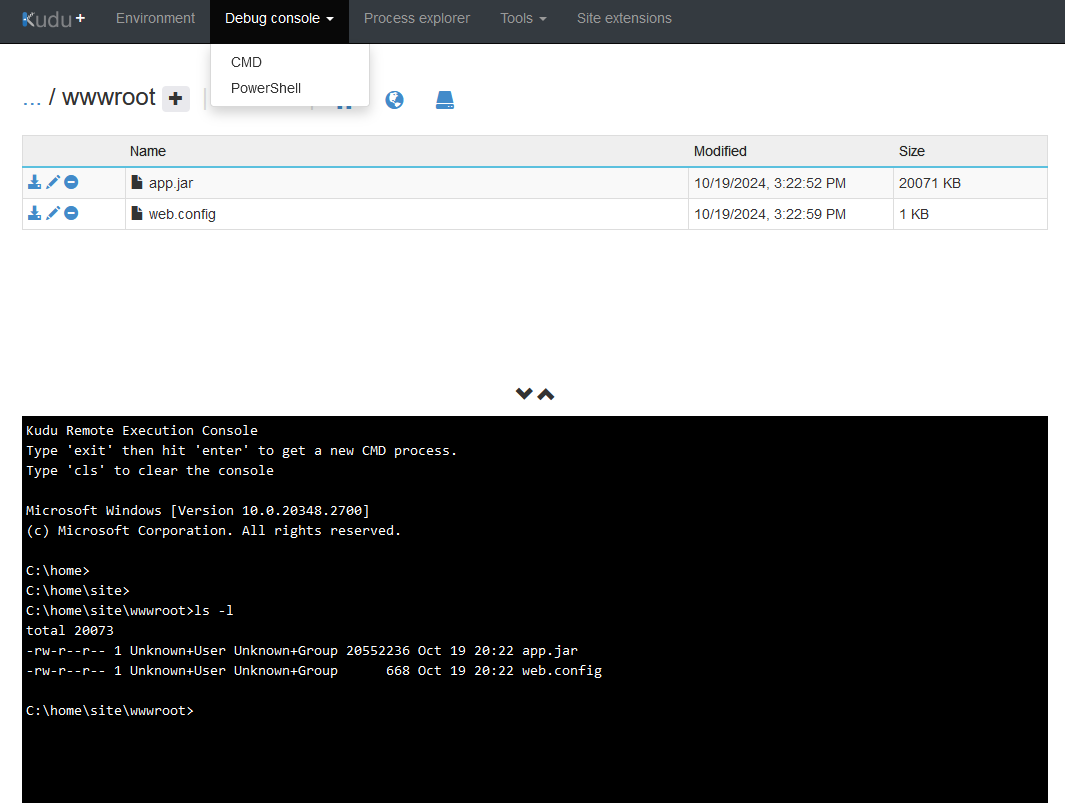
- At this point after deployment, we should be able to browse our application on Azure.

You can view the Maven task documentation for further configuration here.
Troubleshooting
Mismatch of web.config and jar file in /home/site/wwwroot in concurrent deployments.
Eg: When you deploy the code from Azure DevOps and CLI / Eclipse simultaneously
- Add YOUR_JAR with value ‘app’ in the pipeline -> variables section.
- Add <finalName>app</finalName> in the pom.xml -> build tag
<build>
	<plugins>
		<plugin>
			<groupId>org.springframework.boot</groupId>
			<artifactId>spring-boot-maven-plugin</artifactId>
		</plugin>
	</plugins>
	<finalName>app</finalName>
</build>
Note If you don’t follow this approach, the Azure DevOps considers a different jar file name (same as your local machine) and whereas the CLI commands creates the jar as app.jar, hence it will conflict with the web.config configuration, hence your app in Azure won’t run as expected.
Gradle
Below is the .yaml with the recommended changes. Replace $(JAR_NAME) with the name of your jar file.
# Maven package Java project Web App to Linux on Azure
# Build your Java project and deploy it to Azure as a Linux web app
# Add steps that analyze code, save build artifacts, deploy, and more:
# https://docs.microsoft.com/azure/devops/pipelines/languages/java

trigger:
- main

variables:

  # Azure Resource Manager connection created during pipeline creation
  azureSubscription: 'sc deploy to app service'

  # Web app name
  webAppName: 'myapp'

  # Environment name
  environmentName: 'myapp'

  # Agent VM image name
  vmImageName: 'ubuntu-latest'

stages:
- stage: Build
  displayName: Build stage
  jobs:
  - job: GradlePackageAndPublishArtifacts
    displayName: Gradle Package and Publish Artifacts
    pool:
      vmImage: $(vmImageName)
    steps:

    # We add this to set Java 17 for our pipeline environment
    - task: JavaToolInstaller@0
      inputs:
        versionSpec: '17'
        jdkArchitectureOption: 'x64'
        jdkSourceOption: 'PreInstalled'

    # We add this Gradle task to build with Gradle
    - task: Gradle@3
      inputs:
        gradleWrapperFile: 'gradlew'
        tasks: 'build'
        javaHomeOption: 'JDKVersion'

    # We change this to reflect Gradles build output location for our jars
    # Which is /build/libs/<jar>.jar
    # Replace JAR_NAME with the name of your jar -eg., azure-0.0.1.SNAPSHOT.jar
    # NOTE: You can use glob patterns to specify a jar, without having to explicitly name one, eg. like:
    # Contents: '**/target/*.jar'
    # Assuming that only one (1) jar exists or the glob pattern is specific to avoid passing multiple jars to the next stage - Which may fail
    - task: CopyFiles@2
      displayName: 'Copy Files to artifact staging directory'
      inputs:
        SourceFolder: '$(System.DefaultWorkingDirectory)'
        Contents: '**/build/libs/$(JAR_NAME).jar'
        TargetFolder: $(Build.ArtifactStagingDirectory)

    - upload: $(Build.ArtifactStagingDirectory)
      artifact: drop

- stage: Deploy
  displayName: Deploy stage
  dependsOn: Build
  condition: succeeded()
  jobs:
  - deployment: DeployWindowsWebApp
    displayName: Deploy Windows Web App
    environment: $(environmentName)
    pool:
      vmImage: $(vmImageName)
    strategy:
      runOnce:
        deploy:
          steps:
          - task: AzureWebApp@1
            displayName: 'Azure Web App Deploy: jarnamingerror'
            inputs:
              azureSubscription: $(azureSubscription)
              appType: webApp
              appName: $(webAppName)
              # We can change this to reflect the proper Gradle build output path for our jars
              # Replace JAR_NAME with the name of your jar -eg., azure-0.0.1.SNAPSHOT.jar
              package: '$(Pipeline.Workspace)/drop/**/build/libs/$(JAR_NAME).jar'
Troubleshooting
Mismatch of web.config and jar file in /home/site/wwwroot in concurrent deployments
- Add YOUR_JAR with value ‘app’ in the pipeline -> variables section.
- Add the following section in the build.gradle file in your project
tasks {
    bootJar {
        archiveFileName.set("app.jar")
    }
}


