Setting up a NFS volume with Azure Container Apps
This post will cover how to set up an NFS volume with Azure Container Apps through the Azure Portal
Overview
As of writing this, documentation for mounting volumes with Azure Container Apps is mostly cli-based. This post will cover a basic NFS set up from scratch. Current documentation for NFS volumes and Azure Container Apps can be found at Use storage mounts in Azure Container Apps
Creating resources
Storage
To start, you’ll need a Premium tier Storage Account. An NFS share cannot be created on a Standard one if that’s being used.
-
In the Azure Portal, click on ‘Create a Resource’ and search for Storage Account
- Set the following options on the Storage Account basics
- Subscription: Choose your subscription to create the Storage Account in. Use the same subscription as the Container App Environment
- Resource Group: Choose with Resource Group to create this in
- Storage Account Name: Choose a name for the account
- Region: Choose a region for the account
- Preferred storage type: Set this to Azure Files
- Performance: Set this to Premium
- File share billing and Redundancy: Set this to your preferred options
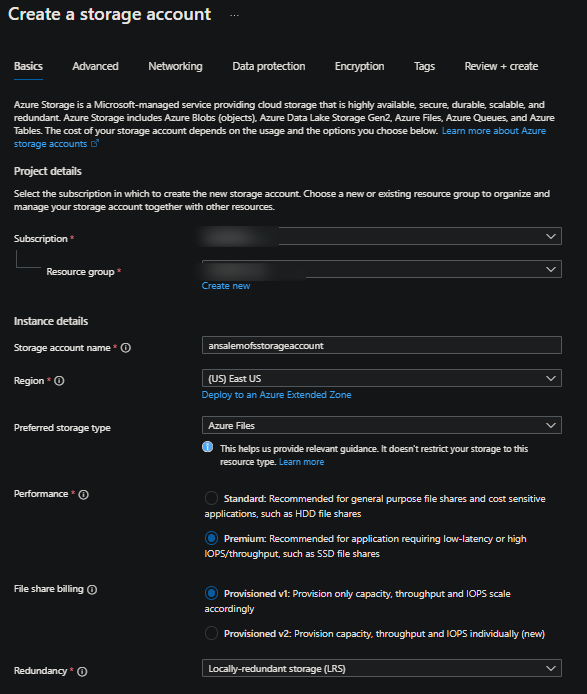
- Select Review and create to create the Storage Account. The rest of the tabs during the creation process can be left the same.
Create the NFS share
- On the Storage Account, go to the Data Storage blade and then select File Shares
- Click on “+ File Share” to create a new share
- In the File Share creation window, set the following:
- Name: Name of your NFS share
- Protocol: NFS
- Root Squash: Keep this defaulted to No Root Squash
- The rest of the options under Provisioned storage and Performance can be left alone unless desired to be changed.
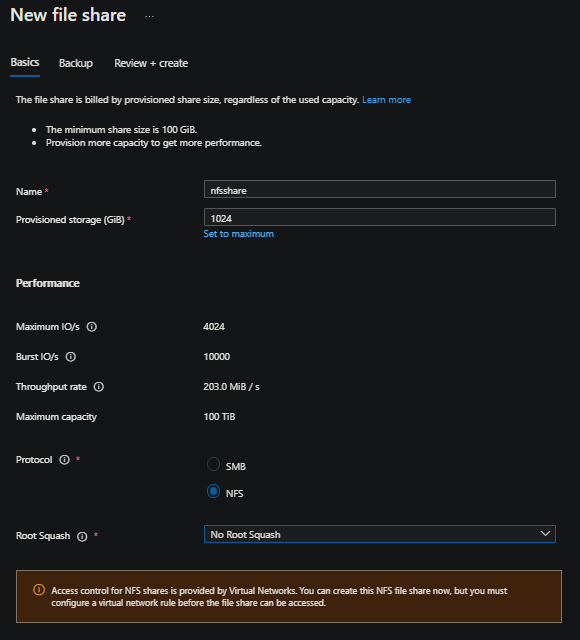
- Click Review + create to create the share.
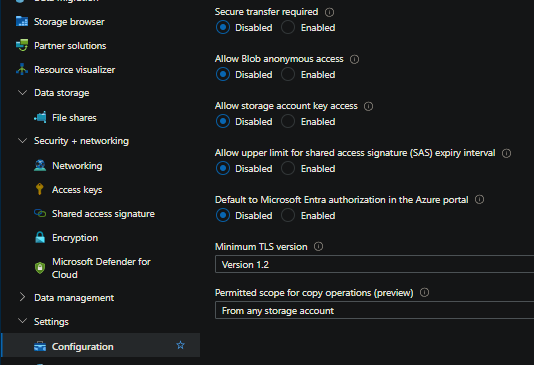
Remove “Secure Transfer Required”
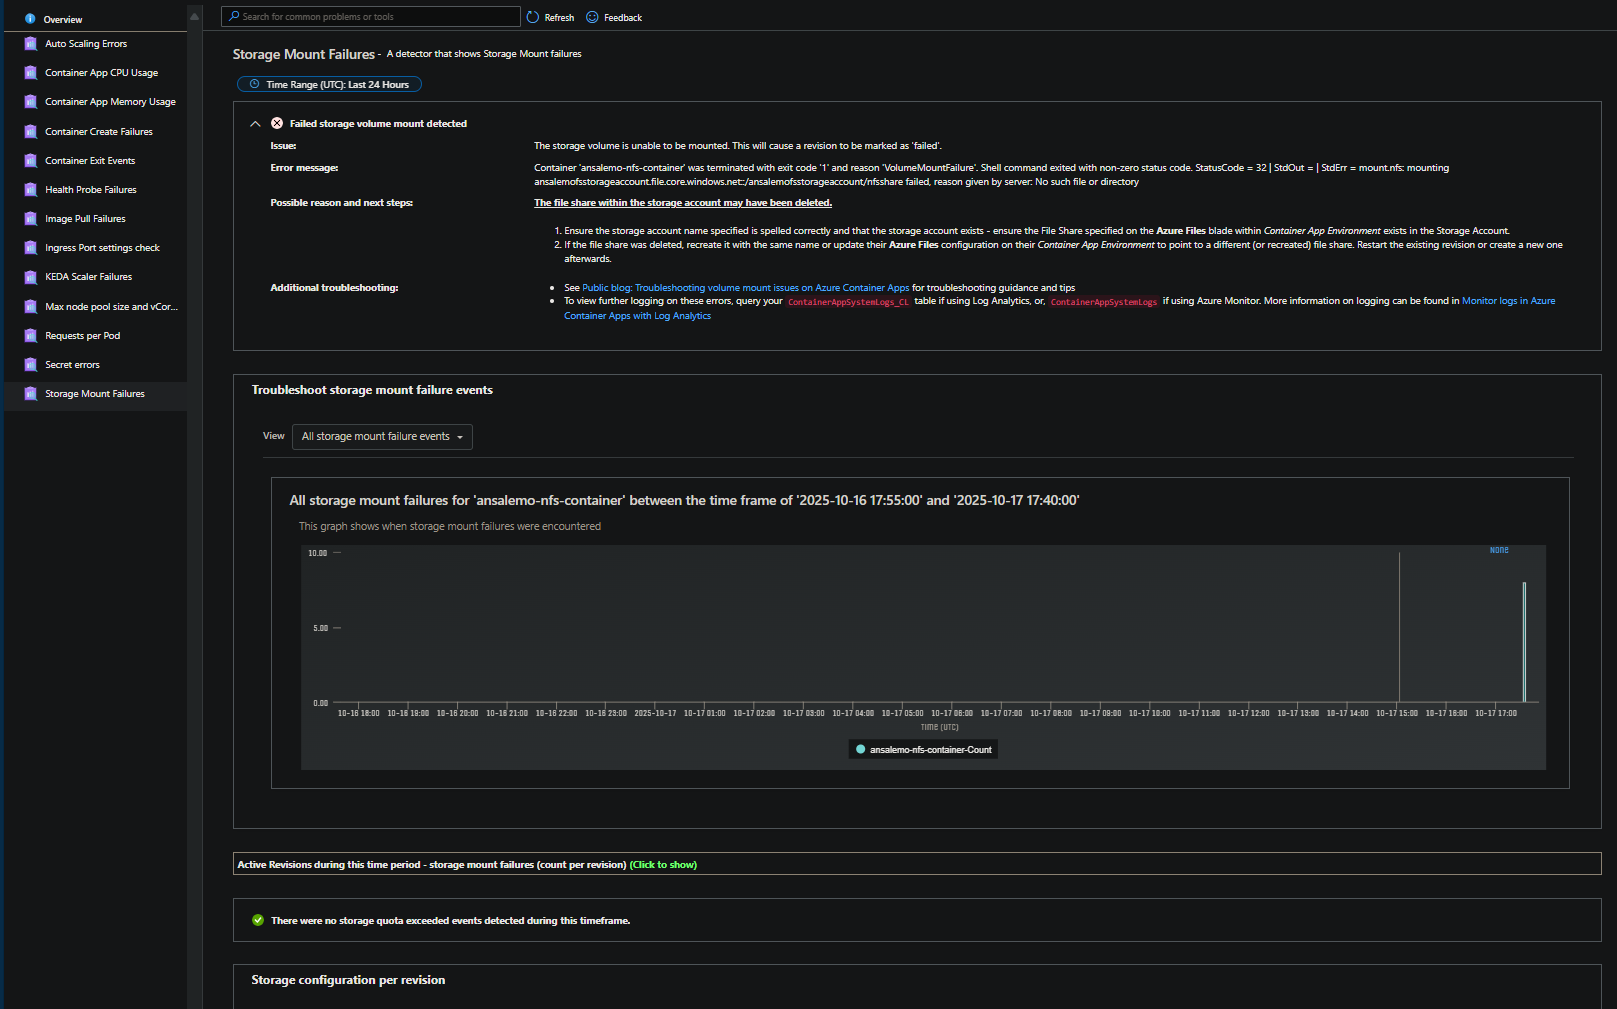
On the Storage Accountt, go to Settings > Configuration and disable Secure transfer required. If this is not done, you’ll see a volume mount failure later on with a message of mount.nfs: access denied by server while mounting in Container App system logs
Container App Environment
At this point, if creating the Storage Account first, you’ll see the message about any access to the NFS share is through a Virtual Network. For the Storage Account, VNET integration can be done later on after the fact, post-creation.
With a Container App Environment, the Virtual Network needs to be specified at creation time. You cannot enable a VNET post-creation - so if you’re following along and your environment does not have a VNET, you’ll need to create a net-new one.
Create a Container App Environment and Container App (with a VNET)
-
In the Azure Portal, click on ‘Create a Resource’ and search for Container App
- On the Basics blade:
- Subscription: Choose a subscription that the Storage Account from earlier exists i n
- Resource group: Choose a Resource Group
- Container app name: Choose a name for your Container App
- For Optimize for Azure Functions, leave this as-is (unless you’re deploying an Azure Function)
- Deployment Source: Container image (unless you’re deploying from source - eg. source-to-cloud)
- Container Apps environment:
- Region: Select a region for the envinronment
- Container apps environment: Click on “Create new environment”
- Environment name: Give a name for the environment
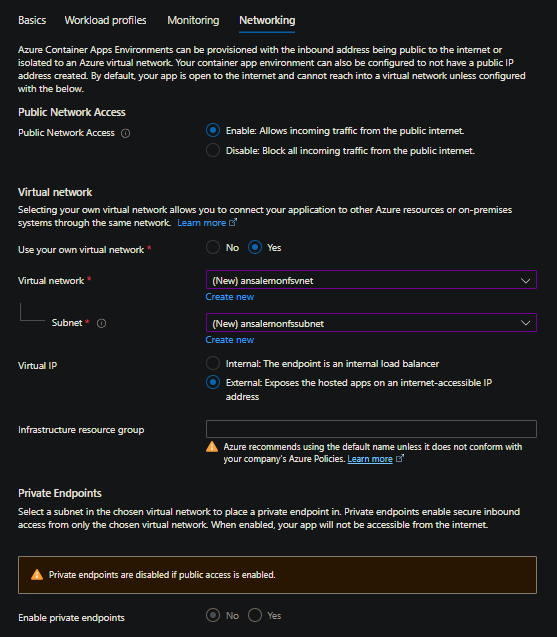
- Networking blade: In the networking blade, select Use your own virtual network as “Yes” under the Virtual network section
- Select Create new if you do not already have an existing VNET and an empty subnet
- Leave Virtual IP as external (for the sake of this blog post)
- Leave Infrastructure resource group empty so it takes the default name
-
All the other blades for Workload profiles and Monitoring can be left-as unless you want to enable Workload Profiles or change your logging destination during the creation process
- Then, select Create
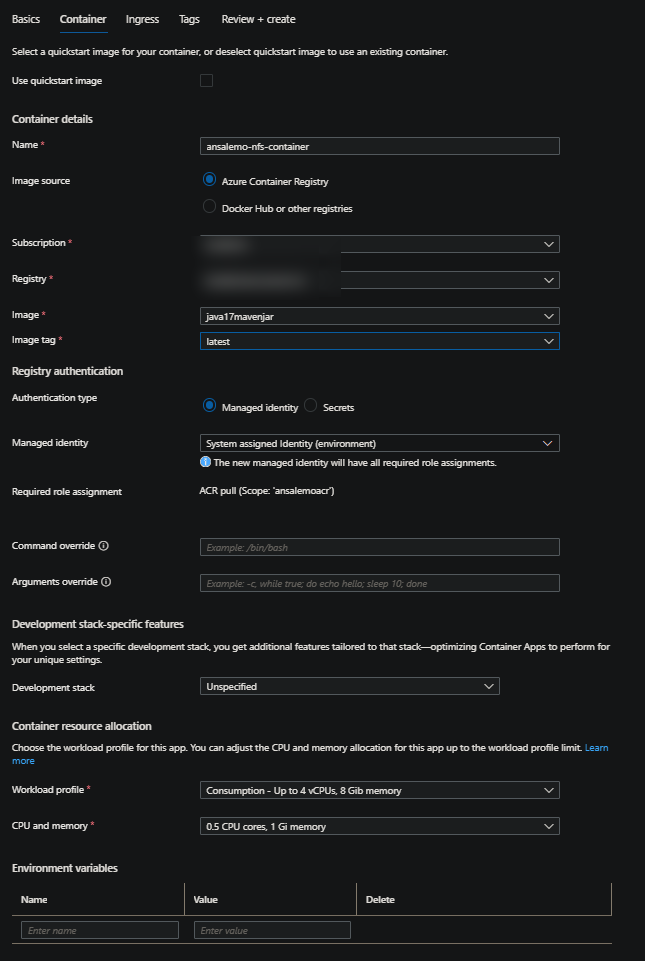
- On the Container blade
- You can either use the quickstart image, by checking the Use quickstart image image checkbox
- Or, bring your own image - NOTE: Failures can happen post-creation, which, at this point would have nothing to do with the storage volume. Always review error logs - follow (Applications (and revisions) stuck in activating state on Azure Container Apps)[https://azureossd.github.io/2025/05/05/Applications-(and-revisions)-stuck-in-activating-state-on-Azure-Container-Apps/index.html] for common reasons why revisions may end up in a degraded or failed state.
- Ingress blade
- If using your own container, and if this application expects external traffic, ensure the Target port matches the application listening port
- Click Review and create to create the environment with the selected VNET, as well as the Container App.
(Option 1) Service Endpoint - Allow the Storage Account access from the ACA VNET
Since the VNET is now created - go back to your Storage Account from earlier.
-
Go to the File Share. Under Overview will show the following:
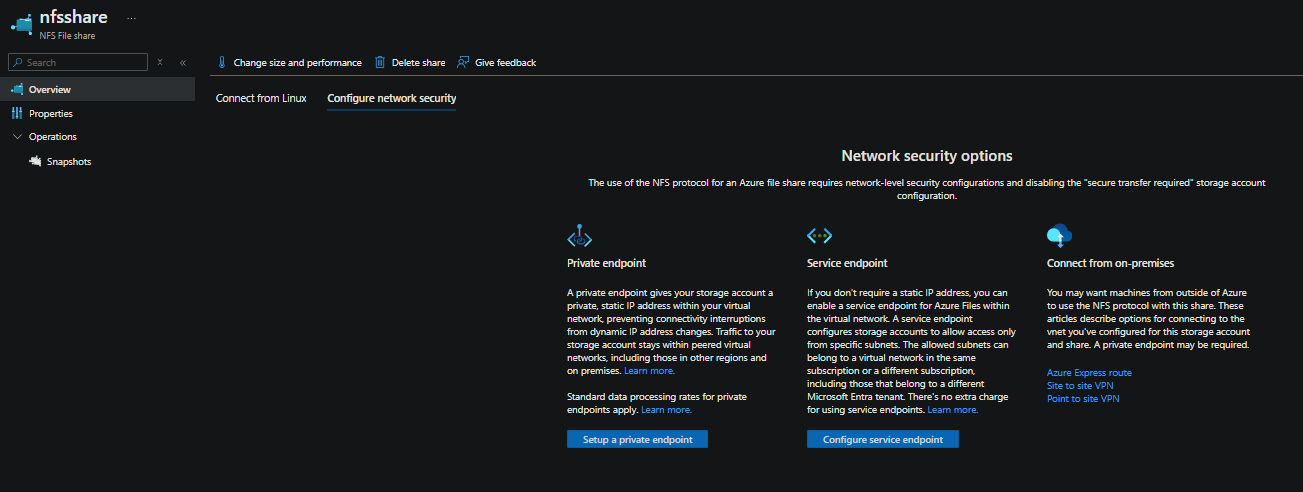
- For ease of setup in terms of this blog post, select Service Endpoint
- Use the following options:
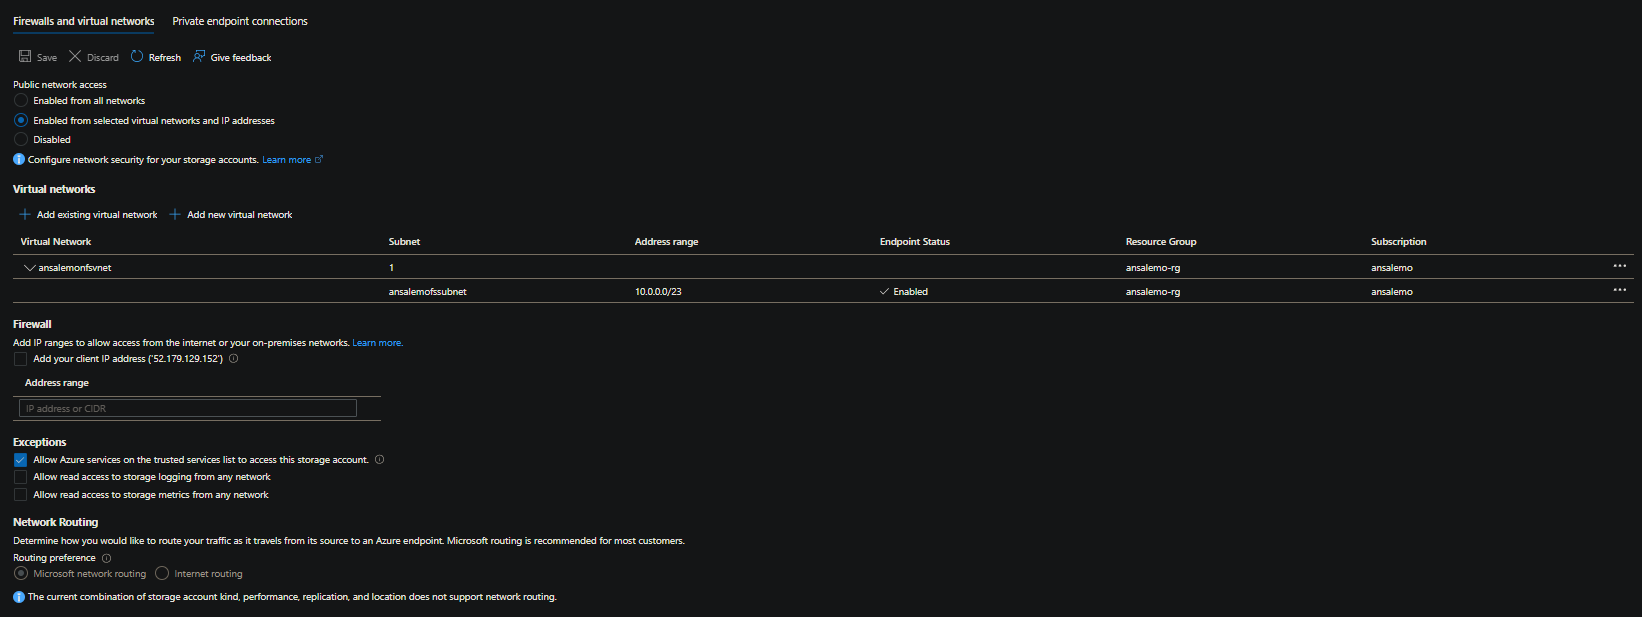
- Public network access: Enabled from selected virtual networks and IP addresses
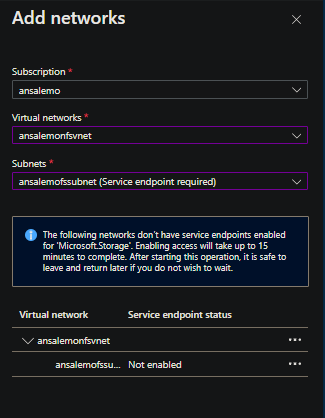
- Virtual networks: Select Add existing virtual network and then select the VNET and subnet from earlier. This will prompt to enable a Service Endpoint, which you want to do. Select Enable
- After this process completes while in the same blade, click Add
- Then, click Save
-
At this point, Endpoint Status should be Enabled and we can now move on to adding the storage resource and volume on the environment and application
(Option 2) Private Endpoint - Allow the Storage Account access from the ACA VNET
Another option is using a Private Endpoint. You’ll need an empty subnet (different than the one given to the Container App Environment) to proceed. You can create an empty subnet in your Virtual Network with the defaults provided and then move back to the below blade on the Storage Account - or - just follow Create a private endpoint for Azure Files
-
Go to the File Share. Under Overview will show the following:
- Select Private Endpoint. This will take you through the creation blade for a Private Endpoint. Follow the step form to create this:
- Basics:
- Subscription: Create this in the same subscription as the Container App Environment and Storage account
- Resource Group: Choose a resouce group
- Name: Give the Private Endpoint a name
- Network Interface Name: This will defaul to
[name]-nic, leave this as the default
- Subscription: Create this in the same subscription as the Container App Environment and Storage account
- Resource: Leave the defaults
- Virtual Network:
- Virtual Network: Select the VNET from earlier
- Subnet: Select the empty subnet created (mentioned above)
- Leave the rest of the defaults for all following tabs
- Click through and then click Create
- Basics:
- After Private Endpoint creation, you should see Private link resource set to your Storage Account. If you
nslookupyour file share FQDN, you should see this now also has the private link alias associated with it:
$ nslookup myfsstorageaccount.file.core.windows.net
Server:  some.thing.com
Address:  xxx.xx.xx.xx

Non-authoritative answer:
Name:    file.xxxxxxxxxx.store.core.windows.net
Address:  xx.xx.xxx.x
Aliases:  myfsstorageaccount.file.core.windows.net
          myfsstorageaccount.privatelink.file.core.windows.net
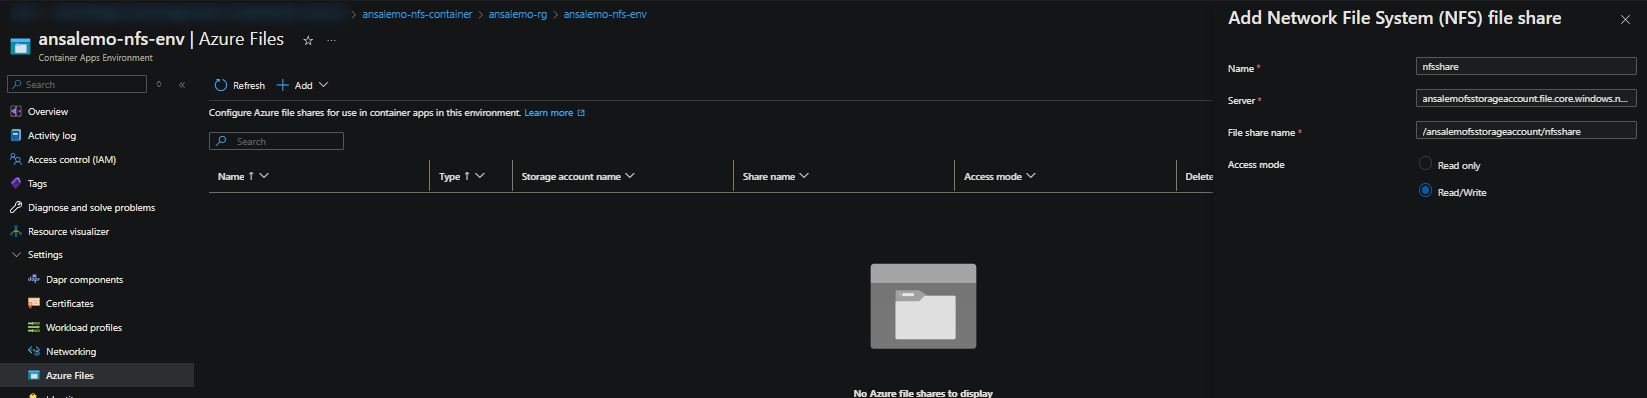
Create a Storage Resource on the environment
NOTE: Irregardless if you used a Service Endpoint or Private Endpoint, the normal FQDN for the file share (eg. somefileshare.file.core.windows.net will be used below - don’t use the Private Link alias if a Private Endpoint was used)
- Go back to the Container App Environment and select Azure Files under Settings
- Select Add and then Network File System (NFS)
- In the pop-out blade, set the following:
- Name: Set a name for the resource
- Server: Set this to
yourstorageaccount.file.core.windows.net - File share name: Set this to
/yourstorageaccount/yournfssharename - Access Mode: Set your access mode to read/write or read-only
IMPORTANT: Make sure to include the forward slashes, this syntax is expected.
NOTE: If you go back to your NFS file share, you’ll see this info in which you can pull from
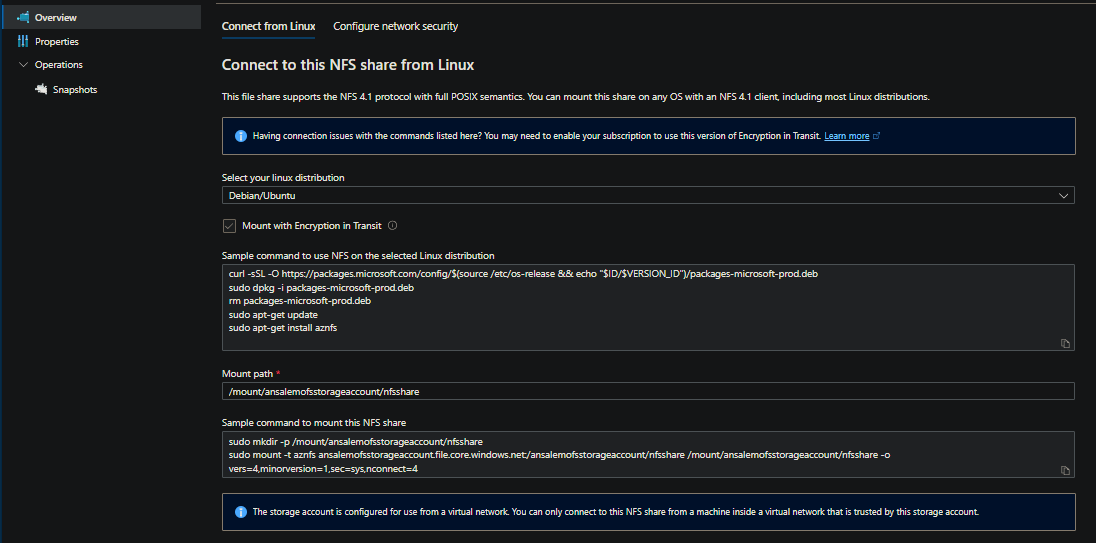
- Select Add and then Save
Add a volume to the Container App
- Go to your Azure Container App that you created and go to Application > Volumes
- Select Add to add a volume
- Volume type: Azure file volume
- Name: Choose a name for the volume
- File share name: Choose the name of the storage resource created earlier above on the Container App Environment
- Mount options: Omit this unless you know which options to pass in. Allowed mount options are also the ones listed on the NFS “man page” - nfs(5) - Linux man page
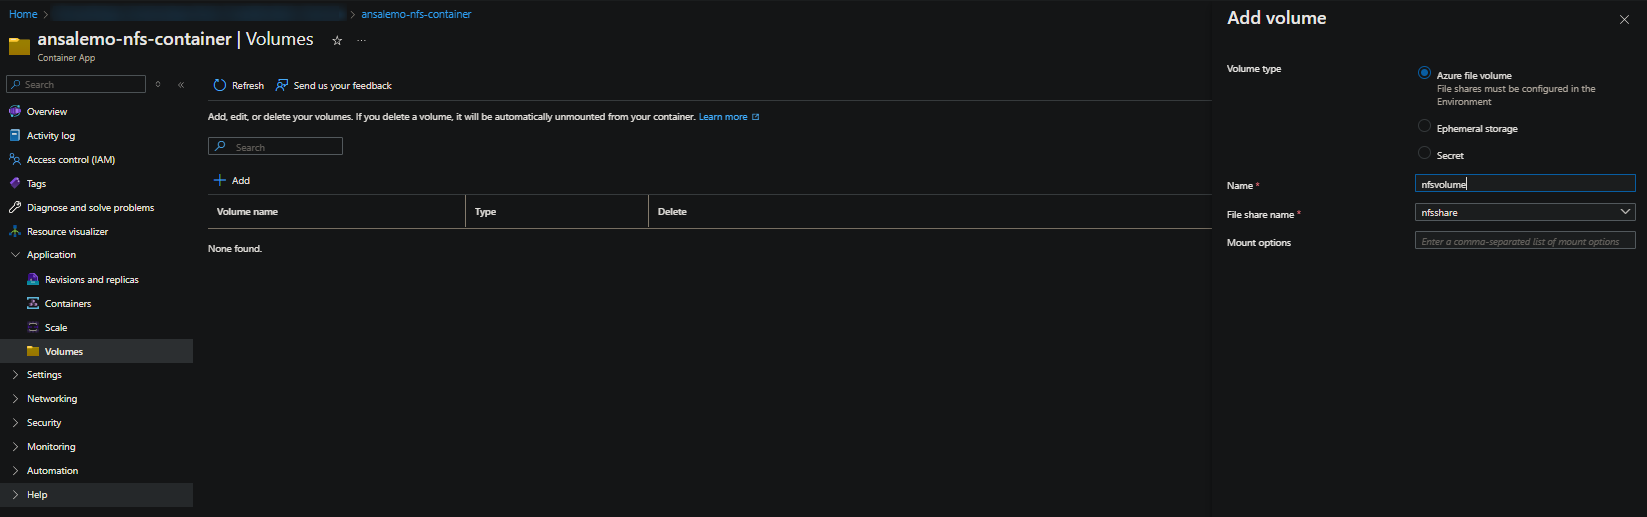
- Lastly, click Add. Then click Save as new revision
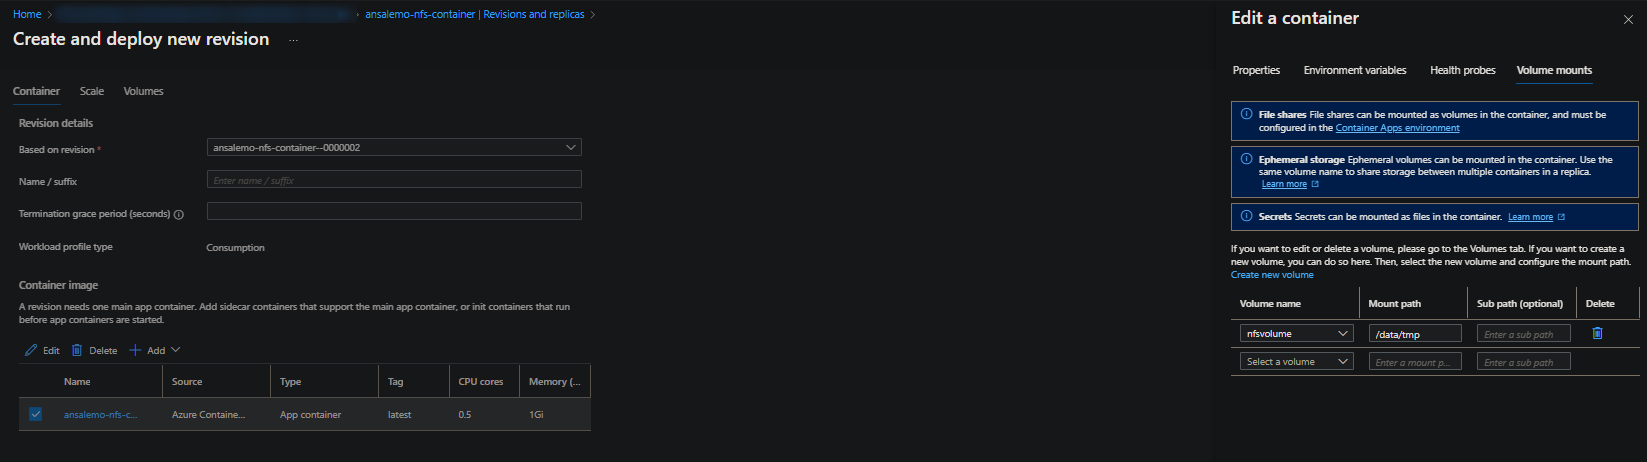
Mount the volume to the Container App
NOTE: You can either explicitly create a new revision through the Revisions and replicas or do this through the Containers blade
- Go to your Azure Container App that you created and go to Application > Revisions and replicas
- Click Create new revision
- Select the container to mount a volume to, then click Edit
- On the popout window, go to the Volume mounts tab
- Volume name: Select the Volume created just before on the Container App
- Mount path: Specify a directory to mount this volume to
-
Click Save, then click Create
Confirm the volume is mounted
If the Revision is not in a degraded or failed state after enabling the volume mount, this already would imply this is successful.
This is is now Failed or Degraded, ensure your Logs destination is set to either Log Analytics or Azure Monitor and query the system logs table for ContainerAppSystemLogs (Azure Monitor) or ContainerAppSystemLogs_CL (Log Analytics) and review the errors seen there.
Otherwise, go to the Console blade, and run df -a or df -h. You can also use the mount command, assuming it’s installed in your container image and available in the running container, to use the command mount | grep "nfs" to see additional arguments and version information
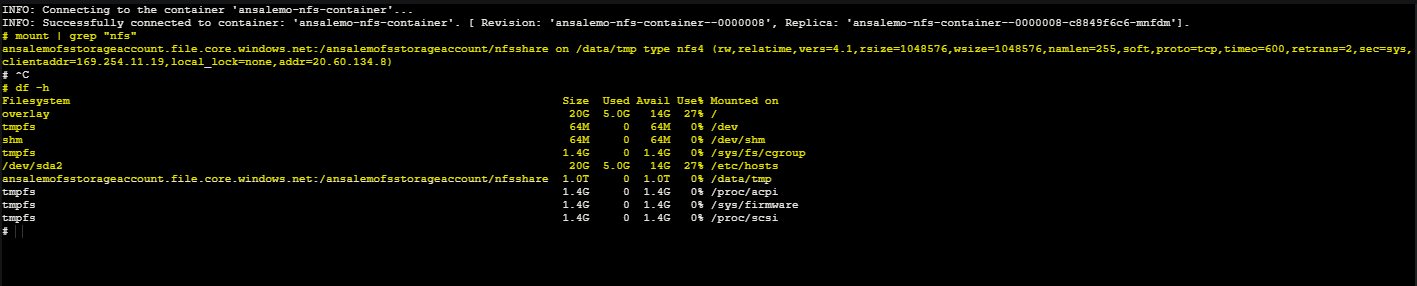
If using a Private Endpoint, you’ll still see the normal FQDN for the file share in the above output. But if you nslookup this from within the container, you should see this resolves to the IP of the NIC for the Private Endpoint

We know this works because if this was failing, console access would be unavailable due to the fact the volume monut happens early on in the container lifecycle (within a pod) - a container is not yet created and running by that point in time.
FAQs and other information
FAQs
- You cannot pass mount options like
-t,--typesthrough the “mount options” field.-tis only set when you either choose SMB (mount.cifs) or NFS (mount.nfs). Using the above Console method, you can see that the NFS version used isnsf4. This cannot be changed (eg. toaznfs) - SMB and NFS have different methods of setting file/directory permissions which can be seen here: Container Apps - Setting storage directory permissions
- SMB requires Access Keys to set up a storage resource and mount a volume, NFS does not
- NFS requires a VNET on the Container App Environment and integrated with the Storage Account to make all of this possible
- This blog post only covered a “typical” Private Endpoint set up - if your VNET has custom DNS, ensure the file share FQDN can be resolved against your DNS servers. You may need to add Azure DNS (168.63.129.16) to “resolve unresolved queries” on your DNS servers
- If a volume mount is failing, no “application” / “console” logs will be available, only system logs. This is because a volume mount happens very early on in a pod lifecycle, prior to a running container. A container never gets to the point of being successfully created and running, which means no application process ever starts (and thus, no application logs)
Troubleshooting
- For general storage mount troubleshooting, review Troubleshooting volume mount issues on Azure Container Apps
- You also should review Azure Files security compatability on Container Apps. This by default is set to “maximum capability” on the file share - if this is changed to options other than this, you risk having the mount fail with
permission denied (13) - Forgetting to disable “Secure Transfer Required” on the Storage Account will also cause
permission denied
Aside from system logs, going to Diagnose and Solve Problems > Storage Mount Failures will also display storage troubleshooting information for mount failure on the Container App