Hosting a Nexus3 repository on an Azure Linux VM
In this post we’ll be setting up a Nexus3 repository on an Azure Linux Virtual Machine(Ubuntu 20.04). After setting this up, we’ll create a Linux Web App for Containers and pull the Image we’re hosting to this application.
Important points:
- This post will set up a basic Virtual Machine with NGINX
- It will be secured with LetsEncrpt and Certbot. No custom domain will be used here but rather the default .cloudapp.azure.com domain for the Virtual Machine for ease-of-use.
- This can be used as a starting point for further development with different certificates or configurations.
Virtual Machine.
Creating the Virtual Machine
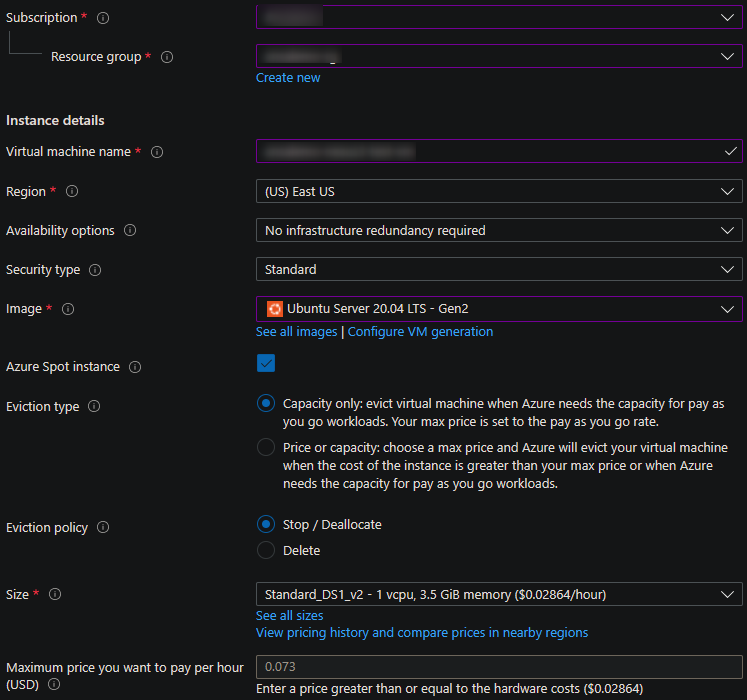
- Navigate to the Azure Portal and search for ‘Virtual Machines’.
- Select the Ubuntu Server 20.04 LTS - Gen2 Image.
-
Continue through the creation process by selecting the default values - if desired - on the Disks, Networking, Management, Advanced and Tags tabs.
Port 22 will be open by default, which we’ll need to have open. Additionally, if no Virtual Network was existing, one may need to be created.
-
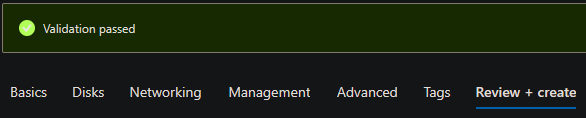
Click on ‘Review and Create’ tab and click Create to create the Virtual Machine.
Configuring the Virtual Machine
Opening ports
- We’ll need to open up ports 80, 443. This is in addition to port 22 which should’ve been open by default in the creation flow. If this was not, this also needs to be enabled to connect to the Virtual Machine with SSH.
- Go to the Virtual Machine that was just created and then select the Networking blade.
- If a Network Security Group is not there - one will need to be created. You can follow this guide on how to open ports for an Azure Virtual Machine in the portal.
Assigning a DNS name
We’ll also assign a default DNS name by following the below:
- Go to the ‘Overview’ blade on the newly created Azure Virtual Machine.
-
DNS name will show as ‘Not configured’ - click on this.

-
In the DNS name label (optional) field, add a name. This will be your Azure configured DNS name for the Virtual Machine. For example, mynexusvm.location.cloudapp.azure.com.
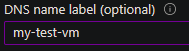
- Click Save. Going back to the Overview blade should have the DNS name field set to your new DNS name.
NGINX
Install NGINX
- Connect to your Azure Linux Virtual Machine either using password or SSH keys, depending on how you set it up initially.
-
Run the following - optionally add
-yyto the ends of these commands if you want to bypass prompts:sudo apt-get update sudo apt-get upgrade sudo apt-get install nginx -
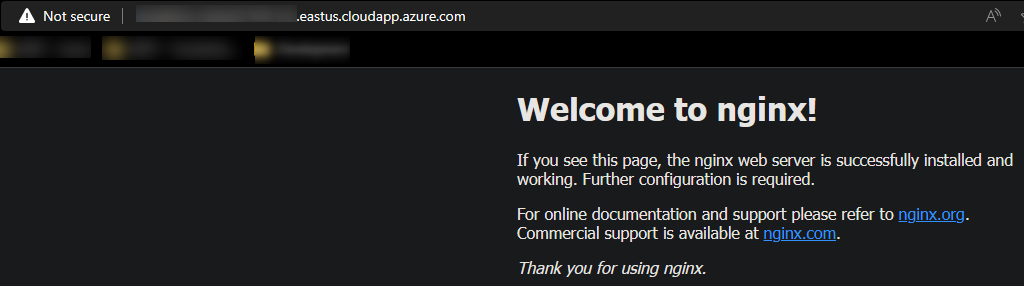
NGINX should now be installed. To validate this run
sudo systemctl status nginx. The following should be output:● nginx.service - A high performance web server and a reverse proxy server Loaded: loaded (/lib/systemd/system/nginx.service; enabled; vendor preset: enabled) Active: active (running) since Fri 2022-05-27 21:02:00 UTC; 1min 54s ago Docs: man:nginx(8) Main PID: 26718 (nginx) Tasks: 2 (limit: 4100) Memory: 3.0M CGroup: /system.slice/nginx.service ├─26718 nginx: master process /usr/sbin/nginx -g daemon on; master_process on; └─26719 nginx: worker process -
With NGINX now being installed you should be able to access the running Web Server with your default DNS name. Browsing this should show the NGINX landing page.
Securing NGINX
As noticed, our domain is showing unsecured and only over HTTP. Our goal here is to use NGINX as a reverse proxy to offload SSL/TLS so we can run our Nexus3 Docker Container over normal HTTP without much further configuration. This approach will still give normal SSL/TLS benefits for us.
- Certbot is a very easy way to get a Web Server set up with a certificate. Other certificates can be used, but this is used in our example to quickly get us going.
-
Use the above Certbot link which will include instructions on how to install this on your Azure Linux Virtual Machine or follow the below commands:
# Install core - this is likely already installed sudo snap install core sudo snap refresh core # Remove any existing certbot packages - likely not already installed on a fresh Virtual Machine sudo apt-get remove certbot # Install Certbot sudo snap install --classic certbot # Symlink it sudo ln -s /snap/bin/certbot /usr/bin/certbot # Configure NGINX with Certbot - Follow the prompts # When asked for the domain, enter yourdnsnameyouconfigured.location.cloudapp.azure.com # Which is the DNS name configured earlier sudo certbot --nginx - If this was successful then you should be output like the below - the site should be accessible over HTTPS now as well:
Successfully received certificate.
Certificate is saved at: /etc/letsencrypt/live/yourvmname.location.cloudapp.azure.com/fullchain.pem
Key is saved at:         /etc/letsencrypt/live/yourvmname.location.cloudapp.azure.com/privkey.pem
This certificate expires on 2022-08-25.
These files will be updated when the certificate renews.
Certbot has set up a scheduled task to automatically renew this certificate in the background.

Deploying certificate
Successfully deployed certificate for yourvmname.location.cloudapp.azure.com to /etc/nginx/sites-enabled/default
Congratulations! You have successfully enabled HTTPS on https://yourvmname.location.cloudapp.azure.com

Troubleshooting
-
If you see
Certbot failed to authenticate some domains (authenticator: nginx)andTimeout during connect (likely firewall problem)then check your NSG configured on the Virtual Machine that it’s allowing traffic through. -
If you see
nginx: [emerg] could not build the server_names_hash, you should increase server_names_hash_bucket_size- this is likely due to the length of the domain trying to be secured. This can be fixed by addingserver_names_hash_bucket_sizeto an integer, likely 64 or greater in yournginx.confserverblock or by shortening your DNS name in the Azure Portal.Instructions will be output on how to resume installation if this occurs.
Configure NGINX for Nexus
- Use a text editor like
vi,vim, ornanoto open and edit/etc/nginx/sites-available/default. - You’ll see that Certbot changed this file and a new
serverblock for SSL was added. In thisserverblock we want to change the originallocation /block and add a secondlocationblock. One for the Nexus UI and another for Docker specific requests - Add the following to the mentioned
serverblock:
location / {
    proxy_pass http://localhost:8083/;
    proxy_set_header Host $host;
    proxy_set_header X-Real-IP $remote_addr;
    proxy_set_header X-Forwarded-For $proxy_add_x_forwarded_for;
    proxy_set_header X-Forwarded-Proto "http";
    proxy_set_header X-Forwarded-Proto $scheme;
    # This may be recommended to add, or else NGINX may throw a warning
    proxy_headers_hash_max_size 512;
    proxy_headers_hash_bucket_size 128;
}

location /nexus/ {
    proxy_pass http://localhost:8081/;
    proxy_set_header Host $host;
    proxy_set_header X-Real-IP $remote_addr;
    proxy_set_header X-Forwarded-For $proxy_add_x_forwarded_for;
    proxy_set_header X-Forwarded-Proto "http";
    proxy_set_header X-Forwarded-Proto $scheme;
    # This may be recommended to add, or else NGINX may throw a warning
    proxy_headers_hash_max_size 512;
    proxy_headers_hash_bucket_size 128;
}
- Location
/and localhost:8083 will be the HTTP connector for Docker requests to this registry - Location/nexus/and localhost:8081 will be the UI. - Run
sudo nginx -tfor a syntax check. - Next, run
sudo systemctl reload nginx.
Setting up Nexus3
Pre-requisites
Docker will need to be installed on a brand new machine. Before going further in this section follow this guide from docs.docker.com on installing Docker on Ubuntu.
Images and Volumes
- Pull the Nexus Image by running the following:
sudo docker pull sonatype/nexus3
NOTE: The repository for this can be found here
- Create the volume for persistent data by running:
sudo docker volume create --name nexus-data
- Start the container with the following:
sudo docker run -d -p 8081:8081 -p 8083:8083 --name nexus -v nexus-data:/nexus-data sonatype/nexus3
NOTE: This Container may take 30(s) - 1 min to fully start. Use
docker psordocker logs <containerId>to check the status.
-
Browsing to your root URL should now show the Nexus Repository Manager dashboard.
-
To sign in, you will need to connect to the running container and retrieve the password on the container filesystem from the
admin.passwordfile. This can be done by the following:# Run docker ps to get the container ID docker ps # Start a shell in the container docker exec -it <containerId> /bin/bash # Change into the nexus-data directory cd nexus-data # Show the output of the admin password in the admin.password file - copy this for later use cat admin.password
Sign-in and repository set up
- Click Sign in on the Nexus dashboard in the upper right.
-
A login box/form will appear - the default username is admin. The password is the one we just copied in the above steps. Follow the prompts after clicking ‘Sign in’. Choose Disable anonymous access on the last dialog.

-
Click the Gear icon at the top:

-
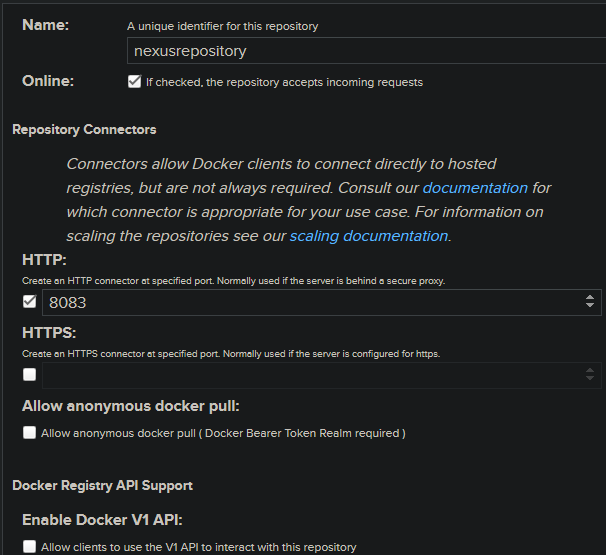
Click Repositories on the left-side navigation bar and then Create repository,
-
Click on docker (hosted)
-
Fill out the below fields - notably the name field and HTTP field. The rest of the fields can be left as is. Make sure Online is checked.:
Log-in to the repository and push a Docker Image
- On your local (or on the Virtual Machine if you have an Image you’d like to push) - log into the repository and push an Image
# Log into the registry
docker login yourdnsname.location.cloudapp.azure.com

# Pick a local Image and tag it
docker tag image yourdnsname.location.cloudapp.azure.com/image:tag

# Push it to your Nexus registry
docker push yourdnsname.location.cloudapp.azure.com/image:tag
Important Note: Depending on your Image size that is being pushed, you may encounter an NGINX
413 Request Entity Too Largeerror. You can resolve this by turning Client Body Size off withclient_max_body_size 0or set it to some arbitrary size, likeclient_max_body_size 500Min yournginx.conffile. See this for more information.
-
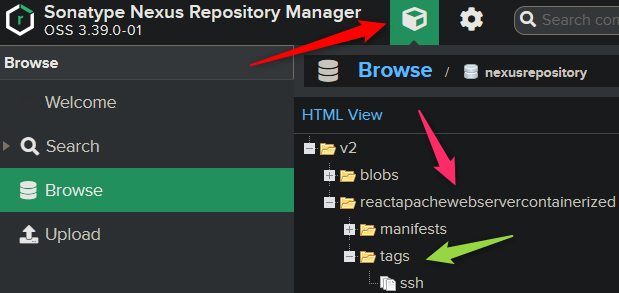
Browsing your repository contents should now show the Image and Tag information.
-
At this point, you should now be able to pull this from your local machine if desired - or else where, if those locations have access with
docker pull yourdnsname.location.cloudapp.azure.com/image:tag
Web App for Containers
Create and configure the App Service
With the Virtual Machine, NGINX and Nexus now set up, we’ll go ahead and create our Web App for Container.
- Go to the portal, choose ‘Create a Resource’ and search for ‘Web App for Containers’.
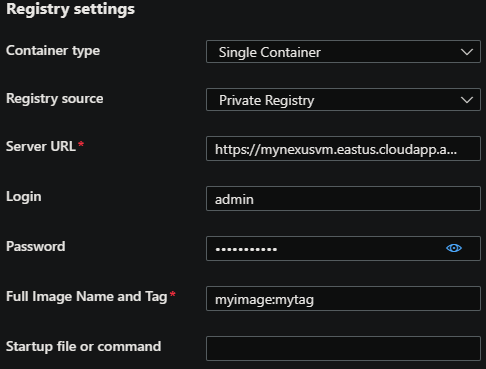
- You can either now, during the creation flow, set up the registry configuration or do this in Deployent Center on the Web App for Container later on. Both options need the same information:
- Container Type should be Single Container
- Registry/Image Source should be Private Registry
- Server URL should be
https://yourdnsname.location.cloudapp.azure.com - Login should be your Nexus user login, such as
admin - Password should be the account password - which we set in earlier steps.
- Both Login and Password are also the same ones used for
docker login- Full Image Name and Tag should be yourimagename:tag that was pushed to the registry earlier.
- At this point the Image should be able to be pulled from the registry to your Web App for Container.
-
You can confirm that the Image was downloaded by viewing the repository and selecting the tag that was pulled - the Last downloaded field will show the most recent Image download date:

Troubleshooting
NOTE: Any of the below scenarios would show “Application Error :(“ when browsing your App Service. Make sure you have App Service Logs enabled or else troubleshooting these issues will take more time. Review how to enable App Serivce Logs here
TIP: Using the Diagnose and Solve Problems tool and then utilizing either the Container Crash, Container Issues, or Application Logs detectors can be helpful in troubleshooting scenarios.
net/http: request canceled while waiting for connection (Client.Timeout exceeded while awaiting headers)
This may indicate there is something blocking docker pull from App Services. Review your NSG/networking on the Virtual Machine side to ensure traffic is allowed through.
x509: certificate signed by unknown authority
This error likely points to an issue with the formatting of the certificate on the Virtual Machine or a mix of the certificate being used and the location it’s stored in relation to Docker.
Testing between different certificates can rule out a specific certificate. If using self-signed, this can be reviewed.
‘no basic auth credentials’
Review if the Image/Tag combination is also including a non existant repository or location in the field. Alternatively, try restarting the App Service.
Manifest not found
If this is seen, such as manifest unknown: manifest tagged by <someTag> is not found this indicates the tag doesn’t exist or may not be valid.


