Deploying Go applications to App Service Linux with Azure DevOps pipelines
This post will cover deploying Go applications to Azure App Service Linux with Go “Blessed” images using Azure DevOps pipelines.
Overview
Note: Go “Blessed Images” are currently marked as experimental - these images and behavior on App Service are subject to change. This is also not recommended for production.
Prerequisites
Application Logs
IMPORTANT: Ensure that App Service Logs are enabled - review this document on how to do so.
This is important incase the application crashes due to misconfiguration of any of these profilers - given this is all at the application level, we need these logs enabled to see what may have gone wrong. You can view logging in a few ways:
- Diagnose and Solve Problems -> Application Logs
- Log Stream
- Directly through the Kudu site - such as the /newui endpoint (https://sitename.scm.azurewebsites.net/newui) or the normal Kudu site
- An FTP client to view logfiles under
/home/LogFiles
Azure DevOps organization
A new or existing Azure DevOps Organization and a DevOps project is needed.
Quickstart
Go “Blessed Images” expose port 8080 - which Go application HTTP servers should be listening on. For example:
err := http.ListenAndServe(":8080", nil)
You can however change this with the PORT App Setting - the HTTP listening port in the application would need to be updated.
If you wanted to listen for PORT, you could do the following:
port := ":" + os.Getenv("PORT")
log.Fatal(app.Listen(port))
See: Default exposed ports of Azure App Service Linux Blessed Images
For this example, we’re going to be using the Fiber example from here azureossd - go-devops-examples. You can bring your own code as well.
Local development
We can quickly get started with a Go project using Fiber with the following:
- Create a
main.gofile - Create a
go.modfile by runninggo mod init yourmodulename - Install Fiber with
go get github.com/gofiber/fiber/v2 - In the
main.gofile, add the following:
package main

import (
    "log"

    "github.com/gofiber/fiber/v2"
)

func main() {
    app := fiber.New()

    app.Get("/", func (c *fiber.Ctx) error {
        return c.SendString("Hello, World - From Fiber!")
    })

  log.Fatal(app.Listen(":8080"))
}
- Run the application with
go run ., you should now see the below in your terminal:
$ go run .

 ┌───────────────────────────────────────────────────┐
 │                   Fiber v2.48.0                   │
 │               http://127.0.0.1:8080               │
 │       (bound on host 0.0.0.0 and port 8080)       │
 │ Handlers ............. 2  Processes ........... 1 │
 │ Prefork ....... Disabled  PID ............. 24812 │
 └───────────────────────────────────────────────────┘
- You should now be able to access the application over
localhost:8080
Create an App Service
Follow this documentation on creating a Go 1.19 App Service on Linux - Deploy a Go web app to Azure App Service
Create the pipeline
Note: This assumes your Azure DevOps organization is already created
Now we’ll create the pipeline.
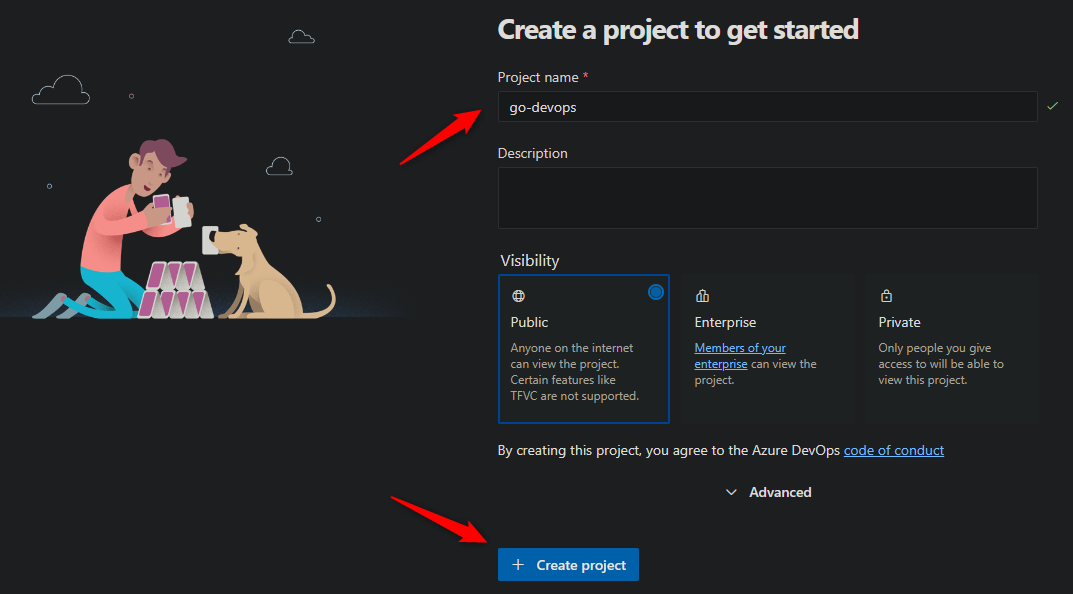
- In your Azure DevOps organization - create a DevOps project, if not already created yet. Choose a Project name and Visibility and then click Create project

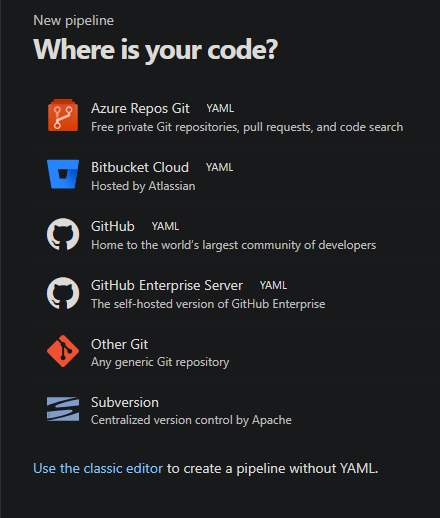
- On the next page, it will ask (if using a newly created project) where your code is hosted. Choose the option relevant to you.

- Select your repository that contains your Go source code.
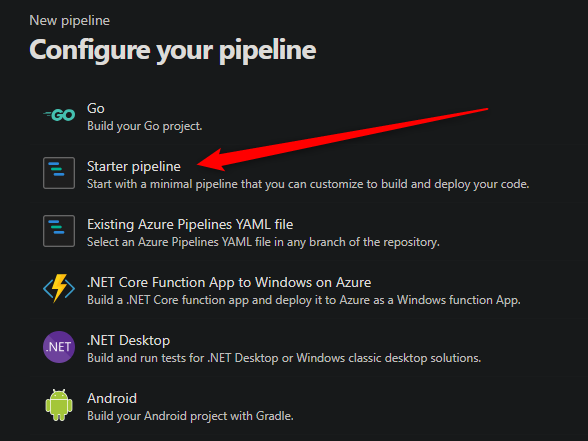
- The next page is “Configure our pipeline” - select Starter pipeline.
Note: Unline Java, Python and Node - there is no starter template available to deploy to Web Apps

- Your starter pipeline will have the following:
trigger:
- main

pool:
  vmImage: ubuntu-latest

steps:
- script: echo Hello, world!
  displayName: 'Run a one-line script'

- script: |
    echo Add other tasks to build, test, and deploy your project.
    echo See https://aka.ms/yaml
  displayName: 'Run a multi-line script'
- Let’s change this step-by-step:
- a. Add a
variablesproperty at the top of the file:
variables: webAppName: 'myapp'- b. Add a
stagesproperty andstagefor “Build”:
stages: - stage: Build displayName: Build stage jobs: - job: BuildJob steps: - task: GoTool@0 inputs: version: '1.19' - task: Go@0 inputs: command: custom customCommand: 'mod' arguments: 'tidy' workingDirectory: '$(System.DefaultWorkingDirectory)' displayName: 'Go mod tidy' - task: Go@0 inputs: command: 'build' workingDirectory: '$(System.DefaultWorkingDirectory)' displayName: 'Go build' - task: ArchiveFiles@2 displayName: 'Archive files' inputs: rootFolderOrFile: '$(System.DefaultWorkingDirectory)' includeRootFolder: false archiveType: zip archiveFile: $(Build.ArtifactStagingDirectory)/$(Build.BuildId).zip replaceExistingArchive: true - task: PublishBuildArtifacts@1 inputs: artifactName: drop- What did we do?:
- We used the
Go@0to rungo mod tidyto download all our dependencies required ingo.mod - We use
Go@0to build the application and generate an executable - We then zip up the executable with
ArchiveFiles@2to be passed on to the deploy stage
- We used the
- a. Add a
- Now, add a
deploystage, we’ll do this in two parts:- First, add the stage without the task:
- stage: Deploy displayName: 'Deploy Web App' dependsOn: Build condition: succeeded() jobs: - deployment: DeploymentJob environment: $(webAppName) strategy: runOnce: deploy: steps:-
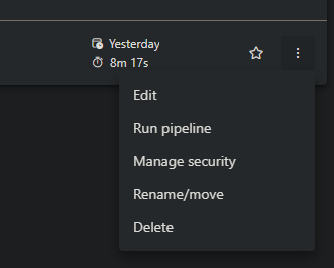
Next, click Pipelines -> Edit:

-
Open the “Task Assistant” on the top right - if it’s not already opened.

- Search for “deploy” in the search bar for avaialble built-in Azure DevOps tasks. You can use either the Azure App Service deploy or Azure Web App task to deploy to “Blessed” images on App Service Linux.
- For this example, we’ll be using the Azure App Service deploy (
AzureRmWebAppDeployment@4) task. Fill out the following information:- Connection type: Your connection/authentication method
- Azure subscription: Your subscription in which the App Service resides
- App Service type: Choose “Web App on Linux”
- App Service name: Name of the App Service
- Package or folder: Set this to
$(Pipeline.Workspace)/drop/$(Build.BuildId).zip - Runtime Stack: Set this to
GO|1.19
- The full deploy stage will now look like:
- stage: Deploy
  displayName: 'Deploy Web App'
  dependsOn: Build
  condition: succeeded()
  jobs:
  - deployment: DeploymentJob
    environment: $(webAppName)
    strategy:
      runOnce:
        deploy:
          steps:
          - task: AzureRmWebAppDeployment@4
            inputs:
              ConnectionType: 'AzureRM'
              azureSubscription: 'your-connection'
              appType: 'webAppLinux'
              WebAppName: 'your-site'
              packageForLinux: '$(Pipeline.Workspace)/drop/$(Build.BuildId).zip'
              RuntimeStack: 'GO|1.19'
The full runnable azure-pipelines.yml will look like this:
# Starter pipeline
# Start with a minimal pipeline that you can customize to build and deploy your code.
# Add steps that build, run tests, deploy, and more:
# https://aka.ms/yaml

trigger:
- main

variables:
  webAppName: 'your-site'

pool:
  vmImage: ubuntu-latest

stages:
- stage: Build
  displayName: Build stage
  jobs:
  - job: BuildJob
    steps:
    - task: GoTool@0
      inputs:
          version: '1.19'

    - task: Go@0
      inputs:
          command: custom
          customCommand: 'mod'
          arguments: 'tidy'
          workingDirectory: '$(System.DefaultWorkingDirectory)/fiber'
      displayName: 'Go mod tidy'

    - task: Go@0
      inputs:
        command: 'build'
        workingDirectory: '$(System.DefaultWorkingDirectory)/fiber'
      displayName: 'Go build'

    - task: ArchiveFiles@2
      displayName: 'Archive files'
      inputs:
        rootFolderOrFile: '$(System.DefaultWorkingDirectory)/fiber'
        includeRootFolder: false
        archiveType: zip
        archiveFile: $(Build.ArtifactStagingDirectory)/$(Build.BuildId).zip
        replaceExistingArchive: true

    - task: PublishBuildArtifacts@1
      inputs:
        artifactName: drop

- stage: Deploy
  displayName: 'Deploy Web App'
  dependsOn: Build
  condition: succeeded()
  jobs:
  - deployment: DeploymentJob
    environment: $(webAppName)
    strategy:
      runOnce:
        deploy:
          steps:
          - task: AzureRmWebAppDeployment@4
            inputs:
              ConnectionType: 'AzureRM'
              azureSubscription: 'your-connection'
              appType: 'webAppLinux'
              WebAppName: 'your-site'
              packageForLinux: '$(Pipeline.Workspace)/drop/$(Build.BuildId).zip'
              RuntimeStack: 'GO|1.19'
Important notes
In the go build section, we don’t specify anything like -o, for any named execuable output.
This is because, at the current time, SCM_DO_BUILD_DURING_DEPLOYMENT is not honored on Go “Blessed” images. oryxBuilder will always be the builder used.
The executable is built by Oryx - and named oryxBuildBinary and placed in /home/site/wwwroot.


