Deploying a Python FastAPI app to App Service Linux
This post will go cover deploying a quickstart FastAPI application to a Python App Service Linux “Blessed Image”.
Overview
FastAPI is an aSGI-based Python framework used for building APIs. FastAPI is quick to develop with, fast, and performant.
This post will cover how to deploy a quickstart FastAPI app to a Python “Blessed Image” on Azure App Service Linux.
Local Development
Set up your virtual environment.
-
For these examples we’ll be creating a basic FastAPI application to get started. Start by creating a folder for your application and
cdinto it to create and activate your virtual environment. You can review the official documentation for this here. For example:mkdir fastapicd fastapi -
With our folder now created (or if you’re using an existing one), we’ll create our virtual environment below:
python -m venv .venvNOTE: .venv in the name of our virtual environment, this can be changed to any arbitrary name
-
We can now activate our virtual environment using the below:
source .venv/Scripts/activate(Bash, *NIX).\.venv\Scripts\activate(Windows)You should now see your virtual environment name activated in your terminal.

-
Run
pip install fasti uvicorn[standard]and thenpip freeze > requirements.txtto create arequirements.txtfor deployment later on. This will create arequirements.txtand populate it with dependencies. This command installs both FastAPI and Uvicorn for usage later when deployed to Azure App Service. -
Create an empty
app.pyin your project root. We’ll use the below as a very basic FastAPI example:
from fastapi import FastAPI

app = FastAPI()


@app.get("/")
def read_root():
    return {"Hello": "World"}
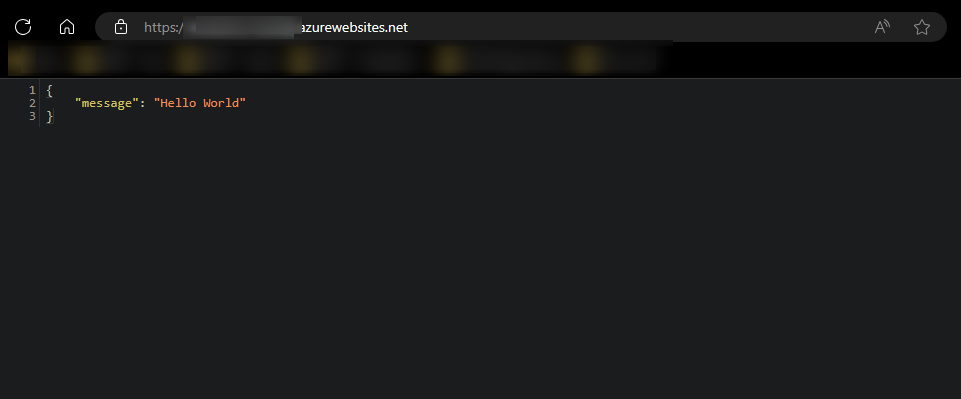
- At this point you’re now able to run the application locally, as well as having source code to be deployed later on. Use
uvicorn main:app --reloadin your terminal to run the application. You should see something like the below:
$ uvicorn app:app --reload
INFO:     Will watch for changes in these directories: ['C:\\Code\\fastapi']
INFO:     Uvicorn running on http://127.0.0.1:8000 (Press CTRL+C to quit)
INFO:     Started reloader process [50036] using WatchFiles
INFO:     Started server process [48776]
INFO:     Waiting for application startup.
INFO:     Application startup complete.
Deployment Options
There are multiple deployment options in Python on App Service Linux such as Continuous Deployment (GitHub Actions, DevOps pipelines), External Git, Local Git, ZipDeploy with Oryx Builder, etc. We’ll be covering 3 of these methods below.
NOTE: For Python on App Service Linux you should not use methods like FTP or ZipDeploy (without the use of Oryx) to avoid improper deployment since the Python environment will not be built, thus causing errors like
ModuleNotFoundor others - sincepip installis not ran in these scenarios. You do want to use deployment methods like Local Git, ZipDeploy (with Oryx builder, see above), or pipelines like DevOps or Github Actions since these will all correctly create and activate the virtual environment, and install dependencies as required.
Local Git
-
Navigate to your Web App and select
Deployment Centerand then click onLocal Gitand then click onSave.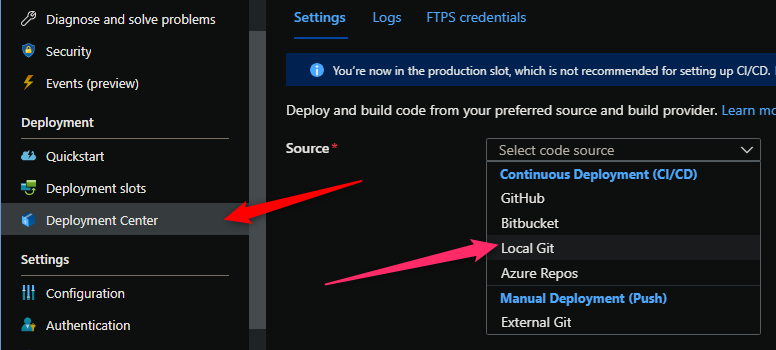
-
Copy the remote git repository from the Azure Portal.
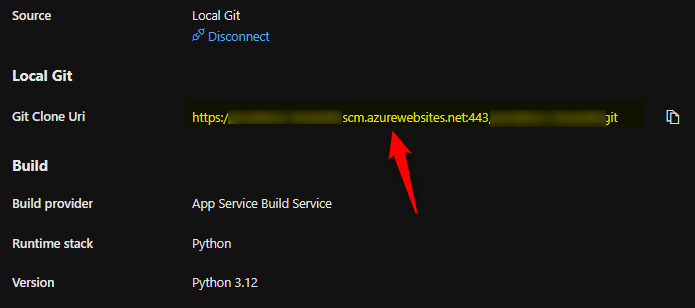
- In your local terminal run the following commands in order:
git add . git commit -m "initial commit" git remote add azure https://<sitename>.scm.azurewebsites.net:443/<sitename>.git git push azure master - Then Oryx will build the application:
NOTE: It would be advisable to have a .gitignore with your virtual environment name included to avoid commiting this. You can create a
.gitignoreyourself and add the name of the environment, like in our case, ‘.venv’, and/or use this official Github Python .gitignore here
3:35:57 PM app-fastapi: Running oryx build...
3:35:57 PM app-fastapi: Command: oryx build /tmp/zipdeploy/extracted -o /home/site/wwwroot --platform python --platform-version 3.12 -p virtualenv_name=antenv --log-file /tmp/build-debug.log  -i /tmp/8dc63036e6ed60f --compress-destination-dir | tee /tmp/oryx-build.log
3:35:57 PM app-fastapi: Operation performed by Microsoft Oryx, https://github.com/Microsoft/Oryx
3:35:57 PM app-fastapi: You can report issues at https://github.com/Microsoft/Oryx/issues
3:35:57 PM app-fastapi: Oryx Version: 0.2.20230508.1, Commit: 7fe2bf39b357dd68572b438a85ca50b5ecfb4592, ReleaseTagName: 20230508.1
3:35:57 PM app-fastapi: Build Operation ID: fa8c3429db3b3cf2
3:35:57 PM app-fastapi: Repository Commit : d082fc8c-4fd2-4b7c-9197-c162aa72ead6
3:35:57 PM app-fastapi: OS Type           : bullseye
3:35:57 PM app-fastapi: Image Type        : githubactions
3:35:57 PM app-fastapi: Detecting platforms...
3:35:58 PM app-fastapi: Detected following platforms:
3:35:58 PM app-fastapi:   python: 3.12.2
3:35:58 PM app-fastapi: Version '3.12.2' of platform 'python' is not installed. Generating script to install it...
3:35:58 PM app-fastapi: Using intermediate directory '/tmp/8dc63036e6ed60f'.
3:35:58 PM app-fastapi: Copying files to the intermediate directory...
3:35:58 PM app-fastapi: Done in 0 sec(s).
3:35:58 PM app-fastapi: Source directory     : /tmp/8dc63036e6ed60f
3:35:58 PM app-fastapi: Destination directory: /home/site/wwwroot
3:35:58 PM app-fastapi: Downloading and extracting 'python' version '3.12.2' to '/tmp/oryx/platforms/python/3.12.2'...
3:35:58 PM app-fastapi: Detected image debian flavor: bullseye.
3:36:04 PM app-fastapi: Downloaded in 6 sec(s).
3:36:04 PM app-fastapi: Verifying checksum...
3:36:04 PM app-fastapi: Extracting contents...
3:36:07 PM app-fastapi: performing sha512 checksum for: python...
3:36:09 PM app-fastapi: Done in 11 sec(s).
3:36:09 PM app-fastapi: image detector file exists, platform is python..
3:36:09 PM app-fastapi: OS detector file exists, OS is bullseye..
3:36:10 PM app-fastapi: Python Version: /tmp/oryx/platforms/python/3.12.2/bin/python3.12
3:36:10 PM app-fastapi: Creating directory for command manifest file if it does not exist
3:36:11 PM app-fastapi: Removing existing manifest file
3:36:11 PM app-fastapi: Python Virtual Environment: antenv
3:36:11 PM app-fastapi: Creating virtual environment...
3:36:14 PM app-fastapi: Activating virtual environment...
3:36:14 PM app-fastapi: Running pip install...
3:36:20 PM app-fastapi: [19:36:15+0000] Collecting annotated-types==0.6.0 (from -r requirements.txt (line 1))
3:36:20 PM app-fastapi: [19:36:15+0000]   Downloading annotated_types-0.6.0-py3-none-any.whl.metadata (12 kB)
[... truncating output ...]
3:36:20 PM app-fastapi: [19:36:18+0000] Downloading websockets-12.0-cp312-cp312-manylinux_2_5_x86_64.manylinux1_x86_64.manylinux_2_17_x86_64.manylinux2014_x86_64.whl (131 kB)
3:36:20 PM app-fastapi: [19:36:18+0000]    ━━━━━━━━━━━━━━━━━━━━━━━━━━━━━━━━━━━━━━━━ 131.2/131.2 kB 8.8 MB/s eta 0:00:00
3:36:20 PM app-fastapi: [19:36:18+0000] Installing collected packages: websockets, typing_extensions, sniffio, PyYAML, python-dotenv, idna, httptools, h11, colorama, click, annotated-types, uvicorn, pydantic_core, anyio, watchfiles, starlette, pydantic, fastapi
3:36:20 PM app-fastapi: [19:36:19+0000] Successfully installed PyYAML-6.0.1 annotated-types-0.6.0 anyio-4.3.0 click-8.1.7 colorama-0.4.6 fastapi-0.110.2 h11-0.14.0 httptools-0.6.1 idna-3.7 pydantic-2.7.0 pydantic_core-2.18.1 python-dotenv-1.0.1 sniffio-1.3.1 starlette-0.37.2 typing_extensions-4.11.0 uvicorn-0.29.0 watchfiles-0.21.0 websockets-12.0
3:36:20 PM app-fastapi: Not a vso image, so not writing build commands
3:36:20 PM app-fastapi: Preparing output...
3:36:20 PM app-fastapi: Copying files to destination directory '/tmp/_preCompressedDestinationDir'...
3:36:20 PM app-fastapi: Done in 0 sec(s).
3:36:20 PM app-fastapi: Compressing content of directory '/tmp/_preCompressedDestinationDir'...
3:36:22 PM app-fastapi: Copied the compressed output to '/home/site/wwwroot'
3:36:22 PM app-fastapi: Removing existing manifest file
3:36:22 PM app-fastapi: Creating a manifest file...
3:36:22 PM app-fastapi: Manifest file created.
3:36:22 PM app-fastapi: Copying .ostype to manifest output directory.
3:36:22 PM app-fastapi: Done in 24 sec(s).
3:36:22 PM app-fastapi: Running post deployment command(s)...
3:36:22 PM app-fastapi: Generating summary of Oryx build
3:36:22 PM app-fastapi: Parsing the build logs
3:36:22 PM app-fastapi: Found 0 issue(s)
3:36:23 PM app-fastapi: Build Summary :
3:36:23 PM app-fastapi: ===============
3:36:23 PM app-fastapi: Errors (0)
3:36:23 PM app-fastapi: Warnings (0)
3:36:23 PM app-fastapi: Triggering recycle (preview mode disabled).
3:36:23 PM app-fastapi: Deployment successful. deployer = deploymentPath =
3:36:32 PM: Deployment to "app-fastapi" completed.
-
Gunicorn is the default WSGI server used to run Python applications on Azure App Service unless otherwise specified. See this documentation as well. Because of that, we need to change our startup command - because upon viewing our site, we’ll see an
Internal Server Error:
If you look at App Service Logs (assuming these are enabled), you’d see this is really failing with the following:
TypeError: FastAPI.__call__() missing 1 required positional argument: 'send'This is not failing due to the fact Gunicorn is used - but rather, a
syncworker for wSGI applications is the default worker type used. We instead need to set this to auvicornworker (like we previously installed inrequirements.txt) to properly run this aSGI application.Change the startup command to the following - note, that Python “Blessed Images” expose port 8000 by default - see Default exposed ports of Azure App Service Linux Blessed Images:
gunicorn --worker-class uvicorn.workers.UvicornWorker --bind 0.0.0.0:8000 -w 4 --timeout 600 --access-logfile '-' --error-logfile '-' app:appNOTE: You can use
-kas a shorthand flag for--worker-classYou should now be able to view the application:
Alternatively, you can run directly against
uvicornwith a startup command like:uvicorn --host "0.0.0.0" --access-log app:app. See Uvicorn - Command Line Options for more details
GitHub Actions
You can quickly get started with GitHub Actions by using the App Service Deployment Center. This will automatically generate a workflow file based on your application stack and commit it to your GitHub repository under .github. You can deploy a workflow manually using a publish profile or service principal, as well.
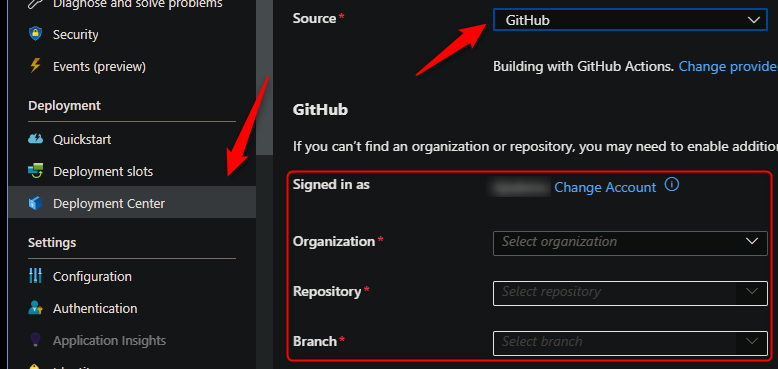
NOTE: If you have numerous repositories that appear in the dropdown, you can search by typing within the text field/dropdown.
You can find more details about these steps documented here:
Below is the yaml file generated after setting up Github Actions (using the “User Identity” option in Deployment Center) - with the extra addition of the startup-command property under azure/webapps-deploy@v2. We manually add that in the below template to avoid our application failing upon startup.
name: Build and deploy Python app to Azure Web App - my-fastapi-app

on:
  push:
    branches:
      - main
  workflow_dispatch:

jobs:
  build:
    runs-on: ubuntu-latest

    steps:
      - uses: actions/checkout@v4

      - name: Set up Python version
        uses: actions/setup-python@v1
        with:
          python-version: '3.12'

      - name: Create and start virtual environment
        run: |
          python -m venv venv
          source venv/bin/activate

      - name: Install dependencies
        run: pip install -r requirements.txt

      # Optional: Add step to run tests here (PyTest, Django test suites, etc.)

      - name: Zip artifact for deployment
        run: zip release.zip ./* -r

      - name: Upload artifact for deployment jobs
        uses: actions/upload-artifact@v3
        with:
          name: python-app
          path: |
            release.zip
            !venv/

  deploy:
    runs-on: ubuntu-latest
    needs: build
    environment:
      name: 'Production'
      url: ${{ steps.deploy-to-webapp.outputs.webapp-url }}
    permissions:
      id-token: write #This is required for requesting the JWT

    steps:
      - name: Download artifact from build job
        uses: actions/download-artifact@v3
        with:
          name: python-app

      - name: Unzip artifact for deployment
        run: unzip release.zip


      - name: Login to Azure
        uses: azure/login@v1
        with:
          client-id: ${{ secrets.AZUREAPPSERVICE_CLIENTID_000000000000000000000000000}}
          tenant-id: ${{ secrets.AZUREAPPSERVICE_TENANTID_0000000000000000000000000000 }}
          subscription-id: ${{ secrets.AZUREAPPSERVICE_SUBSCRIPTIONID_00000000000000000000000 }}

      - name: 'Deploy to Azure Web App'
        uses: azure/webapps-deploy@v2
        id: deploy-to-webapp
        with:
          app-name: 'my-fastapi-app'
          slot-name: 'Production'
          startup-command: 'gunicorn --worker-class uvicorn.workers.UvicornWorker --timeout 600 --access-logfile '-' --error-logfile '-' app:app'
If desired, you can pass in a specific package name in the azure/webapps-deploy@v2 task - the package being the zip from earlier in the pipeline:
- name: 'Deploy to Azure Web App'
  uses: azure/webapps-deploy@v2
  id: deploy-to-webapp
  with:
    app-name: 'yoursitenamehere'
    slot-name: 'Production'
    package: release.zip
    startup-command: 'gunicorn --worker-class uvicorn.workers.UvicornWorker --timeout 600 --access-logfile '-' --error-logfile '-' app:app'
If wanting to use a publish profile instead, follow this, and use the below in your .yaml:
- name: 'Deploy to Azure Web App'
  uses: azure/webapps-deploy@v2
  id: deploy-to-webapp
  with:
    app-name: 'yoursitenamehere'
    slot-name: 'Production'
    package: release.zip
    publish-profile: ${{ secrets.AZUREAPPSERVICE_PUBLISHPROFILE_000000000000000000000000000 }}
    startup-command: "gunicorn --worker-class uvicorn.workers.UvicornWorker --timeout 600 --access-logfile '-' --error-logfile '-' app:app"
Below is the output we’d see in the ‘Actions’ tab on Github after setting up Actions and pushing a new commit to trigger a deployment.

Azure DevOps
You can use Azure Pipelines to build your FastAPI application. For FastAPI apps, you can still use your typical pip and python based commands. You can review more details here: YAML Pipeline explained.
Here is an example on how to implement Azure Pipelines with App Service Linux.
- Create a new DevOps project then go to
Pipelinesand selectCreate Pipeline. - Select your code repository.
- Select
Python to Linux Web App on Azuretemplate. - Select the web app where you will deploy.
- A default pipeline
.yamldefinition will be generated:-
Make sure your Python version matches the App Service Python version. The default yaml for the Python App Service template will have a variable named
pythonVersion(seen below) set towards the top of the file. Change this as needed.# Python version: 3.12 pythonVersion: '3.12'It’s then included in the UsePythonVersion@0 task
- task: UsePythonVersion@0 inputs: versionSpec: '$(pythonVersion)' displayName: 'Use Python $(pythonVersion)' -
If desired you can change the startup command via the
AzureWebApp@1Deployment task- task: AzureWebApp@1 displayName: 'Deploy Azure Web App : yourwebappname' inputs: azureSubscription: $(azureServiceConnectionId) appName: $(webAppName) appType: webAppLinux package: $(Pipeline.Workspace)/drop/$(Build.BuildId).zip startUpCommand: "gunicorn --worker-class uvicorn.workers.UvicornWorker --timeout 600 --access-logfile '-' --error-logfile '-' app:app"
-
NOTE: To avoid any definition errors in the yaml, add the property
appTypeset towebAppLinuxas seen in the above task.
- Save and
runthe pipeline.
Here is an example with recommendations:
trigger:
- main
variables:
# Azure Resource Manager connection created during pipeline creation
azureServiceConnectionId: '0000000-0000-0000-0000-00000000'
# Web app name
webAppName: 'yourwebappname'
# Agent VM image name
vmImageName: 'ubuntu-latest'
# Environment name
environmentName: 'yourwebappname'
# Project root folder. Point to the folder containing manage.py file.
projectRoot: $(System.DefaultWorkingDirectory)
      # Python version: 3.12
      pythonVersion: '3.12'
stages:
- stage: Build
displayName: Build stage
jobs:
- job: BuildJob
pool:
vmImage: $(vmImageName)
steps:
    - task: UsePythonVersion@0
      inputs:
        versionSpec: '$(pythonVersion)'
      displayName: 'Use Python $(pythonVersion)'
- script: |
python -m venv antenv
source antenv/bin/activate
python -m pip install --upgrade pip
pip install setup
pip install -r requirements.txt
workingDirectory: $(projectRoot)
displayName: "Install requirements"
- task: ArchiveFiles@2
displayName: 'Archive files'
inputs:
rootFolderOrFile: '$(projectRoot)'
includeRootFolder: false
archiveType: zip
archiveFile: $(Build.ArtifactStagingDirectory)/$(Build.BuildId).zip
replaceExistingArchive: true
- upload: $(Build.ArtifactStagingDirectory)/$(Build.BuildId).zip
displayName: 'Upload package'
artifact: drop
- stage: Deploy
displayName: 'Deploy Web App'
dependsOn: Build
condition: succeeded()
jobs:
- deployment: DeploymentJob
pool:
vmImage: $(vmImageName)
environment: $(environmentName)
strategy:
runOnce:
deploy:
steps:
- task: UsePythonVersion@0
inputs:
versionSpec: '$(pythonVersion)'
displayName: 'Use Python version'
- task: AzureWebApp@1
displayName: 'Deploy Azure Web App : yourwebappname'
inputs:
azureSubscription: $(azureServiceConnectionId)
appName: $(webAppName)
appType: webAppLinux
package: $(Pipeline.Workspace)/drop/$(Build.BuildId).zip
startUpCommand: 'gunicorn --worker-class uvicorn.workers.UvicornWorker --timeout 600 --access-logfile '-' --error-logfile '-' app:app'
NOTE: Depending on how you set up your pipeline, you may have to authorize permission for deployment. This is a one-time task, below is a screenshot of what you may see:


Troubleshooting
Requirements.txt or .py files not found during deployment
Scenario: When deploying from you may see a Could not find setup.py or requirements.txt; Not running pip install:
-
Resolution: Make sure you
cdinto the correct project folder. For example, there is a chance that the deployment was done from a parent directory that contains your project folder. Make sure you are in the project folder containing your.pyfiles,requirements.txt, etc.:parentfolder/ myproject/ app.py requirements.txt .gitignoreNOTE: This may also manifest as by showing the default Azure App Service ‘splash’/welcome page and the following message in logging:
No framework detected; using default app from /opt/defaultsite
Failed to find attribute ‘app’ in ‘app’
Scenario: You may see Failed to find attribute 'app' in 'app' if your aSGI callable in your main .py file is not named app. For example:
app = FastAPI()
-
Resolution: As mentioned above, Oryx looks for a WSGI (or aSGI) callable named
appfor these kinds of applications. If you decide to name your aSGI callable something not namedapp, you will need to change your startup command to target this appropriately. The example below assumes you have a file namedapp.pywith a aSGI callable namedfastapiinside of it:gunicorn --worker-class uvicorn.workers.UvicornWorker --timeout 600 --access-logfile '-' --error-logfile '-' app:fastapi
Error: Couldn’t detect a version for the platform ‘python’ in the repo.
This would happen during the deployment phase on either Github Actions or Azure Devops. Ensure the following:
- The project structure matches is defined here
- If using a .zip (such as in GitHub Actions), ensure the zip if unzipped first (if not using the
packageproperty) - or - if using thepackageproperty, pass the correct zip name with the appropriate project structure
TypeError: FastAPI.call() missing 1 required positional argument: ‘send’
TypeError: FastAPI.__call__() missing 1 required positional argument: 'send'
As mentioned earlier on, the above error will appear if you’re using Gunicorn without a Uvicorn worker class.
Ensure that --worker-class uvicorn.workers.UvicornWorker is passed to Gunicorn - or - by using uvicorn directly with something like uvicorn --host "0.0.0.0" --access-log app:app
ModuleNotFoundError: No module named ‘uvicorn’
You need to have uvicorn installed to be able to use it directly as a startup command or by passing the UvicornWorker --worker-class to Gunicorn
Ensure this exists in your requirements.txt for deployment.
Container start failures and other troubleshooting
Some of what’s described in this troubleshooting - and much else which is under the Python - Availability and Post Deployment issues section can cause various runtime errors or the container (application) failing to start.
This will manifest as Application Error : ( when browsing or making a request to the site (which will return as a HTTP 503). Or, may show is Container exited / Container didnt respond to HTTP pings on port [port]
Use the above link to view through other various troubleshooting that is not called out in this post directly.


