Deploying a Python Streamlit app to App Service Linux
This post will go cover deploying a quickstart Streamlit application to a Python App Service Linux “Blessed Image”.
Overview
Streamlit is a data driven Python framework for ML/AI. Where the idea is to have less lines of code and to abstract away UI development for rendering data.
UI components are already “baked in” to the framework, so a developer just needs to focus on Python code.
Streamlit uses Websockets for the baked-in client-side code to render data and changes from the server-side. This also comes with popular data libraries like NumPy and Pandas as useable dependencies.
Streamlit uses Tornado under the hood - therefor usage with Gunicorn or other wSGI production servers can not (easily) be used. This is an important note for later on.
NOTE: Tornados HTTP server is not wSGI-conforming by default, but does expose wSGI functionality for interop. However, it’s much easier to run Streamlit as is (through the
streamlitCLI) or in a custom container where NGINX is used in front as a reverse proxy to Streamlit (with Tornado)
Local Development
Set up your virtual environment.
-
For these examples we’ll be creating a basic Streamlit application to get started. Start by creating a folder for your application and
cdinto it to create and activate your virtual environment. You can review the official documentation for this here. For example:mkdir azure-streamlitcd azure-streamlit -
With our folder now created (or if you’re using an existing one), we’ll create our virtual environment below:
python -m venv .venvNOTE: .venv in the name of our virtual environment, this can be changed to any arbitrary name
-
We can now activate our virtual environment using the below:
source .venv/Scripts/activate(Bash, *NIX).\.venv\Scripts\activate(Windows)You should now see your virtual environment name activated in your terminal.

- Run
pip install streamlitand thenpip freeze > requirements.txtto create arequirements.txtfor deployment later on. This will create arequirements.txtand populate it with dependencies. -
Create an empty
app.pyin your project root. -
Run
streamlit helloin your terminal. This will open a new tab onlocalhost:8501with a quickstart to a few demos. In this example, we’ll click on the “Plotting Demo”. After this runs, it’ll show you the code it used which can be copy/pasted:
- Copy the above code from the demo into this file. Note, that it does not contain the imports needed. Ensure these are added in. Below is a full example:
import streamlit as st
import time
import numpy as np

progress_bar = st.sidebar.progress(0)
status_text = st.sidebar.empty()
last_rows = np.random.randn(1, 1)
chart = st.line_chart(last_rows)

for i in range(1, 101):
    new_rows = last_rows[-1, :] + np.random.randn(5, 1).cumsum(axis=0)
    status_text.text("%i%% Complete" % i)
    chart.add_rows(new_rows)
    progress_bar.progress(i)
    last_rows = new_rows
    time.sleep(0.05)

progress_bar.empty()

# Streamlit widgets automatically run the script from top to bottom. Since
# this button is not connected to any other logic, it just causes a plain
# rerun.
st.button("Re-run")
- At this point you’re now able to run the application locally, as well as having source code to be deployed later on.
Deployment Options
There are multiple deployment options in Python on App Service Linux such as Continuous Deployment (GitHub Actions, DevOps pipelines), External Git, Local Git, ZipDeploy with Oryx Builder, etc. We’ll be covering 3 of these methods below.
NOTE: For Python on App Service Linux you should not use methods like FTP or ZipDeploy (without the use of Oryx) to avoid improper deployment since the Python environment will not be built, thus causing errors like
ModuleNotFoundor others - sincepip installis not ran in these scenarios. You do want to use deployment methods like Local Git, ZipDeploy (with Oryx builder, see above), or pipelines like DevOps or Github Actions since these will all correctly create and activate the virtual environment, and install dependencies as required.
Local Git
-
Navigate to your Web App and select
Deployment Centerand then click onLocal Gitand then click onSave.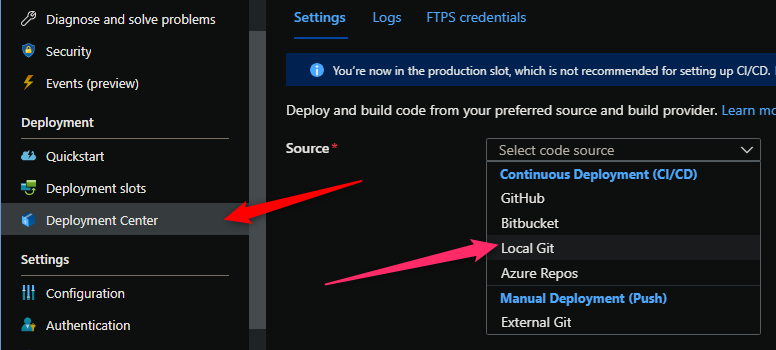
-
Copy the remote git repository from Azure Portal.
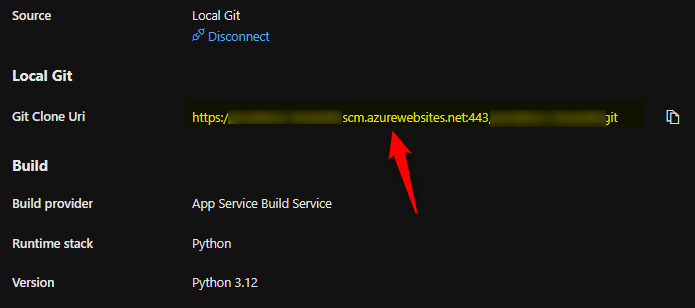
- In your local terminal run the following commands in order:
git add . git commit -m "initial commit" git remote add azure https://<sitename>.scm.azurewebsites.net:443/<sitename>.git git push azure master - Then Oryx will build the application:
NOTE: It would be advisable to have a .gitignore with your virtual environment name included to avoid commiting this. You can create a
.gitignoreyourself and add the name of the environment, like in our case, ‘.venv’, and/or use this official Github Python .gitignore here
[...truncating for readability...]
1:45:32 PM my-streamlit-app: Running oryx build...
1:45:32 PM my-streamlit-app: Command: oryx build /tmp/zipdeploy/extracted -o /home/site/wwwroot --platform python --platform-version 3.12 -p virtualenv_name=antenv --log-file /tmp/build-debug.log  -i /tmp/8dc5e3d033d0f64 --compress-destination-dir | tee /tmp/oryx-build.log
1:45:32 PM my-streamlit-app: Operation performed by Microsoft Oryx, https://github.com/Microsoft/Oryx
1:45:32 PM my-streamlit-app: You can report issues at https://github.com/Microsoft/Oryx/issues
1:45:32 PM my-streamlit-app: Oryx Version: 0.2.20230508.1, Commit: 7fe2bf39b357dd68572b438a85ca50b5ecfb4592, ReleaseTagName: 20230508.1
1:45:32 PM my-streamlit-app: Build Operation ID: 049e0ef92af48cb2
1:45:33 PM my-streamlit-app: Repository Commit : 6ca96737-ee2d-404d-b3e4-bf8eaa0b8542
1:45:33 PM my-streamlit-app: OS Type           : bullseye
1:45:33 PM my-streamlit-app: Image Type        : githubactions
1:45:33 PM my-streamlit-app: Detecting platforms...
1:45:33 PM my-streamlit-app: Detected following platforms:
1:45:33 PM my-streamlit-app:   python: 3.12.2
1:45:34 PM my-streamlit-app: Version '3.12.2' of platform 'python' is not installed. Generating script to install it...
1:45:34 PM my-streamlit-app: Using intermediate directory '/tmp/8dc5e3d033d0f64'.
1:45:34 PM my-streamlit-app: Copying files to the intermediate directory...
1:45:34 PM my-streamlit-app: Done in 0 sec(s).
1:45:34 PM my-streamlit-app: Source directory     : /tmp/8dc5e3d033d0f64
1:45:34 PM my-streamlit-app: Destination directory: /home/site/wwwroot
1:45:34 PM my-streamlit-app: Downloading and extracting 'python' version '3.12.2' to '/tmp/oryx/platforms/python/3.12.2'...
1:45:34 PM my-streamlit-app: Detected image debian flavor: bullseye.
1:45:38 PM my-streamlit-app: Downloaded in 4 sec(s).
1:45:38 PM my-streamlit-app: Verifying checksum...
1:45:38 PM my-streamlit-app: Extracting contents...
1:45:42 PM my-streamlit-app: performing sha512 checksum for: python...
1:45:43 PM my-streamlit-app: Done in 9 sec(s).
1:45:43 PM my-streamlit-app: image detector file exists, platform is python..
1:45:43 PM my-streamlit-app: OS detector file exists, OS is bullseye..
1:45:43 PM my-streamlit-app: Python Version: /tmp/oryx/platforms/python/3.12.2/bin/python3.12
1:45:43 PM my-streamlit-app: Creating directory for command manifest file if it does not exist
1:45:43 PM my-streamlit-app: Removing existing manifest file
1:45:43 PM my-streamlit-app: Python Virtual Environment: antenv
1:45:43 PM my-streamlit-app: Creating virtual environment...
1:45:46 PM my-streamlit-app: Activating virtual environment...
1:45:46 PM my-streamlit-app: Running pip install...
1:46:05 PM my-streamlit-app: [17:45:47+0000] Collecting streamlit (from -r requirements.txt (line 1))
1:46:05 PM my-streamlit-app: [17:45:47+0000]   Downloading streamlit-1.33.0-py2.py3-none-any.whl.metadata (8.5 kB)
1:46:05 PM my-streamlit-app: [17:45:47+0000] Collecting altair<6,>=4.0 (from streamlit->-r requirements.txt (line 1))
1:46:05 PM my-streamlit-app: [17:45:47+0000]   Downloading altair-5.3.0-py3-none-any.whl.metadata (9.2 kB)
[...truncating for readability...]
1:46:07 PM my-streamlit-app: [17:45:51+0000] Downloading jsonschema_specifications-2023.12.1-py3-none-any.whl (18 kB)
1:46:07 PM my-streamlit-app: [17:45:51+0000] Downloading MarkupSafe-2.1.5-cp312-cp312-manylinux_2_17_x86_64.manylinux2014_x86_64.whl (28 kB)
1:46:07 PM my-streamlit-app: [17:45:51+0000] Downloading mdurl-0.1.2-py3-none-any.whl (10.0 kB)
1:46:07 PM my-streamlit-app: [17:45:51+0000] Downloading referencing-0.34.0-py3-none-any.whl (26 kB)
1:46:07 PM my-streamlit-app: [17:45:51+0000] Downloading rpds_py-0.18.0-cp312-cp312-manylinux_2_17_x86_64.manylinux2014_x86_64.whl (1.1 MB)
1:46:07 PM my-streamlit-app: [17:45:51+0000]    ━━━━━━━━━━━━━━━━━━━━━━━━━━━━━━━━━━━━━━━━ 1.1/1.1 MB 126.5 MB/s eta 0:00:00
1:46:07 PM my-streamlit-app: [17:45:51+0000] Downloading six-1.16.0-py2.py3-none-any.whl (11 kB)
1:46:07 PM my-streamlit-app: [17:45:51+0000] Downloading smmap-5.0.1-py3-none-any.whl (24 kB)
1:46:07 PM my-streamlit-app: [17:45:51+0000] Installing collected packages: pytz, watchdog, urllib3, tzdata, typing-extensions, tornado, toolz, toml, tenacity, smmap, six, rpds-py, pygments, protobuf, pillow, packaging, numpy, mdurl, MarkupSafe, idna, click, charset-normalizer, certifi, cachetools, blinker, attrs, requests, referencing, python-dateutil, pyarrow, markdown-it-py, jinja2, gitdb, rich, pydeck, pandas, jsonschema-specifications, gitpython, jsonschema, altair, streamlit
1:46:07 PM my-streamlit-app: [17:46:05+0000] Successfully installed MarkupSafe-2.1.5 altair-5.3.0 attrs-23.2.0 blinker-1.7.0 cachetools-5.3.3 certifi-2024.2.2 charset-normalizer-3.3.2 click-8.1.7 gitdb-4.0.11 gitpython-3.1.43 idna-3.7 jinja2-3.1.3 jsonschema-4.21.1 jsonschema-specifications-2023.12.1 markdown-it-py-3.0.0 mdurl-0.1.2 numpy-1.26.4 packaging-24.0 pandas-2.2.2 pillow-10.3.0 protobuf-4.25.3 pyarrow-15.0.2 pydeck-0.8.1b0 pygments-2.17.2 python-dateutil-2.9.0.post0 pytz-2024.1 referencing-0.34.0 requests-2.31.0 rich-13.7.1 rpds-py-0.18.0 six-1.16.0 smmap-5.0.1 streamlit-1.33.0 tenacity-8.2.3 toml-0.10.2 toolz-0.12.1 tornado-6.4 typing-extensions-4.11.0 tzdata-2024.1 urllib3-2.2.1 watchdog-4.0.0
1:46:07 PM my-streamlit-app: Not a vso image, so not writing build commands
1:46:07 PM my-streamlit-app: Preparing output...
1:46:07 PM my-streamlit-app: Copying files to destination directory '/tmp/_preCompressedDestinationDir'...
1:46:08 PM my-streamlit-app: Done in 3 sec(s).
1:46:08 PM my-streamlit-app: Compressing content of directory '/tmp/_preCompressedDestinationDir'...
1:46:28 PM my-streamlit-app: Copied the compressed output to '/home/site/wwwroot'
1:46:28 PM my-streamlit-app: Removing existing manifest file
1:46:28 PM my-streamlit-app: Creating a manifest file...
1:46:28 PM my-streamlit-app: Manifest file created.
1:46:28 PM my-streamlit-app: Copying .ostype to manifest output directory.
1:46:28 PM my-streamlit-app: Done in 54 sec(s).
1:46:28 PM my-streamlit-app: Running post deployment command(s)...
1:46:28 PM my-streamlit-app: Generating summary of Oryx build
1:46:28 PM my-streamlit-app: Parsing the build logs
1:46:28 PM my-streamlit-app: Found 0 issue(s)
1:46:28 PM my-streamlit-app: Build Summary :
1:46:28 PM my-streamlit-app: ===============
1:46:28 PM my-streamlit-app: Errors (0)
1:46:29 PM my-streamlit-app: Warnings (0)
1:46:29 PM my-streamlit-app: Triggering recycle (preview mode disabled).
1:46:29 PM my-streamlit-app: Deployment successful. deployer = deploymentPath =
1:46:41 PM: Deployment to "my-streamlit-app" completed.
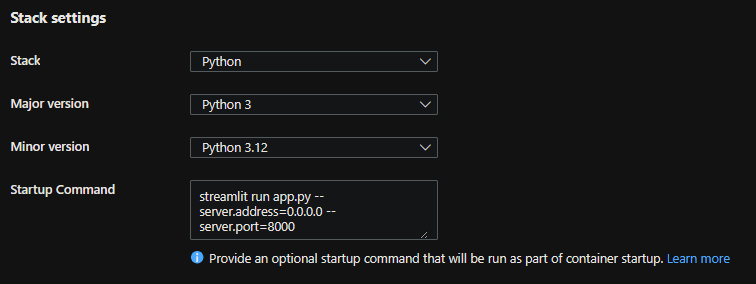
- Gunicorn is the default WSGI server used to run Python applications on Azure App Service unless otherwise specified. See this documentation as well. Because of that, we need to change our startup command - because otherwise this container will immediately fail with the following:
Failed to find attribute 'app' in 'app'
Update the startup command to server.address=0.0.0.0 --server.port=8000.
- We set
server.address=0.0.0.0to listen on all addresses. otherwise, if only usingstreamlit runthis will listen on localhost - We set
--server.port=8000because this image exposes port 8000 by default. Streamlit listens on8501by default. You can however omit this only if you then use the App SettingPORTwith a value of8051
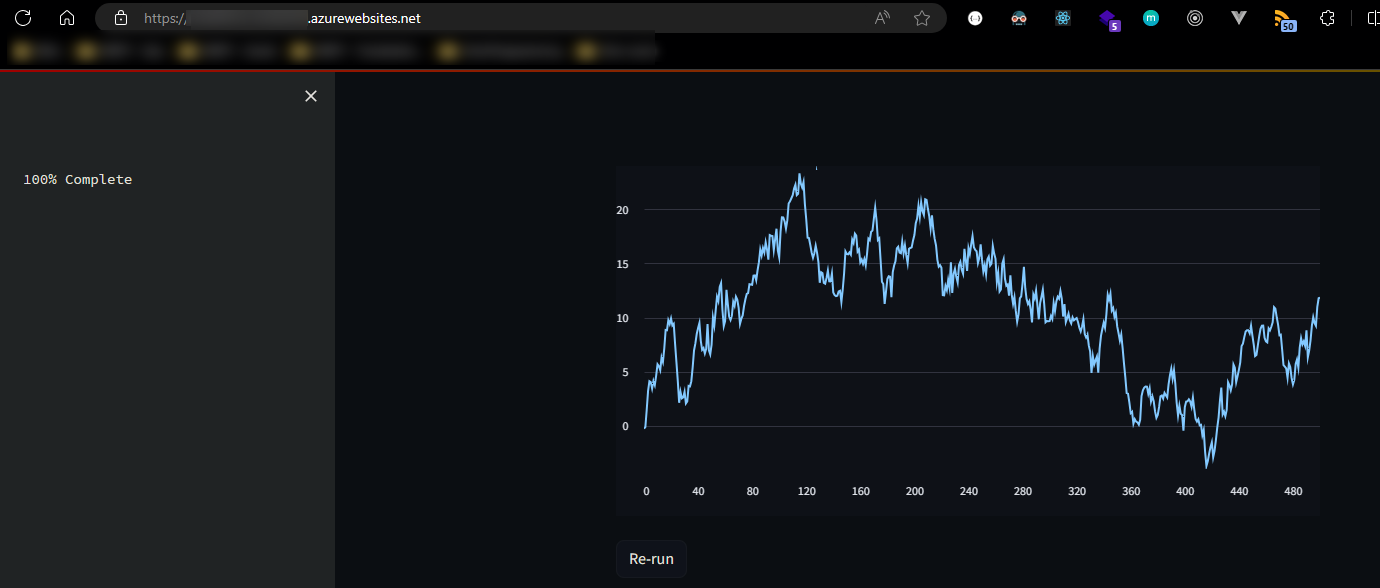
- At this point, you should be able to access the application:
GitHub Actions
You can quickly get started with GitHub Actions by using the App Service Deployment Center. This will automatically generate a workflow file based on your application stack and commit it to your GitHub repository under .github. You can deploy a workflow manually using a publish profile or service principal, as well.
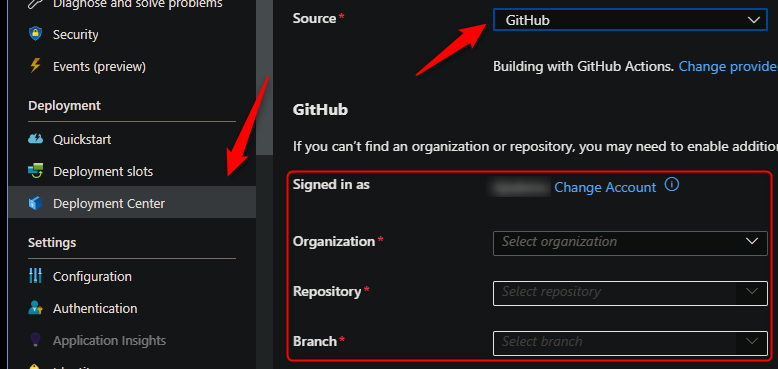
NOTE: If you have numerous repositories that appear in the dropdown, you can search by typing within the text field/dropdown.
You can find more details about these steps documented here:
Below is the yaml file generated after setting up Github Actions (using the “User Identity” option in Deployment Center) - with the extra addition of the startup-command property under azure/webapps-deploy@v2. We manually add that in the below template to avoid our application failing upon startup.
name: Build and deploy Python app to Azure Web App - my-streamlit

on:
  push:
    branches:
      - main
  workflow_dispatch:

jobs:
  build:
    runs-on: ubuntu-latest

    steps:
      - uses: actions/checkout@v4

      - name: Set up Python version
        uses: actions/setup-python@v1
        with:
          python-version: '3.12'

      - name: Create and start virtual environment
        run: |
          python -m venv venv
          source venv/bin/activate

      - name: Install dependencies
        run: pip install -r requirements.txt

      # Optional: Add step to run tests here (PyTest, Django test suites, etc.)

      - name: Zip artifact for deployment
        run: zip release.zip ./* -r

      - name: Upload artifact for deployment jobs
        uses: actions/upload-artifact@v3
        with:
          name: python-app
          path: |
            release.zip
            !venv/

  deploy:
    runs-on: ubuntu-latest
    needs: build
    environment:
      name: 'Production'
      url: ${{ steps.deploy-to-webapp.outputs.webapp-url }}
    permissions:
      id-token: write #This is required for requesting the JWT

    steps:
      - name: Download artifact from build job
        uses: actions/download-artifact@v3
        with:
          name: python-app

      - name: Unzip artifact for deployment
        run: unzip release.zip


      - name: Login to Azure
        uses: azure/login@v1
        with:
          client-id: ${{ secrets.AZUREAPPSERVICE_CLIENTID_000000000000000000000000000}}
          tenant-id: ${{ secrets.AZUREAPPSERVICE_TENANTID_0000000000000000000000000000 }}
          subscription-id: ${{ secrets.AZUREAPPSERVICE_SUBSCRIPTIONID_00000000000000000000000 }}

      - name: 'Deploy to Azure Web App'
        uses: azure/webapps-deploy@v2
        id: deploy-to-webapp
        with:
          app-name: 'my-streamlit'
          slot-name: 'Production'
          startup-command: 'streamlit run app.py --server.address=0.0.0.0 --server.port=8000'
If desired, you can pass in a specific package name in the azure/webapps-deploy@v2 task - the package being the zip from earlier in the pipeline:
- name: 'Deploy to Azure Web App'
  uses: azure/webapps-deploy@v2
  id: deploy-to-webapp
  with:
    app-name: 'yoursitenamehere'
    slot-name: 'Production'
    package: release.zip
    startup-command: 'streamlit run app.py --server.address=0.0.0.0 --server.port=8000'
If wanting to use a publish profile instead, follow this, and use the below in your .yaml:
- name: 'Deploy to Azure Web App'
  uses: azure/webapps-deploy@v2
  id: deploy-to-webapp
  with:
    app-name: 'yoursitenamehere'
    slot-name: 'Production'
    package: release.zip
    publish-profile: ${{ secrets.AZUREAPPSERVICE_PUBLISHPROFILE_000000000000000000000000000 }}
    startup-command: 'streamlit run app.py --server.address=0.0.0.0 --server.port=8000'
Below is the output we’d see in the ‘Actions’ tab on Github after setting up Actions and pushing a new commit to trigger a deployment.

Azure DevOps
You can use Azure Pipelines to build your Streamlit application. For Streamlit apps, you can still use your typical pip and python based commands. You can review more details here: YAML Pipeline explained.
Here is an example on how to implement Azure Pipelines with App Service Linux.
- Create a new DevOps project then go to
Pipelinesand selectCreate Pipeline. - Select your code repository.
- Select
Python to Linux Web App on Azuretemplate. - Select the web app where you will deploy.
- A default pipeline
.yamldefinition will be generated:-
Make sure your Python version matches the App Service Python version. The default yaml for the Python App Service template will have a variable named
pythonVersion(seen below) set towards the top of the file. Change this as needed.# Python version: 3.12 pythonVersion: '3.12'It’s then included in the UsePythonVersion@0 task
- task: UsePythonVersion@0 inputs: versionSpec: '$(pythonVersion)' displayName: 'Use Python $(pythonVersion)' -
If desired you can change the startup command via the
AzureWebApp@1Deployment task- task: AzureWebApp@1 displayName: 'Deploy Azure Web App : yourwebappname' inputs: azureSubscription: $(azureServiceConnectionId) appName: $(webAppName) appType: webAppLinux package: $(Pipeline.Workspace)/drop/$(Build.BuildId).zip startUpCommand: 'streamlit run app.py --server.address=0.0.0.0 --server.port=8000'
-
NOTE: To avoid any definition errors in the yaml, add the property
appTypeset towebAppLinuxas seen in the above task.
- Save and
runthe pipeline.
Here is an example with recommendations:
trigger:
- main
variables:
# Azure Resource Manager connection created during pipeline creation
azureServiceConnectionId: '0000000-0000-0000-0000-00000000'
# Web app name
webAppName: 'yourwebappname'
# Agent VM image name
vmImageName: 'ubuntu-latest'
# Environment name
environmentName: 'yourwebappname'
# Project root folder. Point to the folder containing manage.py file.
projectRoot: $(System.DefaultWorkingDirectory)
      # Python version: 3.12
      pythonVersion: '3.12'
stages:
- stage: Build
displayName: Build stage
jobs:
- job: BuildJob
pool:
vmImage: $(vmImageName)
steps:
    - task: UsePythonVersion@0
      inputs:
        versionSpec: '$(pythonVersion)'
      displayName: 'Use Python $(pythonVersion)'
- script: |
python -m venv antenv
source antenv/bin/activate
python -m pip install --upgrade pip
pip install setup
pip install -r requirements.txt
workingDirectory: $(projectRoot)
displayName: "Install requirements"
- task: ArchiveFiles@2
displayName: 'Archive files'
inputs:
rootFolderOrFile: '$(projectRoot)'
includeRootFolder: false
archiveType: zip
archiveFile: $(Build.ArtifactStagingDirectory)/$(Build.BuildId).zip
replaceExistingArchive: true
- upload: $(Build.ArtifactStagingDirectory)/$(Build.BuildId).zip
displayName: 'Upload package'
artifact: drop
- stage: Deploy
displayName: 'Deploy Web App'
dependsOn: Build
condition: succeeded()
jobs:
- deployment: DeploymentJob
pool:
vmImage: $(vmImageName)
environment: $(environmentName)
strategy:
runOnce:
deploy:
steps:
- task: UsePythonVersion@0
inputs:
versionSpec: '$(pythonVersion)'
displayName: 'Use Python version'
    - task: AzureWebApp@1
      displayName: 'Deploy Azure Web App : yourwebappname'
      inputs:
        azureSubscription: $(azureServiceConnectionId)
        appName: $(webAppName)
        appType: webAppLinux
        package: $(Pipeline.Workspace)/drop/$(Build.BuildId).zip
        startUpCommand: 'streamlit run app.py --server.address=0.0.0.0 --server.port=8000'
NOTE: Depending on how you set up your pipeline, you may have to authorize permission for deployment. This is a one-time task, below is a screenshot of what you may see:


Troubleshooting
NOTE: Any of the below scenarios would show “Application Error :(“ when browsing your App Service. Make sure you have App Service Logs enabled or else troubleshooting these issues will take more time. Review how to enable App Service Logs here.
Container Doesn’t Start
-
ModuleNotFoundError: No module named ‘somemodulename’.
ThisModuleNotFounderror may happen in a few different scenarios, for example:Scenario: Using ZipDeploy without the
SCM_DO_BUILD_DURING_DEPLOYMENTset totrueAppSetting explained earlier in this article.- Resolution: If using ZipDeploy, make sure
SCM_DO_BUILD_DURING_DEPLOYMENTis set totrue. Or else Oryx may not build out the application, which wouldn’t runpip install- thus causing this error.
Scenario: Missing package within the
requirements.txt:- Resolution: Ensure the missing package in the
ModuleNotFounderror is actually added in yourrequirements.txtwith its appropriate name.
- Resolution: If using ZipDeploy, make sure
Requirements.txt or .py files not found during deployment
Scenario: When deploying from you may see a Could not find setup.py or requirements.txt; Not running pip install:
-
Resolution: Make sure you
cdinto the correct project folder. For example, there is a chance that the deployment was done from a parent directory that contains your project folder. Make sure you are in the project folder containing your.pyfiles,requirements.txt, etc.:parentfolder/ myproject/ app.py requirements.txt .gitignoreNOTE: This may also manifest as by showing the default Azure App Service ‘splash’/welcome page and the following message in logging:
No framework detected; using default app from /opt/defaultsite
Container timeout
Streamlit defaults to listening on localhost and 8051 - for example, if you use streamlit run app.py. You’d see the below in default_docker.log - implying this is only listening on the IP of the container:
  You can now view your Streamlit app in your browser.
  Network URL: http://169.254.129.3:8501
  External URL: http://172.171.169.83:8501
The Python “Blessed” image, by default, exposes port 8000.
For a successful startup - you’d need to change the startup command to streamlit run app.py --server.address=0.0.0.0 --server.port=8000
You could alternatively add the PORT App Setting to 8051 and instead use the startup command of streamlit run app.py --server.address=0.0.0.0
You’d then see the URI change to the below in default_docker.log:
You can now view your Streamlit app in your browser.
URL: http://0.0.0.0:8000
Failed to find attribute ‘app’ in ‘app’.
By default, Gunicorn is used if it detects what is listed here. Since Tornado is used by Streamlit (mentioned above), this is going to fail since Gunicorn won’t be able to find a wSGI callable.
This will appear in App Service Logs/log stream/Diagnose and Solve Problems as:
Failed to find attribute 'app' in 'app'
Change to using the startup command defined above in the “Container timeout” section.
Error: Invalid value: File does not exist: /home/site/wwwroot/app.py
Note, this error could present itself as Error: Invalid value: File does not exist: /home/site/wwwroot/[some_entrypoint].py where [some_entrypoint].py is the app entrypoint like index.py, app.py, etc. when using a startup command like streamlit run /home/site/wwwroot/app.py
If Oryx is used - then $APP_PATH is used (see APP_PATH - Python build changes) - which means site contents is extracted from output.tar.gz under /home/site/wwwroot to /tmp/[uid]
To be safe, in cases where both OryxBuilder or BasicBuilder (BasicBuilder deploys to wwwroot, not APP_PATH) may be used - set the .py file in the streamlit run command to be relative, eg:
streamlit run app.py --server.address=0.0.0.0 --server.port=8000streamlit run index.py --server.address=0.0.0.0 --server.port=8000
Slowness - resource contention
Since Streamlit is data driven - there may be scenarios where an application is doing heavy data processing or has long running database queries.
Reminders:
- Idle TCP connections have a 4 minute timeout (non-configurable)
- Python is single threaded. However, scaling up can be done if a more powerful processor is needed
Use Diagnose and Solve Problems or the Metrics Blade to review if high memory or high CPU is occurring.
Large files being read in under /home may see I/O slowness. However, if Oryx is used and APP_PATH contains the deployed contents, this should negate typical I/O issues over persistent file share mounts like /home or with BYOS.
Streamlit caching is an approach recommended by Streamlit to help avoid expensive operations. This should heavily be considered if not already used. Further information on various cache usage can be found in the Cache - Overview documentation for Streamlit.
Additionally, using the profilers should be utilized if trying to narrow down where a piece of code may be consuming CPU time or memory. The blog Container Apps: Profiling Python applications for performance issues as an example of how to do this. Even though that post is targeted towards Container Apps - the same overall concept applies on App Service.
Websockets
Websockets are used by Streamlit and Tornado to help serve active content or changes. There have been scenarios seen where custom networking (or things like corpnets, VPNs) block the web socket connection from a users browser. Which may break the application.
This should be taken into consideration when troubleshooting.
Error: Couldn’t detect a version for the platform ‘python’ in the repo.
This would happen during the deployment phase on either Github Actions or Azure Devops. Ensure the following:
- The project structure matches is defined here
- If using a .zip (such as in GitHub Actions), ensure the zip if unzipped first (if not using the
packageproperty) - or - if using thepackageproperty, pass the correct zip name with the appropriate project structure
‘No module named streamlit’ or ‘streamlit: command not found’
Further troubleshooting of this can be followed in this blog: Python on Linux App Service and ModuleNotFoundError.
Essentially, if streamlit is not in requirements.txt - or - improper deployment was done (eg. not following what’s in the above blog post) then streamlit won’t be accessible via site-packages or it wouldn’t have been installed in the first place.
Additionally, avoid installing streamlit in a “Startup command” - this should be limited to deployment (build-time). See Python on App Service Linux and why to avoid installing packages on startup


