Configuring datasources with JBoss EAP on App Service Linux
This post will cover how to add datasources through JBoss to connect your application to external databases.
Overview
This post will expand on the Configure Java Apps - JBoss EAP Data Sources documentation.
JBoss offered on App Service Linux is a managed offering currently targeting JBoss 8.0.9.1 EAP. You can utilize custom startup scripts to run various JBoss CLI commands - and in this case - using them to set up datasources to connect to external databases.
Prerequisites
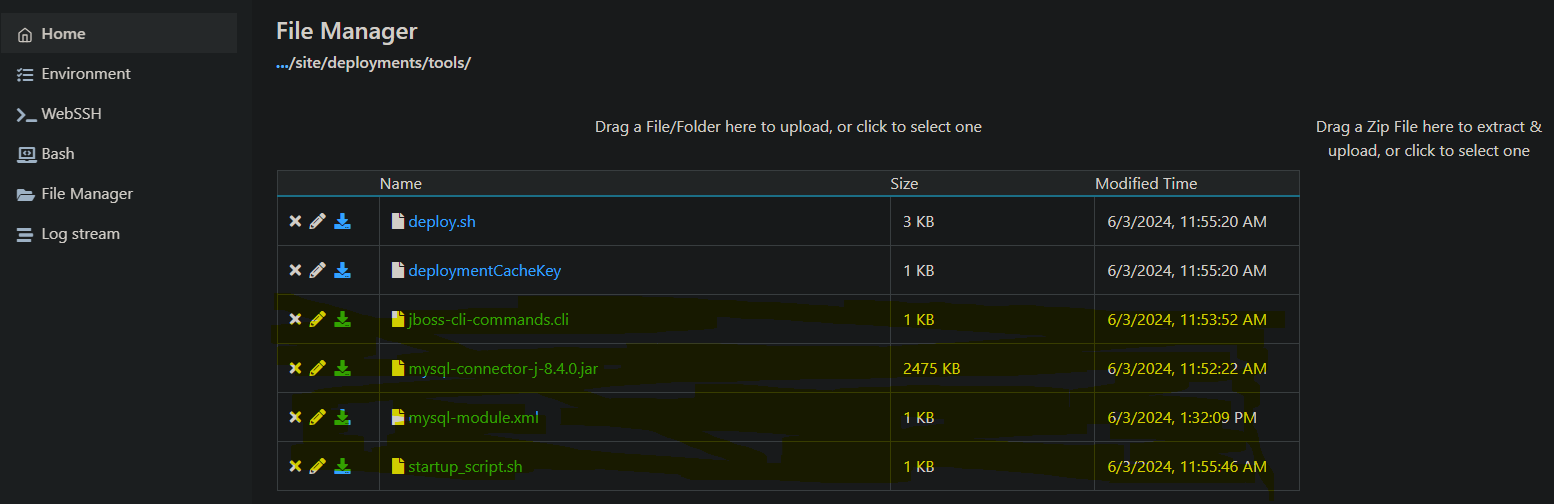
To use datasources, you need to create the following files, at a minimum, and place them under /home.
- An
xmlfile for the data source module - The
.jarfor the driver - A file containing JBoss CLI commands to add the datasource
- A startup script to execute the file containing the JBoss CLI commands
For simplicitly, you can use FTP or https://yoursite.scm.azurewebsites.net/newui/fileManager to add these files. For consistency, we’ll add them to /home/site/deployments/tools in this post. Below is an example of what the file system would look like - in this case, we added a .jar for a MySQL driver and datasource.
jboss-cli-commands.cliis the file containing JBoss CLI commands to add the datasource. This can be arbitrarily named.mysql-connector-j-8.4.0.jarhappens to be the.jarfor the driver we’re using. This will vary depending on what database you want to connect to.mysql-module.xmlis thexmlfile for the data source module. This can be arbitrarily named.startup_scriptis the script to execute the file containing the JBoss CLI commands. This can be arbitrarily named.
NOTE: Ignore the non-highlighted files
Also, ensure App Service Logs are enabled. Click here on how to do this. If these are not enabled (which is written to /home/LogFiles/YYYY_MM_DD_ln0xxxxxxxxx_default_docker.log), you will not be able to see why your application potentially failed to start up. Which can signifantly increase troubleshooting time. You can view this stdout / err through:
- Azure Portal: Diagnose and Solve Problems -> Application Logs
- Azure Portal: Logstream
- Kudu:
https://yoursite.scm.azurewebsites.net/newui/fileManager - FTP
- etc.
Explicitly configuring datasources
Postgres
Everything below assumes this is stored under /home/site/deployments/tools
-
First, download the driver .jarfrom here - [DownloadpgJDBC](https://jdbc.postgresql.org/download/). Select the option to “download” for Java 8 (which means Java 8 or newer). Add this to /home/site/deployments/tools - Create a module
.xmlfile - we’ll name thispostgresql-module.xmlwith the following contents:
<?xml version="1.0" ?>
<module xmlns="urn:jboss:module:1.1" name="org.postgres">
    <resources>
    <!-- ***** IMPORTANT : REPLACE THIS PLACEHOLDER *******-->
    <!-- ***** NOTE : If this doesn't match the location we add the .jar to on the filesystem, it will throw `WFLYJCA0041: Failed to load module for driver [org.postgres]`*******-->
    <resource-root path="/home/site/deployments/tools/postgresql-42.7.3.jar" />
    </resources>
    <dependencies>
        <module name="javax.api"/>
        <module name="javax.transaction.api"/>
    </dependencies>
</module>
- Create a file named
jboss-cli-commands.cliwith the following content - make sure--resourcesand--module-xmlname point to the correct location of our driver jar and.xmlfile:
#!/usr/bin/env bash

module add --name=org.postgres --resources=/home/site/deployments/tools/postgresql-42.7.3.jar --module-xml=/home/site/deployments/tools/postgres-module.xml

/subsystem=datasources/jdbc-driver=postgres:add(driver-name="postgres",driver-module-name="org.postgres",driver-class-name=org.postgresql.Driver,driver-xa-datasource-class-name=org.postgresql.xa.PGXADataSource)

data-source add --name=postgresDS --driver-name=postgres --jndi-name=java:jboss/datasources/postgresDS --connection-url=${POSTGRES_CONNECTION_URL,env.POSTGRES_CONNECTION_URL:jdbc:postgresql://db:5432/postgres} --user-name=${POSTGRES_SERVER_ADMIN_FULL_NAME,env.POSTGRES_SERVER_ADMIN_FULL_NAME:postgres} --password=${POSTGRES_SERVER_ADMIN_PASSWORD,env.POSTGRES_SERVER_ADMIN_PASSWORD:example} --use-ccm=true --max-pool-size=5 --blocking-timeout-wait-millis=5000 --enabled=true --driver-class=org.postgresql.Driver --exception-sorter-class-name=org.jboss.jca.adapters.jdbc.extensions.postgres.PostgreSQLExceptionSorter --jta=true --use-java-context=true --valid-connection-checker-class-name=org.jboss.jca.adapters.jdbc.extensions.postgres.PostgreSQLValidConnectionChecker
- Create a startup script named
startup_script.shwith the following:
#!/usr/bin/env bash

echo "Entering startup_script.sh.."

$JBOSS_HOME/bin/jboss-cli.sh --connect --file=/home/site/deployments/tools/jboss-cli-commands.cli
- Add the following App Setting so
jboss-cli-commands.clihas access to our Postgres credentials:
POSTGRES_CONNECTION_URL: Your Postgres FQDN:jdbc://somedb.postgres.database.azure.com:5432/yourdatabasenamePOSTGRES_SERVER_ADMIN_FULL_NAME: Your Postgres admin login namePOSTGRES_SERVER_ADMIN_PASSWORD: Your Postgres password
-
This will be explained later, but for now, add the App Setting
WEBSITE_SKIP_AUTOCONFIGURE_DATABASEtotrue -
In the Azure portal, navigate to your App Service and find the Configuration > General settings page. Set the Startup Script field to the name and location of your startup script, for example
/home/site/deployments/tools/startup_script.sh. -
Deploy your
.waror.ear, if not done so already. In your App Service Logs, you should see that the datasource has been added:
...
2024-06-03T19:20:41.1381944Z STARTUP_FILE=/home/site/deployments/tools/startup_script.sh
2024-06-03T19:20:41.1382297Z STARTUP_COMMAND=
2024-06-03T19:20:41.1382518Z Copying /home/site/deployments/tools/startup_script.sh to /tmp/startup.sh and fixing EOL characters in /tmp/startup.sh
2024-06-03T19:20:41.1498146Z Running STARTUP_FILE: /tmp/startup.sh
2024-06-03T19:20:41.1500184Z Entering startup_script.sh..
2024-06-03T19:20:41.1513867Z dos2unix: converting file /tmp/startup.sh to Unix format...
2024-06-03T19:20:41.4243196Z Picked up JAVA_TOOL_OPTIONS: -Djava.net.preferIPv4Stack=true
2024-06-03T19:20:41.4262720Z OpenJDK 64-Bit Server VM warning: Options -Xverify:none and -noverify were deprecated in JDK 13 and will likely be removed in a future release.
2024-06-03T19:20:44.3477057Z {
2024-06-03T19:20:44.3503125Z     "outcome" => "success",
2024-06-03T19:20:44.3503440Z     "response-headers" => {"process-state" => "reload-required"}
2024-06-03T19:20:44.3503644Z }
2024-06-03T19:20:44.4394505Z process-state: reload-required
2024-06-03T19:20:44.5623269Z Finished running startup file '/tmp/startup.sh'. Exit code: '0'.
2024-06-03T19:20:44.5648299Z No STARTUP_COMMAND defined.
2024-06-03T19:20:44.5932766Z Deploying WAR/EAR applications in /home/site/wwwroot/webapps
2024-06-03T19:20:44.6013918Z ***Deploying /home/site/wwwroot/webapps/ROOT
2024-06-03T19:20:44.6031131Z /home/site/wwwroot/webapps/ROOT is a directory, so using unmanaged deployment
...
MySQL
Everything below assumes this is stored under /home/site/deployments/tools
-
First, download the driver
.jarfrom here - MySQL :: Download Connector/J. This example selected the “Platform independent” option. This will be a.zip, but if choosing Ubuntu (since these JBoss images are based on a Ubuntu distro) - you’ll need to unpackage the.debfile that’s downloaded. Add themysql-connector-j-8.4.0.jarto/home/site/deployments/tools -
Create a module
.xmlfile - we’ll name thismysql-module.xmlwith the following contents:
<?xml version="1.0" ?>
<module xmlns="urn:jboss:module:1.1" name="com.mysql">
    <resources>
    <!-- ***** IMPORTANT : REPLACE THIS PLACEHOLDER *******-->
    <!-- ***** NOTE : If this doesn't match the location we add the .jar to on the filesystem, it will throw `WFLYJCA0041: Failed to load module for driver [com.mysql]`*******-->
    <resource-root path="/home/site/deployments/tools/mysql-connector-j-8.4.0.jar" />
    </resources>
    <dependencies>
        <module name="javax.api"/>
        <module name="javax.transaction.api"/>
    </dependencies>
</module>
- Create a file named
jboss-cli-commands.cliwith the following content - make sure--resourcesand--module-xmlname point to the correct location of our driver jar and.xmlfile:
#!/usr/bin/env bash

module add --name=com.mysql --resources=/home/site/deployments/tools/mysql-connector-j-8.4.0.jar --module-xml=/home/site/deployments/tools/mysql-module.xml

/subsystem=datasources/jdbc-driver=mysql:add(driver-name=mysql,driver-module-name=com.mysql,driver-class-name=com.mysql.Driver,driver-class-name=com.mysql.cj.jdbc.Driver)

data-source add --name=mysqlDS --driver-name=mysql --jndi-name=java:jboss/datasources/mysqlDS --connection-url=${MYSQL_CONNECTION_URL,env.MYSQL_CONNECTION_URL:jdbc:mysql://db:5432/mysql} --user-name=${MYSQL_SERVER_ADMIN_FULL_NAME,env.MYSQL_SERVER_ADMIN_FULL_NAME:mysql} --password=${MYSQL_SERVER_ADMIN_PASSWORD,env.MYSQL_SERVER_ADMIN_PASSWORD:example} --use-ccm=true --max-pool-size=5 --blocking-timeout-wait-millis=5000 --enabled=true --driver-class=com.mysql.cj.jdbc.Driver --exception-sorter-class-name=com.mysql.cj.jdbc.integration.jboss.ExtendedMysqlExceptionSorter --jta=true --use-java-context=true
- Create a startup script named
startup_script.shwith the following:
#!/usr/bin/env bash

echo "Entering startup_script.sh.."

$JBOSS_HOME/bin/jboss-cli.sh --connect --file=/home/site/deployments/tools/jboss-cli-commands.cli
- Add the following App Setting so
jboss-cli-commands.clihas access to our Postgres credentials:
MYSQL_CONNECTION_URL: Your MySQL connection string as follows:jdbc:mysql://somemysql.mysql.database.azure.com:3306/yourdatabasenameMYSQL_SERVER_ADMIN_FULL_NAME: Your MySQL admin login nameMYSQL_SERVER_ADMIN_PASSWORD: Your MySQL password
-
This will be explained later, but for now, add the App Setting
WEBSITE_SKIP_AUTOCONFIGURE_DATABASEtotrue -
Deploy your
.waror.ear, if not done so already. In your App Service Logs, you should see that the datasource has been added
SQL Server
Everything below assumes this is stored under /home/site/deployments/tools
-
First, download the driver
.jarfrom here - Download - JDBC Driver for SQL Server. The jar file withjre8supports Java 8 and the jar file withjre11supports Java 11 and up. -
Create a module
.xmlfile - we’ll name thissqlserver-module.xmlwith the following contents:
<?xml version="1.0" ?>
<module xmlns="urn:jboss:module:1.1" name="com.microsoft">
    <resources>
    <!-- ***** IMPORTANT : REPLACE THIS PLACEHOLDER *******-->
    <!-- ***** NOTE : If this doesn't match the location we add the .jar to on the filesystem, it will throw `WFLYJCA0041: Failed to load module for driver [com.microsoft]`*******-->
    <resource-root path="/opt/jboss/wildfly/modules/mssql-jdbc-12.6.2.jre11.jar" />
    </resources>
    <dependencies>
        <module name="javax.api"/>
        <module name="javax.transaction.api"/>
    </dependencies>
</module>
- Create a file named
jboss-cli-commands.cliwith the following content - make sure--resourcesand--module-xmlname point to the correct location of our driver jar and.xmlfile:
module add --name=com.microsoft --resources=/home/site/deployments/tools/mssql-jdbc-12.6.2.jre11.jar --module-xml=/home/site/deployments/tools/sqlserver-module.xml

/subsystem=datasources/jdbc-driver=sqlserver:add(driver-name=sqlserver,driver-module-name=com.microsoft,driver-class-name=com.microsoft.sqlserver.jdbc.SQLServerDriver,driver-xa-datasource-class-name=com.microsoft.sqlserver.jdbc.SQLServerXADataSource)

data-source add --name=sqlDS --jndi-name=java:jboss/datasources/sqlDS --driver-name=sqlserver --connection-url=${SQL_SERVER_CONNECTION_URL,env.SQL_SERVER_CONNECTION_URL:jdbc:sqlserver://db:1433/sqlserver} --user-name=${SQL_SERVER_ADMIN_FULL_NAME,env.SQL_SERVER_ADMIN_FULL_NAME:sqlserver} --password=${SQL_SERVER_ADMIN_PASSWORD,env.SQL_SERVER_ADMIN_PASSWORD:example} --validate-on-match=true --background-validation=false --valid-connection-checker-class-name=org.jboss.jca.adapters.jdbc.extensions.mssql.MSSQLValidConnectionChecker --exception-sorter-class-name=org.jboss.jca.adapters.jdbc.extensions.mssql.MSSQLExceptionSorter
- Create a startup script named
startup_script.shwith the following:
#!/usr/bin/env bash

echo "Entering startup_script.sh.."

$JBOSS_HOME/bin/jboss-cli.sh --connect --file=/home/site/deployments/tools/jboss-cli-commands.cli
- Add the following App Setting so
jboss-cli-commands.clihas access to our Postgres credentials:
SQL_SERVER_CONNECTION_URL: Your SQL connection string as follows:jdbc:sqlserver://somesql.sql.database.azure.com:3306/yourdatabasenameSQL_SERVER_ADMIN_FULL_NAME: Your SQL admin login nameSQL_SERVER_ADMIN_PASSWORD: Your SQL password
-
This will be explained later, but for now, add the App Setting
WEBSITE_SKIP_AUTOCONFIGURE_DATABASEtotrue -
In the Azure portal, navigate to your App Service and find the Configuration > General settings page. Set the Startup Script field to the name and location of your startup script, for example
/home/site/deployments/tools/startup_script.sh. -
Deploy your
.waror.ear, if not done so already. In your App Service Logs, you should see that the datasource has been added
Implicitly creating datasources (from the platform)
IMPORTANT: You can opt out of the below behavior by setting the App Setting WEBSITE_SKIP_AUTOCONFIGURE_DATABASE to true
There is helper logic in the JBoss images currently that will execute if it determines if there are the following in App Settings provided by the user:
jdbc:postgresql://jdbc:mysql://jdbc:mariadb://jdbc:oracle://jdbc:sqlserver://
This will map the connection string into a data-source that is then added into Jboss. For this to work, the App Setting containing the connection string must also contain a username and password. Like the below:
jdbc:postgresql://{your_postgres_server}.postgres.database.azure.com:5432/postgres?user={your_user}&password={your_password}&sslmode=require
You can see this behavior when App Service Logs are enabled. This will create a datasource named after the App Setting that contains the matching connections above, and then will suffix _DS to the name.
For example, if my App Setting containing the above Postgres connection string was named POSTGRES_CONNECTION_URI - the data source would be named POSTGRES_CONNECTION_URI_DS. This would show up as the following in default_docker.log:
2024-05-30T19:40:34.2005945Z [standalone@127.0.0.1:9990 /] data-source add --name=POSTGRES_CONNECTION_URL_DS --driver-name=postgresql --jndi-name=java:jboss/env/jdbc/POSTGRES_CONNECTION_URL
_DS --connection-url=${env.POSTGRES_CONNECTION_URL} --use-ccm=true --max-pool-size=5 --blocking-timeout-wait-millis=5000 --enabled=true --driver-class=org.postg
resql.Driver --exception-sorter-class-name=org.jboss.jca.adapters.jdbc.extensions.postgres.PostgreSQLExceptionSorter --jta=true --use-java-context=true --valid-
connection-checker-class-name=org.jboss.jca.adapters.jdbc.extensions.postgres.PostgreSQLValidConnectionChecker
Next, you need to target the platform generated jndi-name - which is essentially java:jboss/env/jdbc/[APP_SETTING_NAME_OF_YOUR_CONNECTION_STRING]. Currently, it seems you can only clearly find this from reviewing default_docker.log.
With the fully connection string (with username and password) added as an App Setting - and the application updated to target the platform jndi-name (seen in the ----jndi-name above), this should now work.
Runtime configuration
Java EE applications
After configuring a data source, you will need to update the JBoss configuration for your app and redeploy it. Use the following steps:
-
Open the
src/main/resources/META-INF/persistence.xmlfile for your app and find the<jta-data-source>element. Replace its contents as shown here:PostgreSQL
<jta-data-source>java:jboss/datasources/postgresDS</jta-data-source>MySQL
<jta-data-source>java:jboss/datasources/mysqlDS</jta-data-source>SQL Server
<jta-data-source>java:jboss/datasources/sqlDS</jta-data-source> -
Rebuild and redeploy your app. You can follow Quickstart: Deploy to a JBoss server on App Service Linux here if you don’t already have a defined deployment method.
Spring Boot/Java SE
For users wanting to deploy Spring Boot applications to Jboss (which needs to be done as a .war, NOT a .jar) - you can set up your application to use a JNDI data source and the spring-boot-starter-data-jpa package - which is the Java/Jakarta Persistence API.
Make sure to configure your data source as mentioned above.
- If wanting to use Spring Boot JPA - add the following to your
pom.xmlor the equivalent togradle.build. Note, it’s possible to potentially use some other relational persistence API.
<dependency>
  <groupId>org.springframework.boot</groupId>
  <artifactId>spring-boot-starter-data-jpa</artifactId>
  </dependency>
<dependency>
-
The Jboss
data-source add ..commands injboss-cli-commands.cliwe added earlier would handle the authentication portion regarding the database host URL, username, and password. -
Next, in
application.propertiesorapplication.yaml, undersrc/main/resources, add the following - which is based on the ways we added the data sources earlier above:
# for postgres
spring.datasource.jndi-name=java:jboss/datasources/postgresDS
# for mysql
# spring.datasource.jndi-name=java:jboss/datasources/mysqlDS
# for sql
# spring.datasource.jndi-name=java:jboss/datasources/sqlDS

# disable schema generation from Hibernate
spring.jpa.hibernate.ddl-auto=none
The spring.datasource.jndi-name needs to match the --jndi-name flag in the data-source add.. command in jboss-cli-commands.cli
Troubleshooting
WFLYJCA0041: Failed to load module for driver [org.somedriver]
The error will depend on the database driver you’re using, for example:
`WFLYJCA0041: Failed to load module for driver [org.postgres]`
This will happen if the <resource-root path="/path/to/database_driver.jar" /> in your module.xml does not actually contain the .jar
Ensure the database .jar exists under the absolute path specific in the resource-root XML element in module.xml.
org.springframework.jdbc.datasource.lookup.DataSourceLookupFailureException
org.springframework.jdbc.datasource.lookup.DataSourceLookupFailureException: Failed to look up JNDI DataSource with name 'java:jboss/datasources/[somedatasource]'; nested exception is javax.naming.NameNotFoundException: datasources/postgresDS -- service jboss.naming.context.java.jboss.datasources.postgresDS
Review the entirety of the startup logging and exception. This could happen due to various reasons. If the datasource fails to be added, then the datasource via jndi-name would not be available to the application.
If the datasource is failed to be added, something like this will show in default_docker.log:
2024-05-30T17:52:00.6548749Z {"WFLYCTL0062: Composite operation failed and was rolled back. Steps that failed:" => {"Operation step-1" => "WFLYCTL0xxx: Some failure reason [
2024-05-30T17:52:00.6577941Z     (\"subsystem\" => \"datasources\"),
2024-05-30T17:52:00.6578384Z     (\"data-source\" => \"somedatasource\")
2024-05-30T17:52:00.6578645Z ]"}}
If the datasource does get successfully added, typically it will show the below in default_docker.log:
2024-05-30T17:51:55.0464000Z [standalone@127.0.0.1:9990 / ...]   /subsystem=datasources/jdbc-driver=postgresql:add(driver-name=postgresql,driver-module-name=postgresql,driver-class-name=org
.postgresql.Driver,driver-xa-datasource-class-name=org.postgresql.xa.PGXADataSource)
2024-05-30T17:51:55.0598713Z [standalone@127.0.0.1:9990 / ...] end-if
2024-05-30T17:51:56.6518554Z {
2024-05-30T17:51:56.6561028Z     "outcome" => "success",
2024-05-30T17:51:56.6561484Z     "response-headers" => {"process-state" => "reload-required"}
2024-05-30T17:51:56.6561803Z }
NOTE: The above example is using Postgres, so the driver will vary depending on what the customer is using
This can happen if the datasource is implicitly being created and a an application is referencing the wrong --jndi-name - see the Implicitly creating datasources (from the platform) section above
“Red Hat landing page” or “404 not found” page
If either of these show - review the applications stdour / err through default_docker.log (review the “Prerequisites” section above)
This means the application has encountered some type of fatal error. Ensuring that App Service Logs are enabled will help troubleshoot this further
In default_docker.log - you can also get an idea if your startup script or file was successfully executed. Essentially, if exit code is not zero (0) - then this is a failure, and will potentially impact your application - depending on what is being done here. Below is an example:
2024-06-03T22:01:38.5976006Z STARTUP_FILE=
2024-06-03T22:01:38.5990623Z STARTUP_COMMAND=/home/site/deployments/tools/startup_script
2024-06-03T22:01:38.5990896Z No STARTUP_FILE available.
2024-06-03T22:01:38.5991064Z Running STARTUP_COMMAND: /home/site/deployments/tools/startup_script
2024-06-03T22:01:38.6043174Z Finished running startup file '/home/site/deployments/tools/startup_script'. Exit code: '127'.
2024-06-03T22:01:38.6053893Z /bin/appservice_helper.sh: line 122: /home/site/deployments/tools/startup_script: No such file or directory
If it was successful, you’d see something like this - note the exit code of 0:
2024-06-03T22:03:23.2042874Z STARTUP_FILE=/home/site/deployments/tools/startup_script.sh
2024-06-03T22:03:23.2056192Z STARTUP_COMMAND=
2024-06-03T22:03:23.2056460Z Copying /home/site/deployments/tools/startup_script.sh to /tmp/startup.sh and fixing EOL characters in /tmp/startup.sh
2024-06-03T22:03:23.2511911Z dos2unix: converting file /tmp/startup.sh to Unix format...
2024-06-03T22:03:23.2534282Z Running STARTUP_FILE: /tmp/startup.sh
2024-06-03T22:03:23.2552254Z Entering startup_script.sh..
2024-06-03T22:03:23.4003440Z Picked up JAVA_TOOL_OPTIONS: -Djava.net.preferIPv4Stack=true
2024-06-03T22:03:23.4023311Z OpenJDK 64-Bit Server VM warning: Options -Xverify:none and -noverify were deprecated in JDK 13 and will likely be removed in a future release.
2024-06-03T22:03:26.0454632Z {
2024-06-03T22:03:26.0472406Z     "outcome" => "success",
2024-06-03T22:03:26.0472708Z     "response-headers" => {"process-state" => "reload-required"}
2024-06-03T22:03:26.0472889Z }
2024-06-03T22:03:26.3624104Z Picked up JAVA_TOOL_OPTIONS: -Djava.net.preferIPv4Stack=true
2024-06-03T22:03:26.3625227Z OpenJDK 64-Bit Server VM warning: Options -Xverify:none and -noverify were deprecated in JDK 13 and will likely be removed in a future release.
2024-06-03T22:03:27.0064208Z process-state: reload-required
2024-06-03T22:03:27.0065040Z Finished running startup file '/tmp/startup.sh'. Exit code: '0'.


