NodeJS with Keep-Alives and Connection Reuse
This post will be an overview of how to implement connection reuse on Azure with Node.js. By default, Node.js doesn’t reuse connections - and in terms of Azure and the way SNAT (Source Network Address Translation) works, we can effectively exhaust all of our available SNAT ports quickly if they’re not being reused.
SNAT overview and recap
We won’t deep dive into SNAT itself as this is covered in multiple areas, such as:
- SNAT with App Service - this is a great in-depth read and highly recommended.
- SNAT and outbound connections
- Azure SNAT
But in short, there are 128 (or 160, depending on the algorithm) SNAT ports allocated per instance (Instance, meaning the underlying Virtual Machine(s)). Multiple applications on one instance would share these ports. Per TCP flow, one port is consumed. There is a possibility more than 128 ports can be allocated - however this is on a ‘best effort’ basis and the recommended usage would be to use at most 128 SNAT ports since this is guaranteed. These numbers cannot be changed, as this is generally fixed at the Stamp level.
SNAT port exhaustion
Speaking in terms of Node.js, when SNAT port exhaustion occurs it can manifest in a few different ways:
- Application slowness. Some requests may seem to finish quickly, while others take an abnormal amount of time. Others may consistently time out at the 240 second mark (the ‘Front Ends’ (Load Balancer) configured timeout limit for HTTP requests).
-
DNS lookup errors or general TCP wrap errors thrown and/or written to stderr. Depending on the library, such as if using
axios, if the whole exception is written to stderr - the error would be more obvious as the exception body would show this is related toTCP timeout.Some errors in stderr may look like:
Error: connect ETIMEDOUT <someIPAddress:port> at TCPConnectWrap.afterConnect [as oncomplete] (node:net:1146:16) - Increase in CPU. If SNAT port exhaustion starts occurring, CPU increase may occur while these requests wait to finish execution. This may be more promiment in CPU intensive tasks.
- Other general application instability showing in the HTTP 5xx range (possibly HTTP 500’s, but more likely HTTP 502 - 504’s.)
When port exhaustion occurs and the 128 (or 160) ports allocated (per instance) are exhausted, any new connections that intend to use a SNAT port will have to wait for an existing port in use to be freed and released.
NOTE: It is always good to try and confirm if the HTTP 5xx status code range is actually related to SNAT first, if you think SNAT is the issue. As a 5xx status code range could be indicative of numerous other issues.
Common request flows for SNAT to occur would be an application (our Node based App Service in this case) connecting outbound over the public internet to either another App Service (a REST API flow for instance) or to a 3rd party API, amongst others.
NOTE: External endpoints that respond slow can also potentially cause SNAT issues. In these cases it’s always good to verify if the endpoint you’re calling is responding appropriately to avoid troubleshooting down the wrong path.
Troubleshooting tools
On Azure App Service - there is a few ways to determine if you’re encountering SNAT port exhaustion.
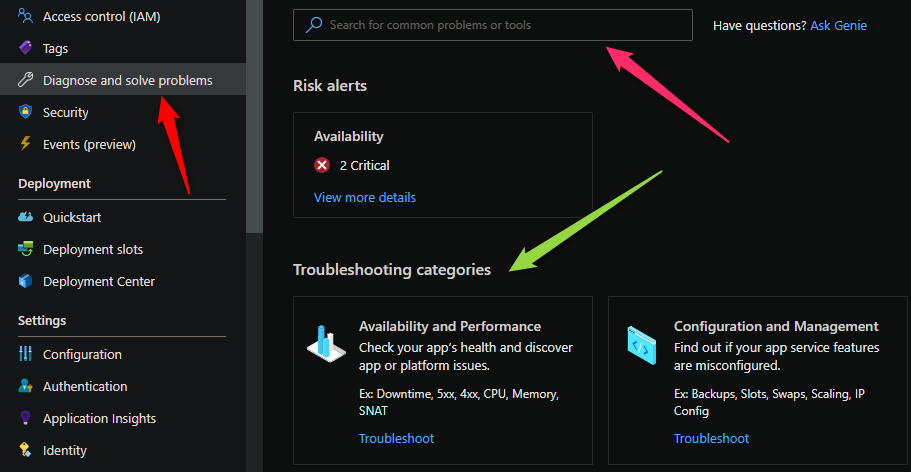
Diagnose and Solve Problems - Diagnose and Solve Problems can be a useful tool with the many detectors it offers. For both Linux and Windows App Services there is a few detectors we can use that will be helpful. You can additionally search by Detector name or click into the Troubleshooting categories section to search by category below.
-
SNAT Failed Connections Endpoint: This detector logically tries to determine specific endpoints that this application may be connecting to that is associated with SNAT port exhaustion.
-
SNAT Port Exhaustion: This detector will show how many ports are in use per-instance and will call out when exhaustion is occurring or potentially close.
NOTE: Depending on how keep-alives are set up for your application, a ‘warning’ may appear about port exhaustion being ‘close’ to happening. If you’re consistently using up to 128 or 160 ports, this warning may show - but is also no cause for alarm if application logic is configured to NOT use any further number than this socket wise.
-
Application Logs: This detector does what the name implies and shows Application (and platform) logs. In our case, we want to see Application Logs specifically to see if any stderr was written about connection timeouts (if applicable to the application).
-
Web App Slow(or Linux Web App Slow): Both detectors, depending on OS, will show slowness percentile. Which can also be correlated with SNAT if needed.
Overview Blade: The overview blade also offers other metrics to determine if SNAT is occurring, for example - a few useful metrics might be the:
- Http 5xx graph:

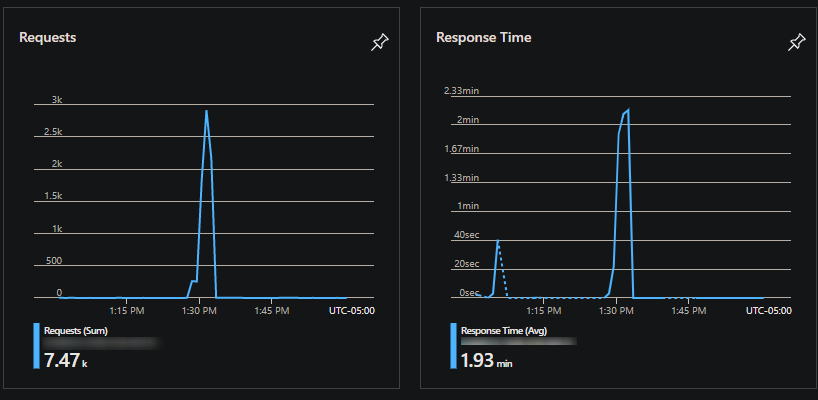
- Requests graph and Response time graph:
Network traces: To additionally confirm whether or not a connection is being reused, such as if you’re unsure after implementing any below proposed solutions - a network trace can be captured and reviewed. On Windows, in the Diagnose and Solve Problems blade there is a detector for Collect Network Trace. These can be read in Wireshark.
Application Insights: If Application Insights is enabled you can review the telemetry collected here to see if either HTTP status codes or stderr generated are an indication of SNAT exhaustion - which can also be correlated with the above. Additionally, having a Application Map (if applicable for the services being called) can help dictate which service being called is showing issues such as slowness for requests being made.
On Linux, tcpdump would need to be installed:
NOTE: The below is for Ununtu based Images. For Alpine replace apt-get with
apk updateandapk add
apt-get update
apt-get install tcpdump
For Custom Docker Images SSH will need to be enabled in the Image(Dockerfile) beforehand. This can be used as a baseline example on how to do so.
Testing
All testing done below is with either with loadtest or Apache jMeter. Loadtest is sometimes used since it’s easier to configure requests-per-second. Both are load testing tools.
Additionally load testing tools like these can be good to validate these solutions after implementations as SNAT port exhaustion may not be seen until an application takes under certain load.
Solutions
agentkeepalive
agentkeepalive is one of the recommended approaches to using keep-alives. This package by default also implements certain default changes to the Node timeout settings, notably serverTimeout which could possibly introduce obscure issues, to avoid this. In Node v12.9 and greater this was corrected.
Implementation
The below implementation will also use axios for ease of use. An explaination of the below as follows:
- We import our
agentkeepalivepackage and also it’sHttpsAgentclass. By default, not importingHttpsAgentwill be using HTTP. For each protocol (meaning HTTP and HTTPS) we need to create an instance of each agent. - We then create a new instance of our respective HTTP and HTTPS classes. We use the maxSockets and maxFreeSockets properties - here, we do not want to put these greater than 160. Ideally, 128 should suffice. This would dictate the number of sockets used per instance.
- We then use axios.createInstance to create a reusable instance of axios that we can configure and pass around as needed - to ensure we are only using one(1) instance of axios.
- Importantly, we want to implemenent this on the calling service (the Application making/initiating the outbound request to the upstream endpoint (3rd party API, other API, other REST service, etc.))
NOTE: If running multiple instances of Node on a single App Service Instance - for example using
iisnode.yaml’snodeProcessCountPerApplicationon Windows orpm2or native clustering support on Linux - then maxSockets and maxFreeSockets should be updated to 128 (or 160) / os.Cpus().length - since all of these options run node on as many CPUs available on the machine.
const Agent = require("agentkeepalive");
const HttpsAgent = require("agentkeepalive").HttpsAgent;
const axios = require("axios");

// Create a reusable connection instance that can be passed around to different controllers
const keepAliveAgent = new Agent({
  maxSockets: 128, // or 128 / os.cpus().length if running node across multiple CPUs
  maxFreeSockets: 128, // or 128 / os.cpus().length if running node across multiple CPUs
  timeout: 60000, // active socket keepalive for 60 seconds
  freeSocketTimeout: 30000, // free socket keepalive for 30 seconds
});

// HTTPS agent
const httpsKeepAliveAgent = new HttpsAgent({
  maxSockets: 128, // or 128 / os.cpus().length if running node across multiple CPUs
  maxFreeSockets: 128, // or 128 / os.cpus().length if running node across multiple CPUs
  timeout: 60000, // active socket keepalive for 30 seconds
  freeSocketTimeout: 30000, // free socket keepalive for 30 seconds
});

const axiosInstance = axios.create({
  // Create an agent for both HTTP and HTTPS
  httpAgent: keepAliveAgent,
  httpsAgent: httpsKeepAliveAgent,
});

module.exports = axiosInstance;
This would be imported into your controllers and used as needed
const express = require("express");
const axiosInstance = require("../config/axiosInstance");
const router = express.Router();

const pingController = router.get("/", async (_, res, next) => {
  try {
    const { data } = await axiosInstance.get(process.env.API_URL);
    res.send(data);
  } catch (error) {
    console.log("An error has occurred: ", error);
    next(error);
  }
});
Comparison
In this comparison we tested using two App Services with the below setup not using agentkeepalive or keep-alives in general:
[App Service A, site1.azurewebsites.net/api/ping (Node, express.js)] -> HTTP GET request -> [App Service B, site2.azurewebsites.net(Node, express.js)]
NOTE: Internally site1.azurewebsites.net/api/ping calls site2.azurewebsites.net/api/pong and returns a small JSON body.
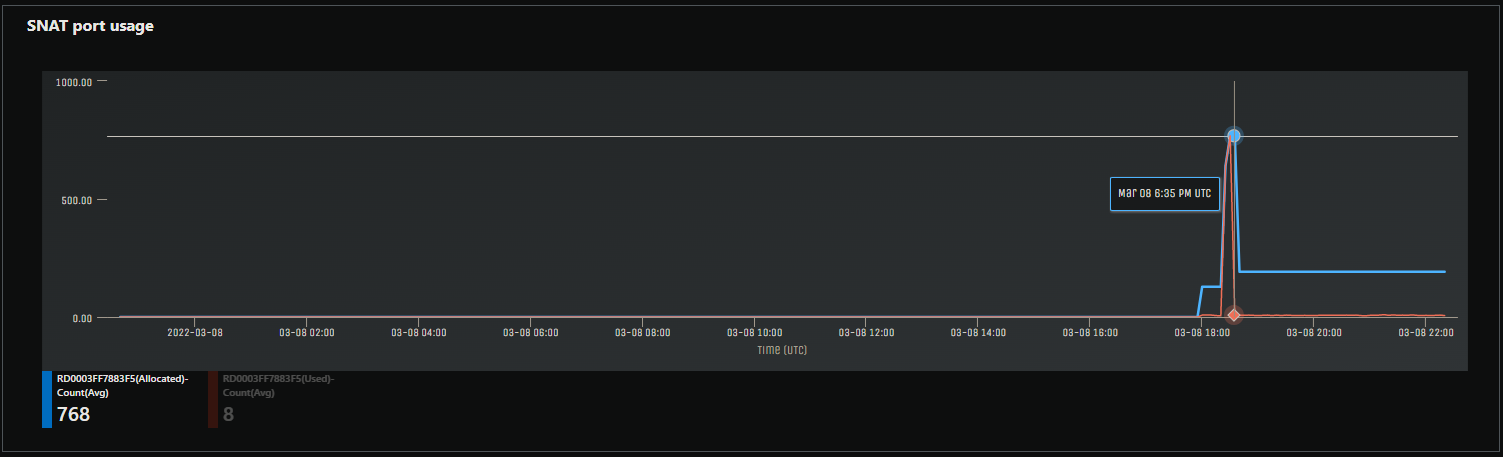
Testing without a keepalive implementation we can see SNAT ports were quickly exhausted - using at a peak of about 768. This was tested at 50 requests a second over the course of 10 minutes.
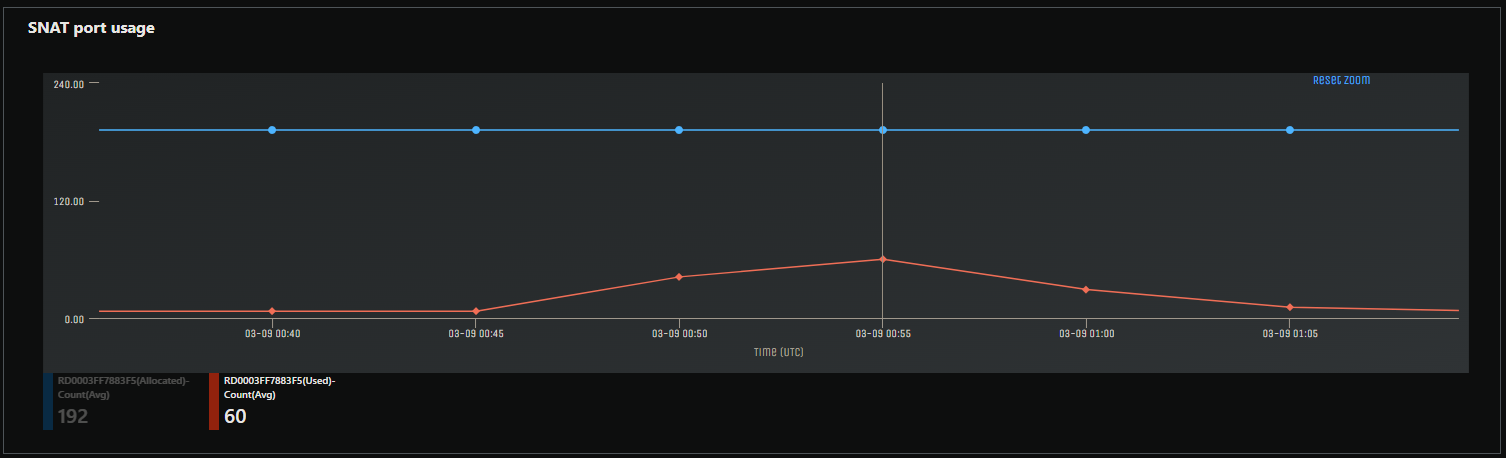
In the image below, we are now using agentkeepalive, as implemented above in the described flow. With the same amount of requests (50 per second) we can see 60 SNAT ports being used at most after testing of about 20 minutes combined at a sustained request rate of 3k requests per minute.
For Node.js without frameworks
If using Node without any frameworks, the implementation would be similar. Below, we have a separate file we can call config.js that houses our agentkeepalive creation and also our options object that we pass into our request method.
config.js
const Agent = require("agentkeepalive").HttpsAgent;

const keepaliveAgent = new Agent({
  maxSockets: 128, // or 128 / os.cpus().length if running node across multiple CPUs
  maxFreeSockets: 128, // or 128 / os.cpus().length if running node across multiple CPUs
  timeout: 60000,
  freeSocketTimeout: 30000,
});

const options = {
  host: `${process.env.API_HOST}`,
  port: 443,
  path: "/api/pong",
  method: "GET",
  agent: keepaliveAgent,
};

module.exports = options;
We can then pass this to our request methods, lets say we have a file named pingController.js. We take our options object from our config.js file that we export and pass this into the get() method that our https module exposes.
const https = require("https");
const options = require("../config/keepAlive");

const pingController = (res) => {
  https
    .get(options, (response) => {
      let data = "";
      response.on("data", (chunk) => {
        data += chunk;
      });

      response.on("end", () => {
        res.end(data);
      });
    })
    .on("error", (err) => {
      console.log("Error: " + err.message);
    });
};

module.exports = pingController;
http.Agent or https.Agent (native Node module)
We can also use Node’s native http or https module to implement connection reusage, essentially in the same way as agentkeepalive
NOTE: By default the
keepAliveproperty is set tofalse.
const https = require("https");

const keepaliveAgent = new https.Agent({
  keepAlive: true,
  maxSockets: 128, // or 128 / os.cpus().length if running node across multiple CPUs
  maxFreeSockets: 128, // or 128 / os.cpus().length if running node across multiple CPUs
  timeout: 60000,
  freeSocketTimeout: 30000,
});

const options = {
  host: `${process.env.API_URL}`,
  port: 443,
  path: "/api/pong",
  method: "GET",
  agent: keepaliveAgent,
};

module.exports = options;
Regional VNET integration with either Service or Private Endpoints
Regional VNET integration - Service Endpoints
If no code change can truly be done and the endpoint being called is also within Azure and supports Service Endpoints - a Regional VNET can be configured with Service Endpoints as long as the endpoint in question can support Service Endpoints.
To set this up you can read more general information on this topic here. More specific Service Endpoint Information can be found here. A walkthrough on creating a Virtual Network and enabling a Service Endpoint can be found here as well.
This implementation would not cause traffic to go out over the internet to use SNAT ports.
Regional VNET integration - Private Endpoints
Additionally Virtual Network integration with Private Endpoints can be done essentially in the same concept as Service Endpoints.
This implementation would not cause traffic to go out over the internet to use SNAT ports.
NAT Gateway
A NAT Gateway implementation can be added, as called out here - this gives the option for 64k total SNAT ports to use.
Avoiding the problem
As described here - it would be good to avoid this problem to begin with by trying to ensure the nessecary code changes are implemented. Private Endpoints, Service Endpoints or a NAT gateway can always be implemented - but for future proofing, ensuring your code is properly reusing connections to begin with can prevent any obscure problems or performance issues to begin with. As ensuring this is done can help - since each new request made without connection reuse incurs slight usage of CPU while lookups are done on the endpoint. Additionally, this prevents random or rare and obscure DNS lookup issues or intermittent timeouts.
Connection Pooling for Databases
Another concept that is just as important is connection pooling for databases. Connection pooling keeps a ready-to-use set of pre-allocated connections that can be reused as needed, instead of creating a brand new connection for each request made to the database. If you have a Node application that invokes calls to a database, but does not implement connection pooling - you may additionally see SNAT exhaustion, intermittent timeouts when queries are made, amongst other issues. You can reference the Snat Port Exhaustion section above for issues seen when this occurs in this scenario and tools to use to help.
All major ORM’s that can used with Node or database drivers for Node should have an implementation for connection pooling. Below are some examples:
NOTE: Each library below may have their own way of closing the connection pool. It’s important to make sure connections are properly returned to the pool after use to avoid open connections, for instance:
pool.end(err => {
  // all connections in the pool have ended
});
ORM’s and Drivers
Below are some examples of connection pooling implementations that can be used with different databases and Node.
sequelize
Connection pooling for Sequelize
const sequelize = new Sequelize(/* ... */, {
  // ...
  pool: {
    max: 128, // or 128 / os.cpus().length if running node across multiple CPUs
    min: 0,
    acquire: 30000,
    idle: 10000
  }
});
node-postgres
Connection pooling for node-postgres
const { Pool } = require('pg')

const pool = new Pool({
  host: 'localhost',
  user: 'database-user',
   max: 128, // or 128 / os.cpus().length if running node across multiple CPUs
  idleTimeoutMillis: 30000,
  connectionTimeoutMillis: 2000,
})
mysql
const mysql = require('mysql');

const pool  = mysql.createPool({
  connectionLimit: 128, // or 128 / os.cpus().length if running node across multiple CPUs
  host: 'example.org',
  user: 'bob',
  password: 'secret',
  database: 'my_db'
});
mariadb
Connection pooling with mariadb (under the Quick Start section)
const mariadb = require('mariadb');

const pool = mariadb.createPool({
  host: process.env.DB_HOST,
  user: process.env.DB_USER,
  connectionLimit: 128, // or 128 / os.cpus().length if running node across multiple CPUs
});
mongodb
Connection pooling with mongodb
const client = new MongoClient(uri,
  {
    maxPoolSize: 128, // or 128 / os.cpus().length if running node across multiple CPUs
  }
);
mssql
const sql = require('mssql')
const sqlConfig = {
  user: process.env.DB_USER,
  password: process.env.DB_PWD,
  database: process.env.DB_NAME,
  server: 'localhost',
  pool: {
    max: 128, // or 128 / os.cpus().length if running node across multiple CPUs
    min: 0,
    idleTimeoutMillis: 30000
  }
}


