NestJS deployment on App Service Windows
This blog post will cover deploying a NestJS application to Azure App Service on Windows.
Local Development
Create a Nest app
- Create a new Nest project with the Nest CLI, use
npmto install this.myappis the name you’ll choose for the local application and folder:
    npm i -g @nestjs/cli
    nest new myapp
- Follow the prompts:
- Choose your package manager
-
Once the creation is done, cd into the myapp folder and then start the server using:
npm startThis will start the application:
$ npm start > nest start [Nest] 18896 - 11/28/2022, 4:47:05 PM LOG [NestFactory] Starting Nest application... [Nest] 18896 - 11/28/2022, 4:47:05 PM LOG [InstanceLoader] AppModule dependencies initialized +55ms [Nest] 18896 - 11/28/2022, 4:47:05 PM LOG [RoutesResolver] AppController {/}: +11ms [Nest] 18896 - 11/28/2022, 4:47:05 PM LOG [RouterExplorer] Mapped {/, GET} route +6ms [Nest] 18896 - 11/28/2022, 4:47:05 PM LOG [NestApplication] Nest application successfully started +4ms -
Browse the site with
http://localhost:3000to get the default page.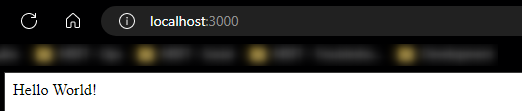
-
To create a production build you can run:
npm run build
Nest uses TypeScript by default, so a production build will be transpiling the TypeScript in the project source to JavaScript under a directory in the project root named /dist.
You can run this production build locally by targetting the JavaScript entrypoint by doing:
node dist/main.js
This is an important concept for later on when deploying.
Important prerequisites
Do not hardcode ports
The Nest project we created listens on port 3000 by default. When deployed to Azure, we need to pick up the port for that environment. This actually maps to a named pipe, as this is how iisnode (used by default) communicates between itself and node.exe. If we logged out the port variable, we’d see something like the following:
\\.\pipe\c472f934-3d3c-4a8a-8d49-6982fc768922
We can change our listening port by changing our src/main.ts to the below:
(Before)
import { NestFactory } from '@nestjs/core';
import { AppModule } from './app.module';

async function bootstrap() {
  const app = await NestFactory.create(AppModule);
  await app.listen(3000);
}
bootstrap();
(After)
import { NestFactory } from '@nestjs/core';
import { AppModule } from './app.module';

const port = process.env.PORT || 3000;

async function bootstrap() {
  const app = await NestFactory.create(AppModule);
  await app.listen(port);
}
bootstrap();
If we don’t do this, we’ll encounter either timeouts on startup since our application is not listening on the predefined named pipe, or encounter some form of iisnode specific HTTP 500.1xxx errors.
Review this post for common iisnode-based issues - Troubleshooting Common iisnode Issues
Add a web.config
Since IIS (and iisnode) is used on App Service Windows with Node applications, we’ll need to bring a web.config. Sometimes, in a application deployment to App Service Windows, a web.config will be auto generated. However, we need to ensure this targets our dist/main.js entrypoint. To avoid the site failing immediately after deploying and having to change this file later to correct this, let’s add one now.
Add the following web.config to your project root:
<?xml version="1.0" encoding="utf-8"?>
<!--
     This configuration file is required if iisnode is used to run node processes behind
     IIS or IIS Express.  For more information, visit:
    https://github.com/tjanczuk/iisnode/blob/master/src/samples/configuration/web.config
-->
<configuration>
    <system.webServer>
        <!-- Visit http://blogs.msdn.com/b/windowsazure/archive/2013/11/14/introduction-to-websockets-on-windows-azure-web-sites.aspx for more information on WebSocket support -->
        <webSocket enabled="false" />
        <handlers>
            <!-- Indicates that the dist/main.js file is a node.js site to be handled by the iisnode module -->
            <add name="iisnode" path="dist/main.js" verb="*" modules="iisnode" />
        </handlers>
        <rewrite>
            <rules>
                <!-- Do not interfere with requests for node-inspector debugging -->
                <rule name="NodeInspector" patternSyntax="ECMAScript" stopProcessing="true">
                    <match url="^dist/main.js\/debug[\/]?" />
                </rule>

                <!-- First we consider whether the incoming URL matches a physical file in the /public folder -->
                <rule name="StaticContent">
                    <action type="Rewrite" url="public{REQUEST_URI}" />
                </rule>

                <!-- All other URLs are mapped to the node.js site entry point -->
                <rule name="DynamicContent">
                    <conditions>
                        <add input="{REQUEST_FILENAME}" matchType="IsFile" negate="True" />
                    </conditions>
                    <action type="Rewrite" url="dist/main.js" />
                </rule>
            </rules>
        </rewrite>

        <!-- 'bin' directory has no special meaning in node.js and apps can be placed in it -->
        <security>
            <requestFiltering>
                <hiddenSegments>
                    <remove segment="bin" />
                </hiddenSegments>
            </requestFiltering>
        </security>

        <!-- Make sure error responses are left untouched -->
        <httpErrors existingResponse="PassThrough" />
        <!--
      You can control how Node is hosted within IIS using the following options:
        * watchedFiles: semi-colon separated list of files that will be watched for changes to restart the server
        * node_env: will be propagated to node as NODE_ENV environment variable
        * debuggingEnabled - controls whether the built-in debugger is enabled
     See https://github.com/tjanczuk/iisnode/blob/master/src/samples/configuration/web.config for a full list of options
    -->
        <!--<iisnode watchedFiles="web.config;*.js"/>-->
    </system.webServer>
</configuration>
This should be placed relative to your package.json. Example:
|-- dist
|   | -- main.js
|   | -- <other production build files>
|-- controllers
|   | -- homeController.js
|-- server.js
|-- package.json
|-- package-lock.json
|-- web.config
Deployment Options
Below are a few ways that we can deploy this application to Azure.
Local Git
Including the build folder
If deploying with Local Git, VSCode, or other methods that build against the Kudu site directly, we’ll want to ensure our /dist folder gets deployed as well. If we don’t include this, our site will fail to start. This is because we cannot run directly against a .ts file, but rather need to target our .js transpiled entrypoint under dist/main.js.
By default, Node deployments with these methods do not run npm run build / yarn run build. So we’ll either need to:
- Remove
/distfrom our.gitignore, build locally, and push thedistfolder with our site content. - Or, use a custom build script to automate the building of this Nest application against the Kudu site. This post can be followed on how to set up this approach - React deployment on App Service Windows - custom deployment script
Set up
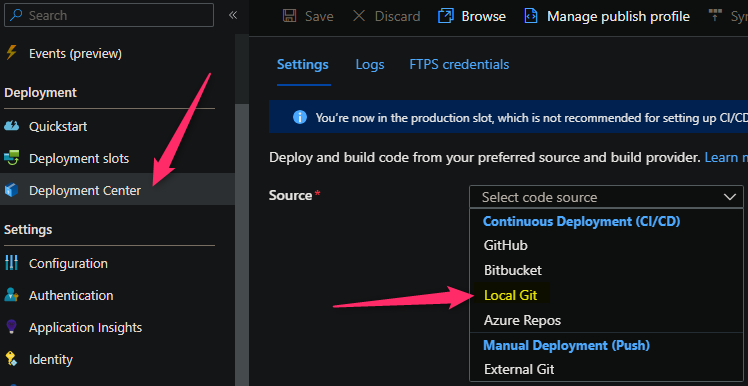
To setup Local Git as a deployment option, follow these steps:
- Navigate to your web app and select Deployment Center -> Local Git and then click on Save.
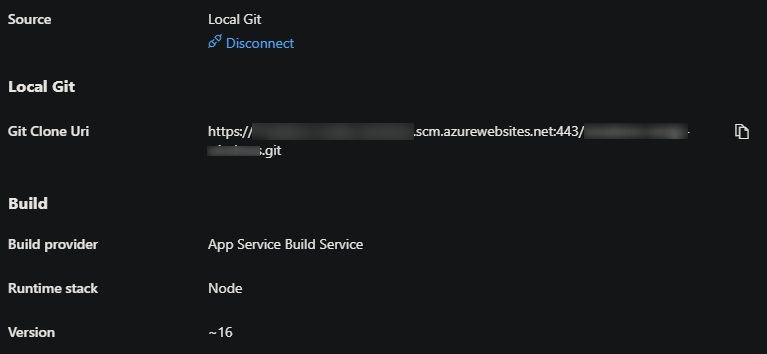
- Copy the remote git repository from Azure Portal.
- In your local terminal run the following commands in order:
git add .
git commit -m "initial Commit"
git remote add azure https://<sitename>.scm.azurewebsites.net:443/<sitename>.git
- You should see some output like the below:
create mode 100644 dist/app.controller.d.ts
 create mode 100644 dist/app.controller.js
 create mode 100644 dist/app.controller.js.map
 create mode 100644 dist/app.module.d.ts
 create mode 100644 dist/app.module.js
 create mode 100644 dist/app.module.js.map
 create mode 100644 dist/app.service.d.ts
 create mode 100644 dist/app.service.js
 create mode 100644 dist/app.service.js.map
 create mode 100644 dist/main.d.ts
 create mode 100644 dist/main.js
 create mode 100644 dist/main.js.map
 create mode 100644 dist/tsconfig.build.tsbuildinfo
Enumerating objects: 19, done.
Counting objects: 100% (19/19), done.
Delta compression using up to 8 threads
Compressing objects: 100% (15/15), done.
Writing objects: 100% (17/17), 34.51 KiB | 3.45 MiB/s, done.
Total 17 (delta 4), reused 0 (delta 0), pack-reused 0
remote: Updating branch 'master'.
remote: Updating submodules.
remote: Preparing deployment for commit id '9703d4fcb6'.
remote: Generating deployment script.
remote: Running deployment command...
remote: Handling node.js deployment.
remote: Creating app_offline.htm
remote: KuduSync.NET from: 'C:\home\site\repository' to: 'C:\home\site\wwwroot'
remote: Copying file: '.gitignore'
remote: Copying file: 'package-lock.json'
remote: Copying file: 'dist\app.controller.d.ts'
remote: Copying file: 'dist\app.controller.js'
remote: Copying file: 'dist\app.controller.js.map'
remote: Copying file: 'dist\app.module.d.ts'
remote: Copying file: 'dist\app.module.js'
remote: Copying file: 'dist\app.module.js.map'
remote: Copying file: 'dist\app.service.d.ts'
remote: Copying file: 'dist\app.service.js'
remote: Copying file: 'dist\app.service.js.map'
remote: Copying file: 'dist\main.d.ts'
remote: Copying file: 'dist\main.js'
remote: Copying file: 'dist\main.js.map'
remote: Copying file: 'dist\tsconfig.build.tsbuildinfo'
remote: Deleting app_offline.htm
remote: Invalid start-up command "nest start" in package.json. Please use the format "node <script relative path>".
remote: Looking for app.js/server.js under site root.
remote: Missing server.js/app.js files, web.config is not generated
remote: The package.json file does not specify node.js engine version constraints.
remote: The node.js application will run with the default node.js version 16.16.0.
remote: Selected npm version 8.11.0
remote: npm WARN config production Use `--omit=dev` instead.
remote: npm WARN old lockfile
remote: npm WARN old lockfile The package-lock.json file was created with an old version of npm,
remote: npm WARN old lockfile so supplemental metadata must be fetched from the registry.
remote: npm WARN old lockfile
remote: npm WARN old lockfile This is a one-time fix-up, please be patient...
remote: npm WARN old lockfile
remote: .........
remote:
remote: up to date, audited 112 packages in 17s
remote:
remote: 15 packages are looking for funding
remote:   run `npm fund` for details
remote:
remote: found 0 vulnerabilities
remote: Finished successfully.
remote: Running post deployment command(s)...
remote: Triggering recycle (preview mode disabled).
remote: Deployment successful.
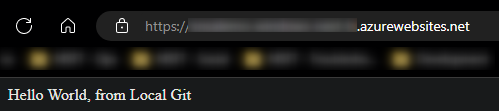
- After ensuring that you’re either bringing your build (
dist) folder folder by building it locally first, or with a custom deployment script (referenced above) - and you have included an updatedweb.config, as called out in the prerequisites portion, you should see the site now deployed and browsable:
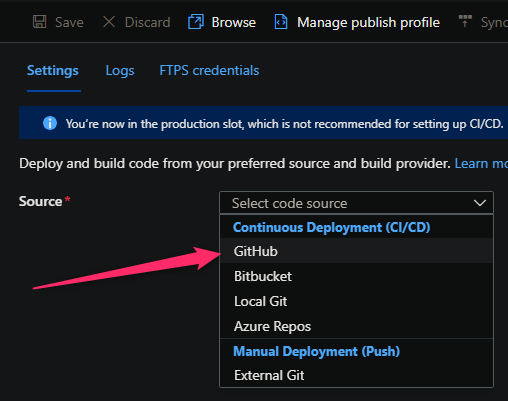
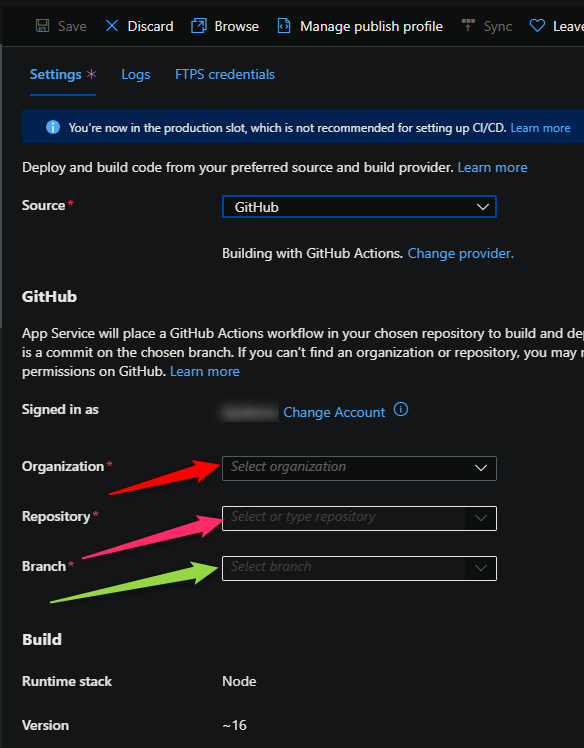
GitHub Actions
You can quickly get started with GitHub Actions by using the App Service Deployment Center. This will automatically generate a workflow file based on your application stack and commit it to your GitHub repository in the correct directory. You can deploy a workflow manually using deployment credentials.
You can find more details about these steps documented here:
For Nest deployments it is recommended to modify the default template with the following recommendations - this is due to the time it takes overwise to copy over files between deployment stages (eg., actions/upload-artifact@v2) - without these changes, it may take 15 minutes to easily over an hour(s) since node_modules contains thousands of files, or more, depending on the project.
name: Build and deploy Node.js app to Azure Web App - myapp

on:
  push:
    branches:
      - main
  workflow_dispatch:

jobs:
  build:
    runs-on: windows-latest

    steps:
      - uses: actions/checkout@v2

      - name: Set up Node.js version
        uses: actions/setup-node@v1
        with:
          node-version: '16.x'

      - name: npm install, build, and test
        run: |
          npm install
          npm run build --if-present

      - name: Zip all files for upload between jobs
        run: Compress-Archive -Path .\* -DestinationPath nest.zip

      - name: Upload artifact for deployment job
        uses: actions/upload-artifact@v2
        with:
          name: node-app
          path: nest.zip

  deploy:
    runs-on: ubuntu-latest
    needs: build
    environment:
      name: 'Production'
      url: $

    steps:
      - name: Download artifact from build job
        uses: actions/download-artifact@v2
        with:
          name: node-app

      - name: 'Deploy to Azure Web App'
        uses: azure/webapps-deploy@v2
        id: deploy-to-webapp
        with:
          app-name: 'myapp'
          slot-name: 'Production'
          publish-profile: $
          package: nest.zip

      - name: Delete zip file
        run: rm nest.zip
Using a pipeline like this, we can build for production which generates the needed /dist folder. This negates needing to use any specific custom deployment script logic or removing dist as an entry in our .gitignore.
Azure DevOps
You can use Azure Pipelines to build your Nest application. For Nest apps, you can use npm or yarn to install application dependencies. You can review more details here: Implement JavaScript frameworks.
The below will be creating a pipeline through .yaml based creation.
- Go to Pipelines and create New pipeline.
- Select where your repository is stored (GitHub, Azure Repos, etc.)
- Select your code repository.
- Create an empty template template. To make it easier to authenticate for deployment, when adding the below tasks, use the “Tasks Assistant” on the right-hand side. This will give an option in the UI for the deployment task to Authorize the Service Connection needed for deployment.
Here is an example with recommendations:
trigger:
- main

variables:
  # Agent VM image name
  vmImageName: 'windows-latest'
  environmentName: 'appname'

stages:
- stage: Build
  displayName: Build stage
  jobs:
  - job: Build
    displayName: Build
    pool:
      vmImage: $(vmImageName)

    steps:
    - task: NodeTool@0
      inputs:
        versionSpec: '16.x'
      displayName: 'Install Node.js'

    - script: |
        npm install
      displayName: 'npm install'

    - script: |
        npm run build
      displayName: 'npm run build'

    - task: ArchiveFiles@2
      inputs:
        rootFolderOrFile: '$(System.DefaultWorkingDirectory)'
        includeRootFolder: false
        archiveType: 'zip'
        archiveFile: '$(Build.ArtifactStagingDirectory)/$(Build.BuildId).zip'
        replaceExistingArchive: true

    - task: PublishBuildArtifacts@1
      inputs:
        PathtoPublish: '$(Build.ArtifactStagingDirectory)/$(Build.BuildId).zip'
        ArtifactName: 'drop'

- stage: Deploy
  displayName: Deploy stage
  dependsOn: Build
  condition: succeeded()
  jobs:
  - deployment: Deploy
    displayName: Deploy
    environment: $(environmentName)
    pool:
      vmImage: $(vmImageName)
    strategy:
      runOnce:
        deploy:
          steps:
          - task: AzureWebApp@1
            inputs:
              azureSubscription: 'subscriptionName(00000000-0000-0000-0000-000000000000)'
              appType: 'webApp'
              appName: 'appname'
              package: '$(Pipeline.Workspace)/drop/$(Build.BuildId).zip'
This approach, like with GitHub Actions, will build for production in the pipeline and deploy the dist folder that’s referenced by our web.config.
Troubleshooting
404 after deployments
Ensure you have deployed your dist folder. Since this handles our production build and ultimately our routing. This may introduce other issues since our web.config points to this location.
You do not have permission to view this directory or page.
You may have forgetten to deploy your web.config, or this is misconfigured. Review the web.config mentioned earlier in this article for comparison. Ensure this is also pointing to the correct .js entrypoint file in the production build.
Additionally, a web.config in an incorrect location may cause this as well. Eg., placing this in a subfolder outside of the project root.
HTTP 500.1xxx errors after deployments
Review this post for common iisnode-based issues - Troubleshooting Common iisnode Issues
A table of iisnode substatus codes can be found here - this can be used to track down what may be occurring. This usual indicates that node.exe is crashing. A logging-errors.txt file will be created (assuming that App Service Logs are enabled). If an uncaught exception is occurring, it will be logged into this file.
Common scenarios for this directly after a deployment may be:
- Forgetting to add a package into your
package.jsonbut referencing the missing package as an import in code - Forgetting needed environment variables that may otherwise cause the application to crash
- Targeting a version of Node that may not support features Nest or underlying libraries use (ex., outdated Node version - if the App Setting
WEBSITE_NODE_DEFAULT_VERSIONis not set, this falls back to a v0.x version.)
A note on hardcoded ports
As opposed to Linux, where if hardcoding the listening port for a Node application on App Service Linux will result in a HTTP 502 and a container time out on start up, doing this on Windows App Service will likely introduce a HTTP 500.1001 (or closely related substatus code). Follow the steps in the prerequisites portion of this post to avoid encountering this situation.


