How to deploy Azure Functions as Custom Docker container using Azure DevOps
In this blog post, we are covering a simple way to build a custom container for your function app and use Azure DevOps for CI/CD with public or self-hosted agents.
Prepare Docker and Run Locally
Create Dockerfile
-
You can create a Dockerfile to an existing function or create a new function and Dockerfile with the following command (E.g. Javascript):
func init --worker-runtime node --language javascript --dockerNote: Same command will apply for all the runtime stacks supported here.
-
By default the function images don’t contain SSH configuration, but if you want to add this configuration you can enable ssh and remote debugging changing the base image to
-appservice.Here is a quick example of a current Dockerfile:
# To enable ssh & remote debugging on app service change the base image to the one below #FROM mcr.microsoft.com/azure-functions/node:4-node16-appservice FROM mcr.microsoft.com/azure-functions/node:4-node16 ENV AzureWebJobsScriptRoot=/home/site/wwwroot \ AzureFunctionsJobHost__Logging__Console__IsEnabled=true COPY . /home/site/wwwroot RUN cd /home/site/wwwroot && \ npm install - If you want to use a different tag, you can find the available tags and OS versions for each tag here.
-
All the function images are hosted into the Microsoft Container Registry (MCR). To retrieve the list of all available tags for specific azure function stack you can use
https://mcr.microsoft.com/v2/azure-functions/<stack-here>/tags/list.E.g. Node:
https://mcr.microsoft.com/v2/azure-functions/node/tags/list.
Running function container locally
-
If you have Windows, you can install Docker Desktop, or you can use it with WSL2 Ubuntu as well or use Linux and install it from package manager.
-
In the same folder where your function files and Dockerfile are located, build the image with following command:
docker build --tag your_image_name:your_tag . -
To run the container you can use any external port but keep port 80 as internal for the container, since the Azure Function Host will be listening on that port, you can use the following command to run:
docker run -d -p 8080:80 mynodefunctionapp:v1 -
To review if your container is up and running you can use
docker ps.Note: In case your container is not running, you can use
docker ps -aand then grab the container id and rundocker logs container_idto investigate the reason.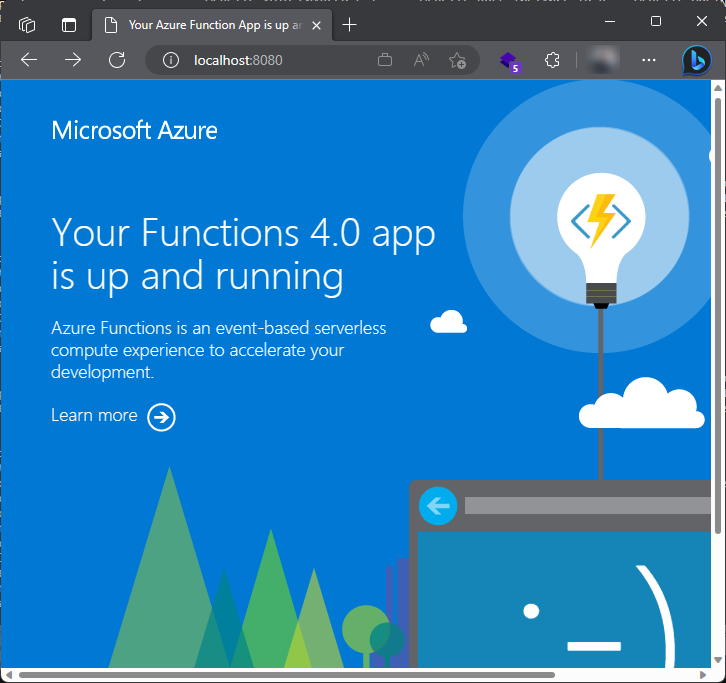
-
You can access to the running container using
docker exec -it container_id /bin/bash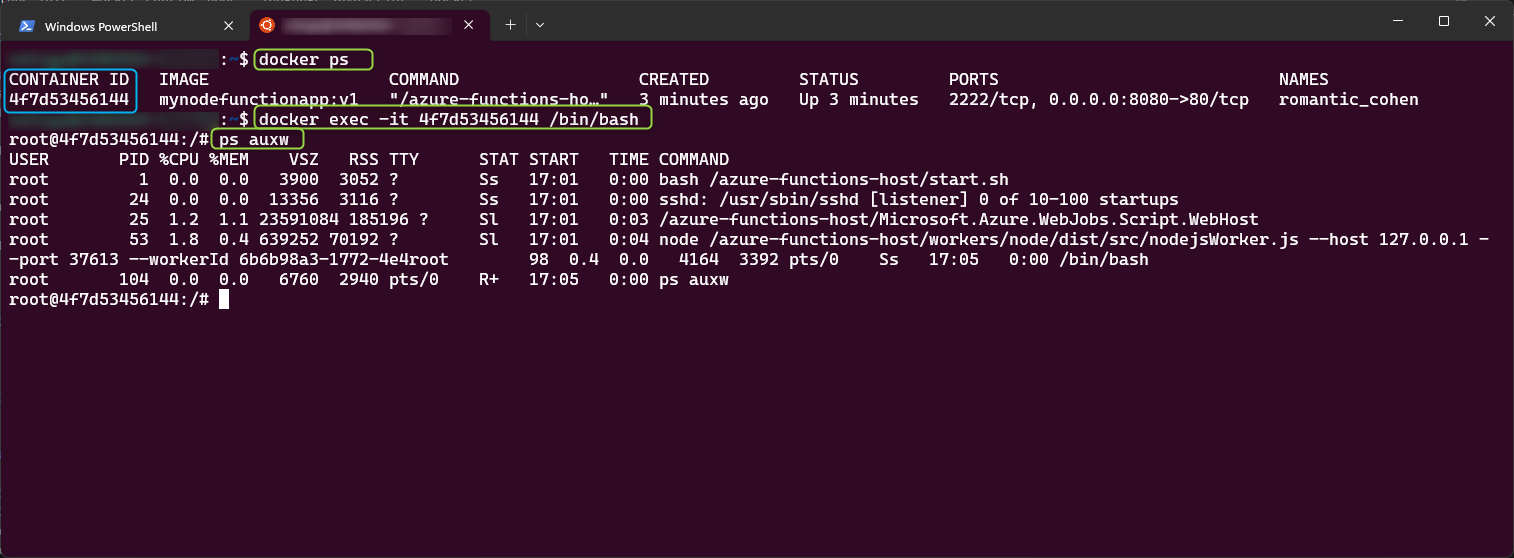
Deploy to Azure DevOps
Push code
There are several ways to push your code to Azure DevOps, you can check this reference, here is one using command line with git commands.
git init
git add .
git commit -m "Initial Commit"
git remote add devops "<azure-devops-git-url>"
git push devops master
Create a Pipeline
In this section, we are using Azure Container Registry to host our image.
- Select
Pipelines, then click inNew pipeline. - Select
Azure Repos Git, then select a repository. - Pick
Docker - Build and push an image to Azure Container Registrytemplate.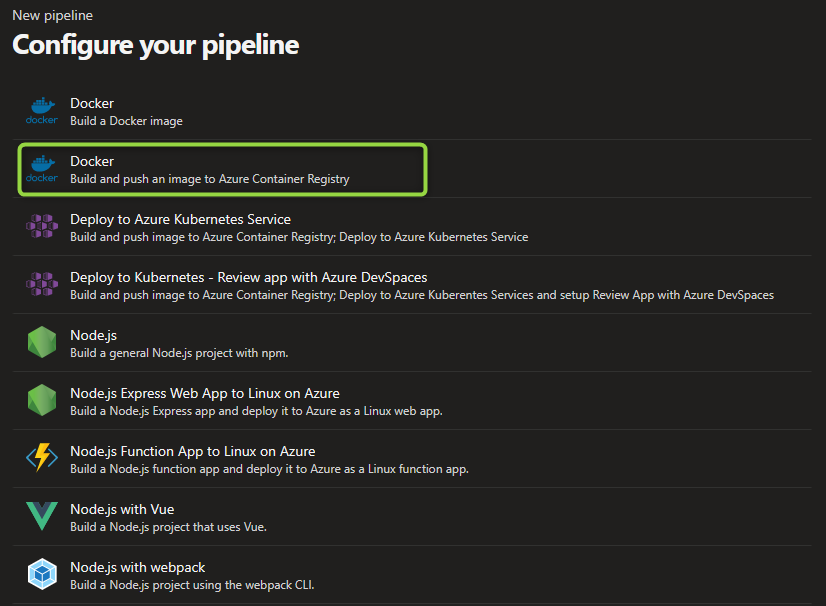
- Select an
Azure Subscriptionand then select aContainer Registry, followed byImage NameandDockerfilelocation.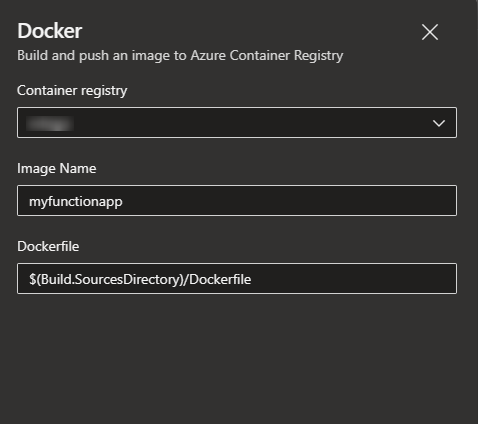
-
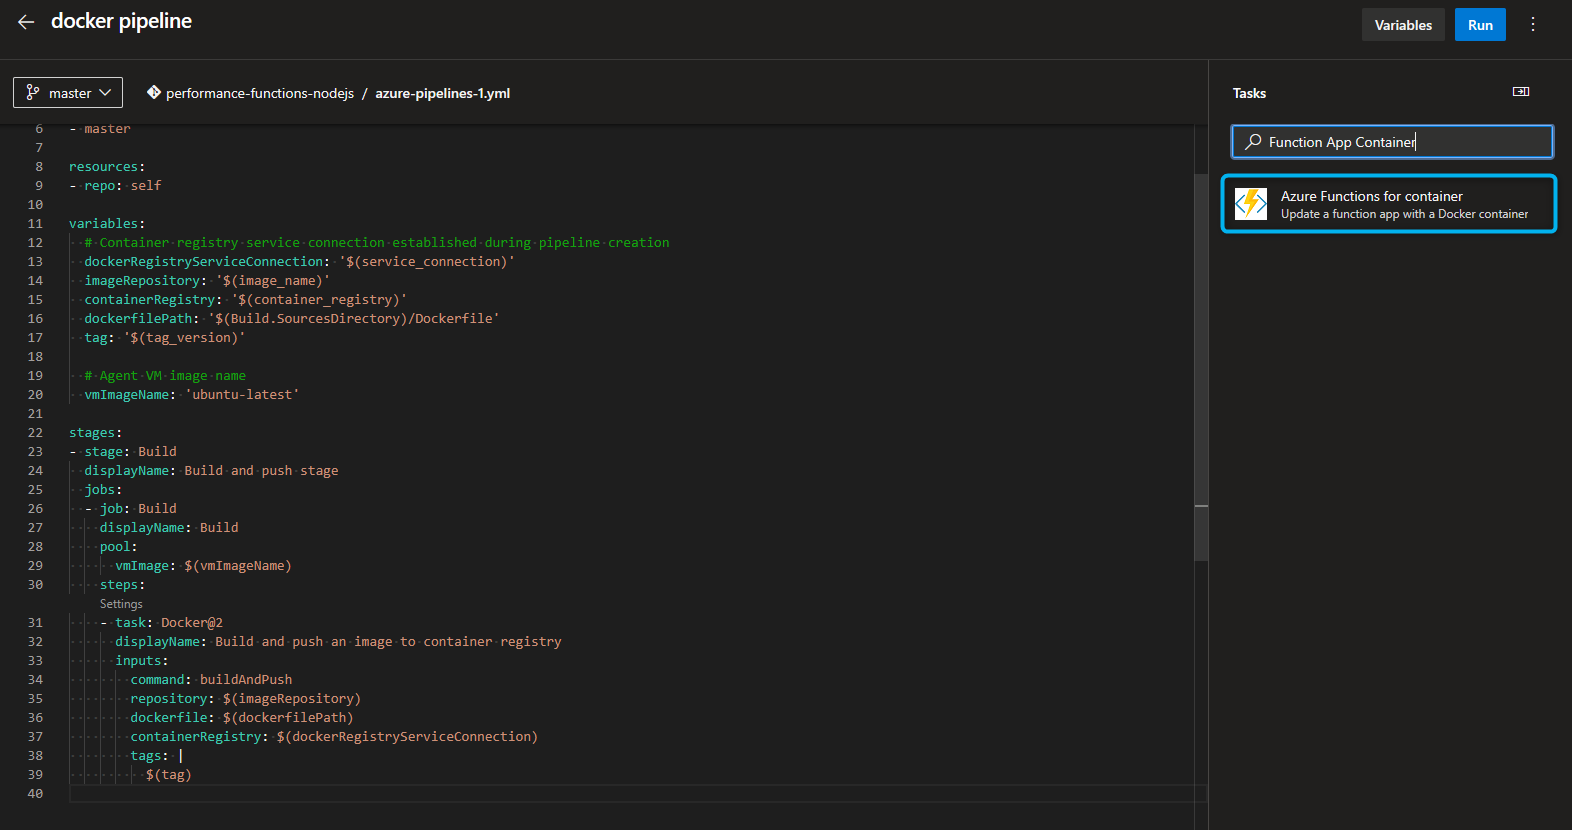
After the yaml template is created, you can click on
Show assistantand add new taskAzure Functions for containerand set the values for app name, image and subscription.Note: You can review all the available inputs for this task here.
- You can use variables to handle better secrets or avoid hardcoding in the template. Click on
Variablesto add.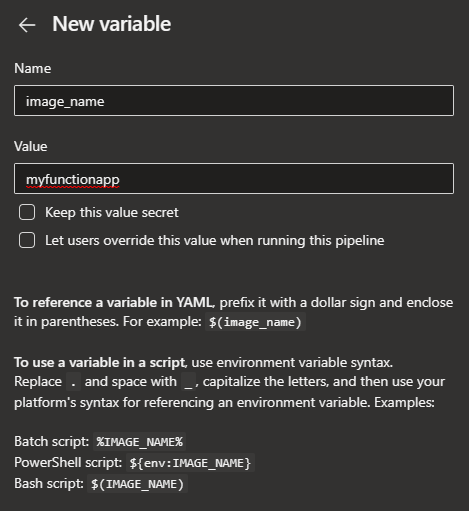
- You can customize your template replacing values with values. Here is a final template:
trigger: - master resources: - repo: self variables: # Container registry service connection established during pipeline creation dockerRegistryServiceConnection: '$(service_connection)' imageRepository: '$(image_name)' containerRegistry: '$(container_registry)' dockerfilePath: '$(Build.SourcesDirectory)/Dockerfile' tag: '$(tag_version)' # Agent VM image name vmImageName: 'ubuntu-latest' stages: - stage: Build displayName: Build and push stage jobs: - job: Build displayName: Build pool: vmImage: $(vmImageName) steps: - task: Docker@2 displayName: Build and push an image to container registry inputs: command: buildAndPush repository: $(imageRepository) dockerfile: $(dockerfilePath) containerRegistry: $(dockerRegistryServiceConnection) tags: | $(tag) - task: AzureFunctionAppContainer@1 inputs: azureSubscription: $(subscription) appName: '$(app_name)' appSettings: '-DOCKER_REGISTRY_SERVER_URL $(registry_url) -DOCKER_REGISTRY_SERVER_USERNAME $(registry_username) -DOCKER_REGISTRY_SERVER_PASSWORD $(registry_password)' imageName: '$(container_registry)/$(imageRepository):$(tag_version)' -
Final step will be to set up
DOCKER_REGISTRY_SERVER_URL,DOCKER_REGISTRY_SERVER_USERNAMEandDOCKER_REGISTRY_SERVER_PASSWORDappsettings for authentication with azure container registry and be able to pull the image correctly into the hosting plan, for this you need first to enableAdmin Credentialsin the ACR side.Note: There are several ways to pull container images from ACR like using User/System Assigned MSI, check this reference for best practices.
-
Run pipeline to build/push and deploy your container.
Note: For the first time, it will require authorization for the service connection to access the resource.
Create a Release Pipeline
If you don’t prefer to combine the docker build and push tasks with the Azure Function Deploy task in same pipeline using YAML, then you can create a classic release pipeline and use the same task.
- Click on
Create a new release pipeline, then selectEmpty job. - In the default stage, create a task.
-
Select
Azure Functions for containerfrom the list.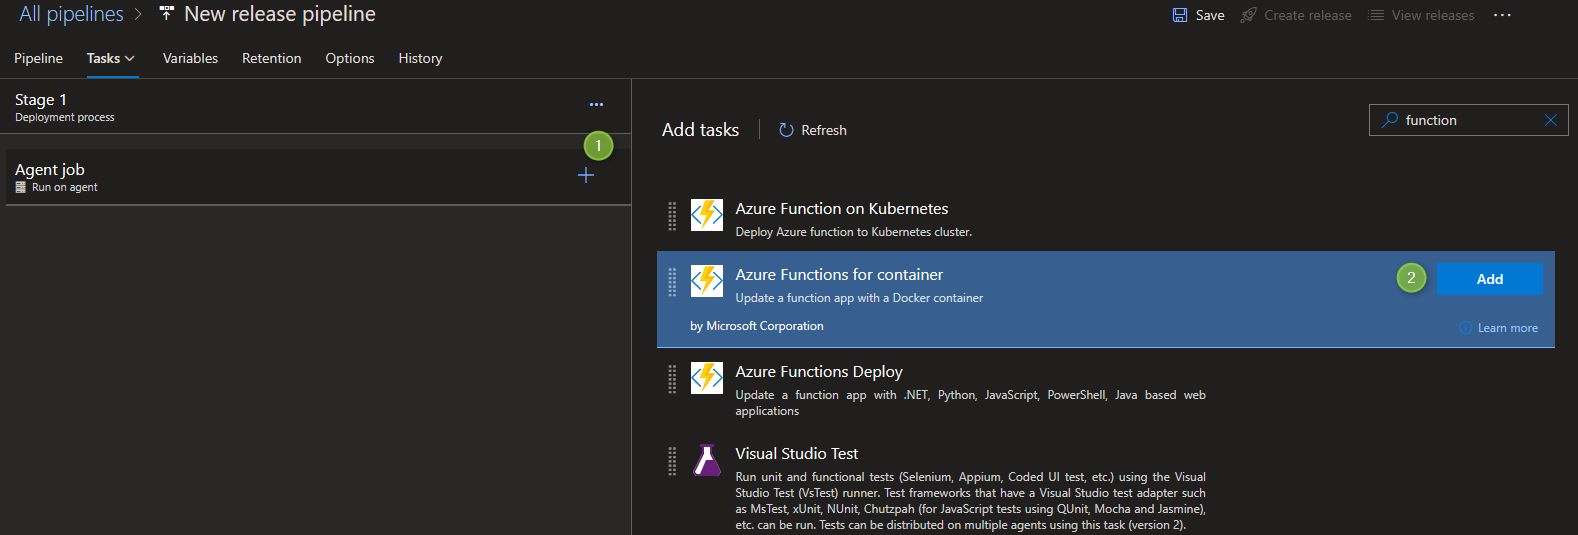
-
Select from Subscription the function app name, and set the image and tag, as well as the AppSettings for authentication with azure container registry and be able to pull the image correctly into the hosting plan. You can use variables.
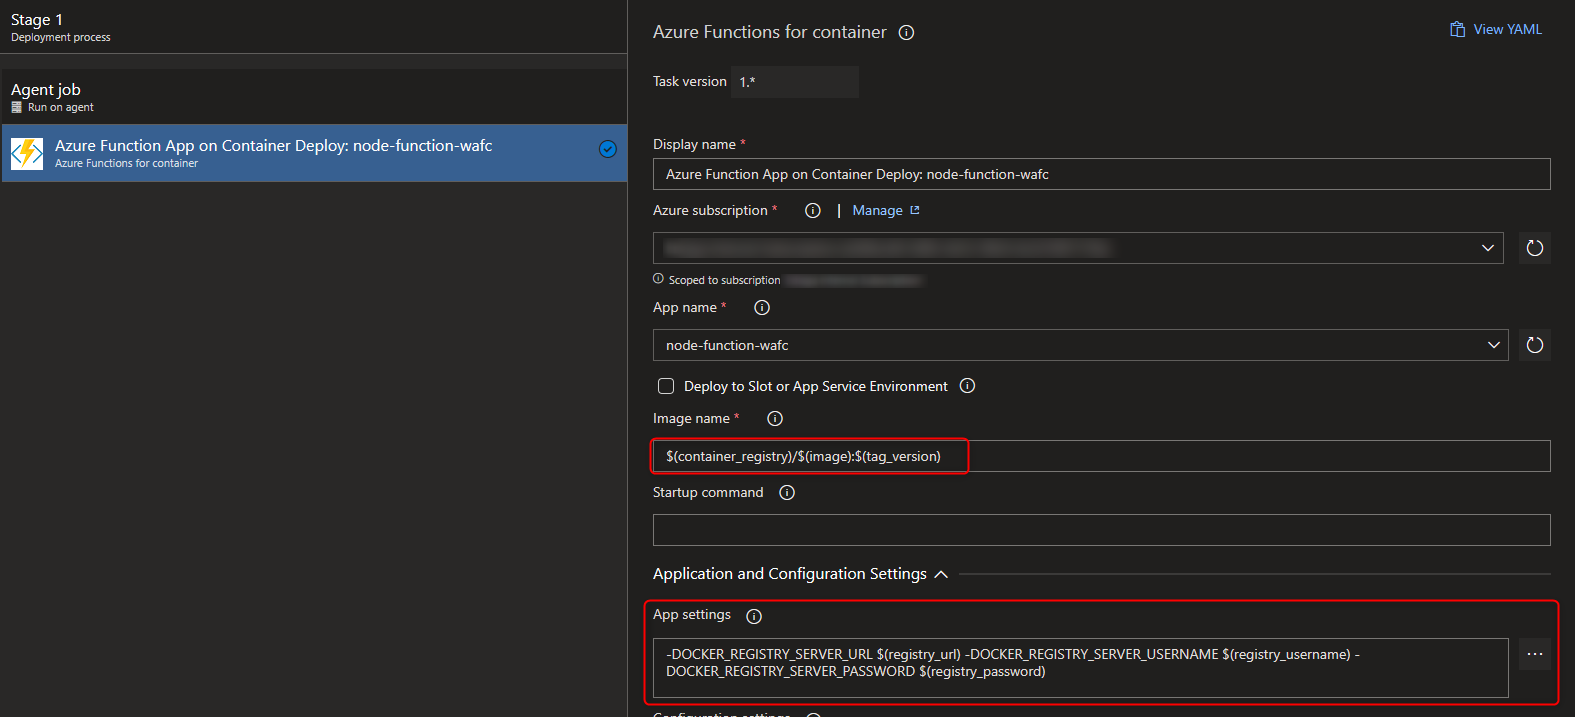
Note: If you are using Azure Container Registry, follow this syntax for image name:
<container_registry_name>.azurecr.io/<image_name>:<tag> - Finally deploy your custom container
Deploy to Azure DevOps with Self-Hosted agent in Docker
Note: This article will cover the basic configuration you can follow for setting up an environment, but it is not intended to be applicable for production environments. Every app’s purpose is different and will require network security validation and best practices, please consider configure into a dev/test scenario.
Configuring SKU and Azure Container Registry
VNET and Private DNS Zone
If you are looking for steps using az cli, check this reference.
-
Create a VNET (Virtual Network). For this example you can leave address space by default to (10.0.0.0/16)
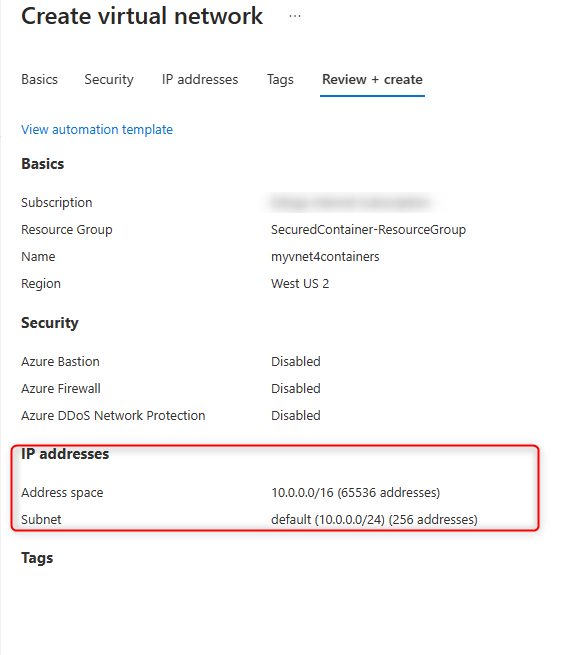
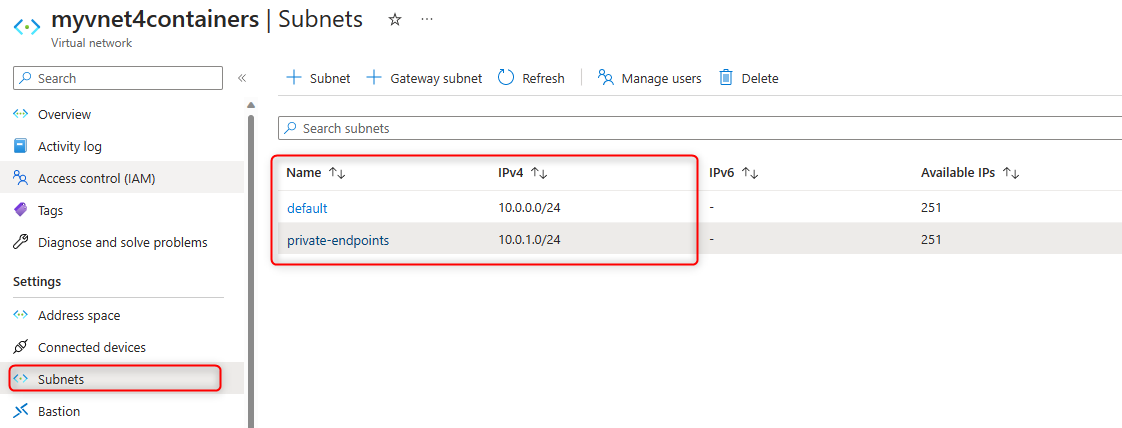
- We need create two subnets, one for the regional VNET integration and one for the private endpoints. The address-prefix size must be at least /28 for both subnets.
Note: Small subnets (CIDR block size) can affect scaling limits and the number of private endpoints. You can review the subnet requirements for VNET integration with App Service. It is recommended to set up with /26 or /24 for both subnets.
-
Designate a subnet to be used by App Service, and delegate it to
Microsoft.Web/serverFarms
-
Create a Private DNS Zone to host the DNS records for private endpoints. Use
privatelink.azurecr.iofor the name.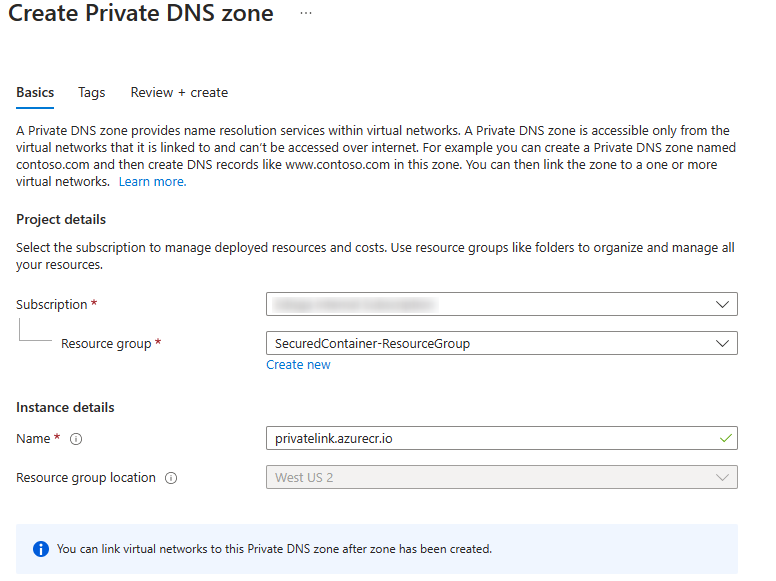
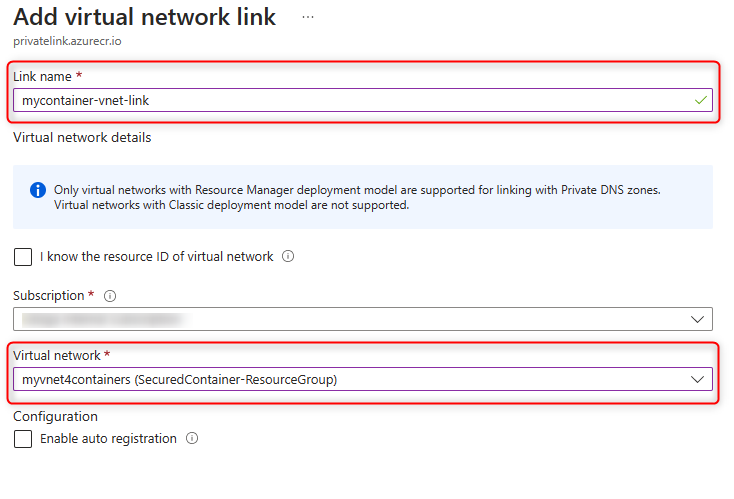
- Link the Private DNS Zone to your VNET.
- In the Private DNS Zone, click on
Virtual network linksand then click onAdd. - Set a
link name, then select your createdvnetand disableAuto-Registration.
- In the Private DNS Zone, click on
Azure Container Registry
-
Create a Container Registry, in the same region where you will be hosting your App Service and select Premium to enable private endpoints.

- In the
Networking tab, selectPublic accessfor now, to add your ip address before securing the registry. - Review and Create the resource.
-
Once created, go to
Networkingblade and underPublic accessclick onSelected networksand then add yourip address, this is to allow you access to the ACR repositories through the portal for any configuration. Click onSave.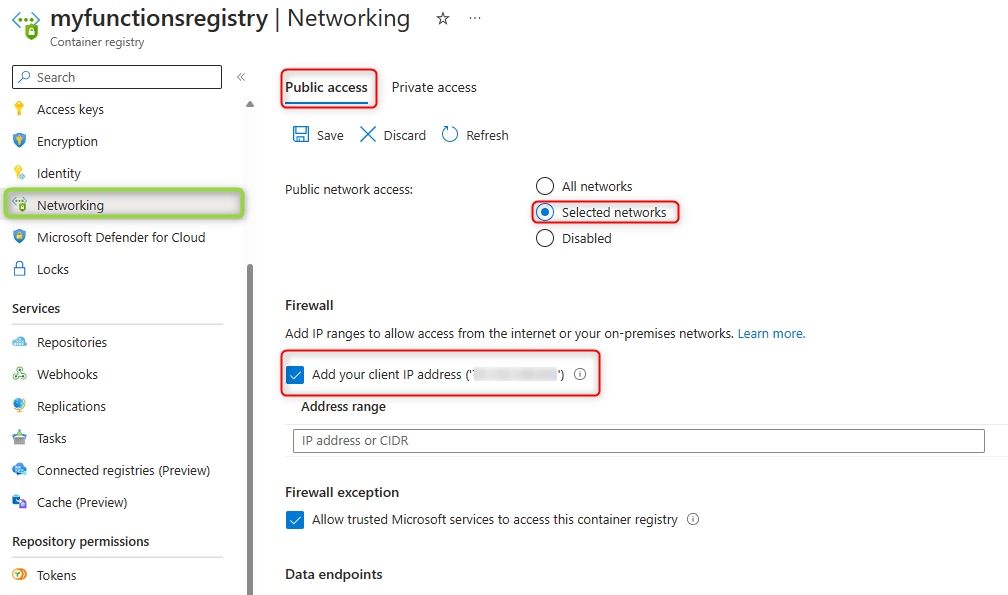
- Go to
Private accesstab:- Click on
Create a private endpoint connection. -
Set a private endpoint
nameand NIC name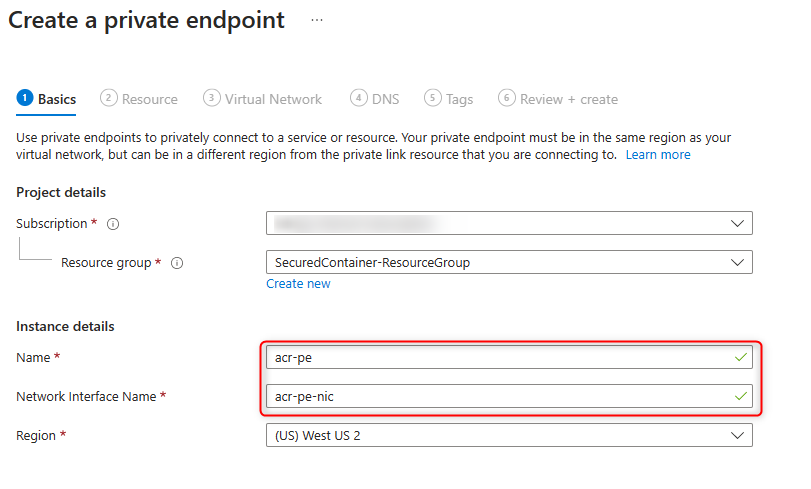
- Pick
registryas Target sub-resource. - Select your
VNETandsubnetcreated for private endpoints. -
Finally click Yes to
Integrate with private DNS Zoneand select your private DNS Zone.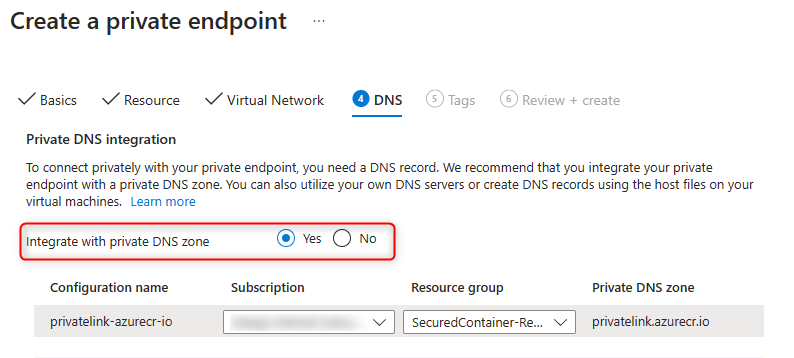
- Click on
- Review and create the resource.
Note: It is important to review if the PE connection was approved and provision state was succeeded.
Configuring Self-Hosted Agent
Virtual Machine
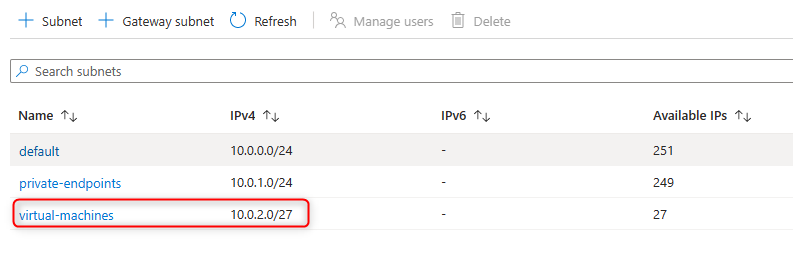
-
Create a new subnet in your VNET for Virtual Machines. In this example, we are using a small subnet size /27.
- Create a Virtual Machine. For this lab we are selecting
Ubuntu Server 20.04 LTS. It is important that you validate the prerequisites for Self-hsoted Linux Agents. - Follow steps, set a user and select authentication type (SSH public key or password).
-
In
Networkingtab, select the new subnet you createad for VM.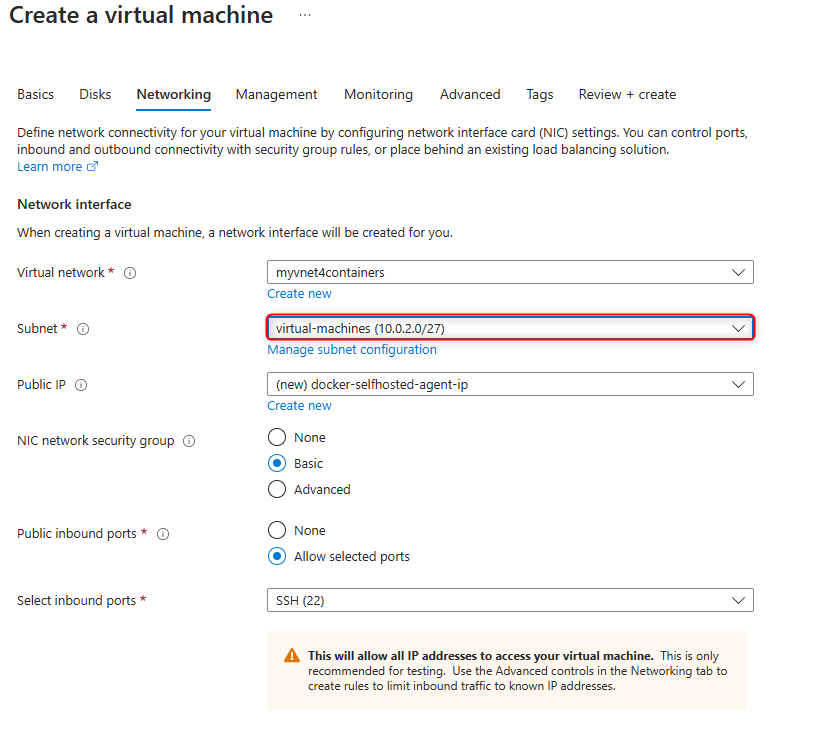
- It is important you allow SSH port on the NSG to continue setting up the agent in the next step.
-
After created, you can use several tools as
Puttyoropensshincluded in git tools. If you choose SSH public key, you can download and pass that file as parameter:ssh -i .\docker-selfhosted-agent_key.pem <user>@<vm-ip-address>Here is a quick reference to how to connect to a Linux Virtual Machine using SSH keys.
Configure Authentication
In this lab, we are using personal access token (PAT) but validate and read carefully the security information for self-hosted agents here.
- Access to your Azure DevOps organization through
(https://dev.azure.com/<your_organization>). - From default page, open user settings and then click on
Personal access tokens: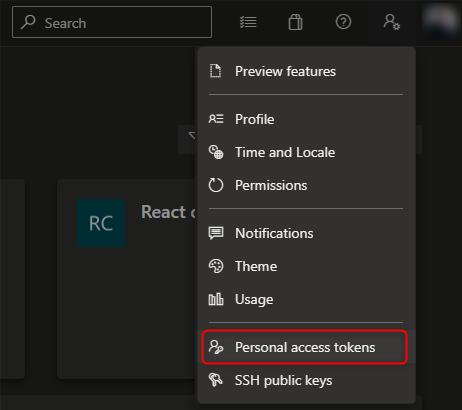
-
Create a new personal access token and select
Agent Pools (read, manage)as scope. If this is a deployment group agent, selectDeployment group (read, manage).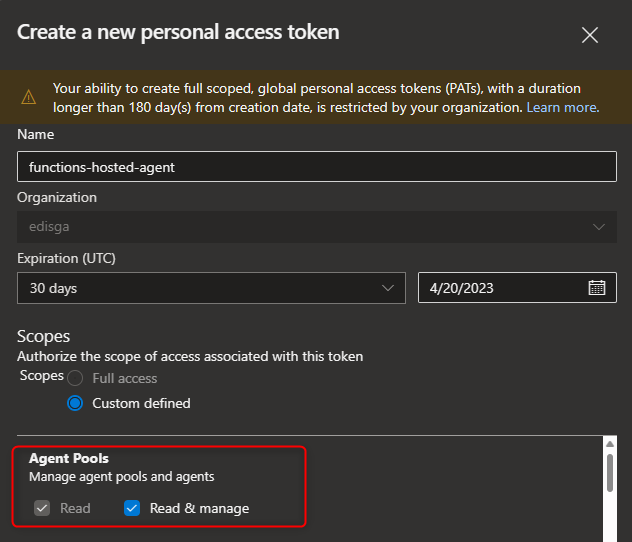
- Copy your token since Azure DevOps doesn’t store it and you will not be able to see it again.
Configure Agent Pool
There are different ways to configure an agent, you can do runing in Docker or installing directly in the Self-hosted Linux box. For this lab, we are going to install directly on the Linux machine.
- Go to
Organization settings, and then underPipelinesclick onAgent Pools. -
Click on
Defaultand then click onAgentsand add aNew agent.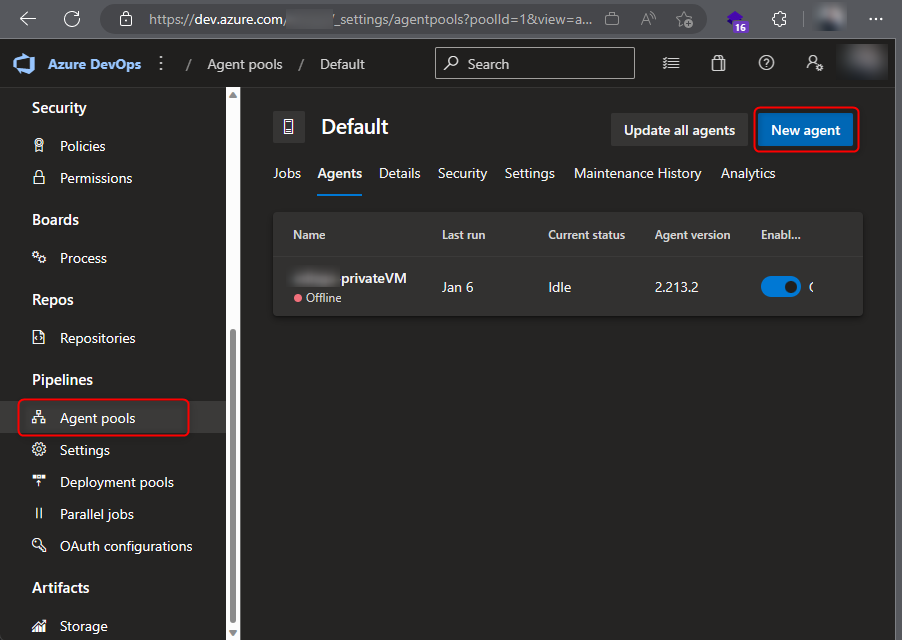
- This will prompt you the steps to download the agent. In this lab, select
Linux-x64and copy the download link. -
In your SSH session on your Linux VM, use
wgetto download the tar.gz file and extract it.cd ~ && mkdir myagent && wget -c https://vstsagentpackage.azureedge.net/agent/3.218.0/vsts-agent-linux-x64-3.218.0.tar.gz -O - | tar -xz -C ~/myagent -
Configure the agent with:
cd ~/myagent && bash ./config.shFollow the steps to accept Team Explorer Everywhere license, enter server url
https://dev.azure.com/<your_organization>, PAT as authentication, your token, agent name and work folder.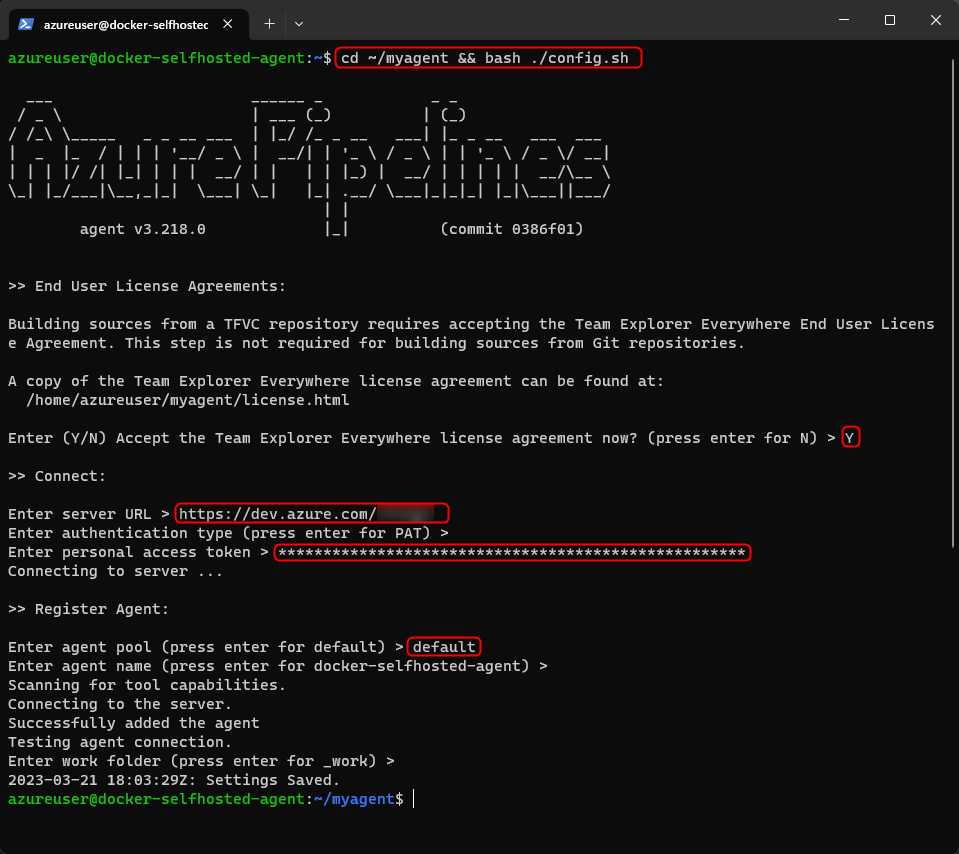
-
There are different ways to run the agent. In this lab, we running as a systemd service. You can check other options as run interactively, run once.
- A
./svc.shscript was generated after configuring the agent. - Run the following commands:
cd ~/myagent sudo ./svc.sh install [username] - To start/get status/stop the service you can use:
sudo ./svc.sh start sudo ./svc.sh status sudo ./svc.sh stop -
You can ls this folder
ls /etc/systemd/systemand check for systemd service file/etc/systemd/system/vsts.agent.{tfs-name}.{agent-name}.servicethat was created in the install process. Then you can usesudo ./svc.sh startorsystemctl start vsts.agent.{tfs-name}.{agent-name}.serviceto start the service.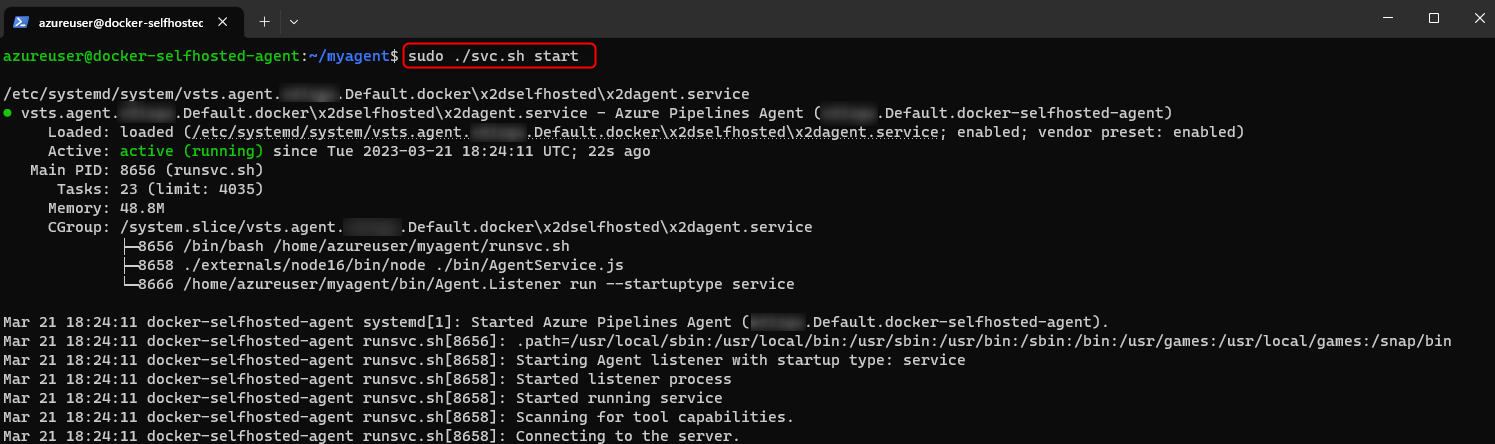
- A
-
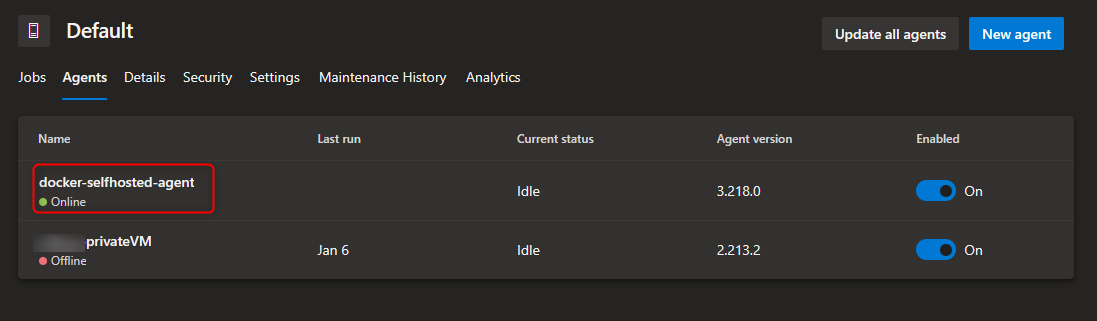
After doing that, you can see the self-hosted agent Online.
Installing Docker on Agent
-
Follow steps to install Docker in Ubuntu 20.04. Steps can vary, please validate always updated information.
cd ~ sudo apt update sudo apt install -y apt-transport-https ca-certificates curl software-properties-common curl -fsSL https://download.docker.com/linux/ubuntu/gpg | sudo apt-key add - sudo add-apt-repository "deb [arch=amd64] https://download.docker.com/linux/ubuntu focal stable" apt-cache policy docker-ce sudo apt-get install -y docker-ce docker-ce-cli sudo groupadd docker sudo usermod -aG docker $USER sudo usermod -aG sudo $USER sudo chmod 666 /var/run/docker.sock sudo systemctl start docker - To apply the new group membership, you need to type
sudo suand then typesu {your-username} - To check if docker is running use
docker -vordocker info.
Create Function App and VNET integration
Note: These steps will also apply for Web Apps for Containers(WafC), here is another reference for WafC and Azure DevOps.
- Create Function Custom Container App.
- For now select
Enable public access - OnandSingle Container - Quickstart. - Create and Review
- After created, go to
Networkingtab, click onVNET integrationunderOutbound Traffic. - Click on
Add VNetand selectVirtual Networkcreated before. - Finally add appsetting
WEBSITE_PULL_IMAGE_OVER_VNET=trueto avoid pulling the container over outbound ip address instead of vnet ip.
ACR Authentication
You can use several ways to authenticate, using Admin user, System assigned or User Assigned. For the purpose of this lab, we will use Admin user.
- Go to your ACR and click on
Access keysand then enableAdmin user. - Copy username, password and login server for next step.
Configure Pipeline with Agent
- Follow the same steps described in Create a pipeline section.
-
In this pipeline set the
poolname to ‘Default’ or custom pool configured, also setvmImageto the name of your docker self-hosted agent. Also you can add DOCKER_BUILDKIT:1 to improved build’s performanceNote: If you don’t set a pool name it will use the
Azure Pipelinesby default.trigger: - master resources: - repo: self variables: # Container registry service connection established during pipeline creation dockerRegistryServiceConnection: '$(service_connection)' imageRepository: '$(image_name)' containerRegistry: '$(container_registry)' dockerfilePath: '$(Build.SourcesDirectory)/Dockerfile' tag: '$(tag_version)' DOCKER_BUILDKIT: 1 stages: - stage: Build displayName: Build and push stage jobs: - job: Build displayName: Build pool: name: 'Default' vmImage: '$(vmImageName)' steps: - task: Docker@2 displayName: Build and push an image to container registry inputs: command: buildAndPush repository: $(imageRepository) dockerfile: $(dockerfilePath) containerRegistry: $(dockerRegistryServiceConnection) tags: | $(tag) - task: AzureFunctionAppContainer@1 inputs: azureSubscription: '$(subscription)' appName: '$(app_name)' imageName: '$(container_registry)/$(imageRepository):$(tag_version)' appSettings: '-DOCKER_REGISTRY_SERVER_URL $(registry_url) -DOCKER_REGISTRY_SERVER_USERNAME $(registry_username) -DOCKER_REGISTRY_SERVER_PASSWORD $(registry_password)'Note: Ensure that pipeline yaml has acess to the Pool. An easy shortcut it is to go under Pool Security tab and open or restrict access to pipelines.
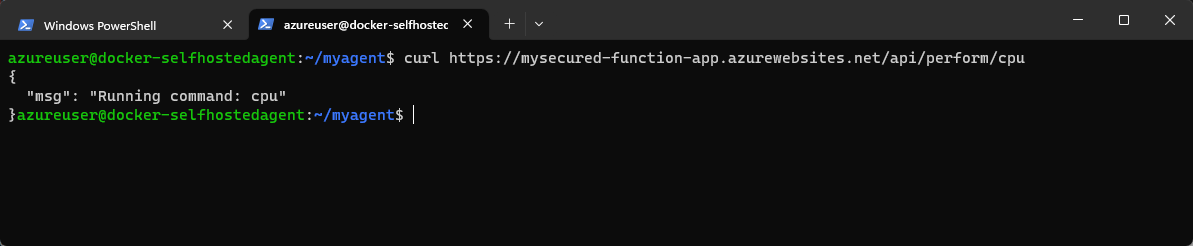
- Run pipeline to deploy.
Assign Private Endpoint and Restrict Public Access
To secure your function app and scm sites with Private endpoints and Access restrictions disabling public network access.
- Select
Networkingand underInbound Traffic, selectPrivate endpoints, selectExpress. -
Select
VNETand private endpointssubnet. Then integrate withprivate DNS Zone.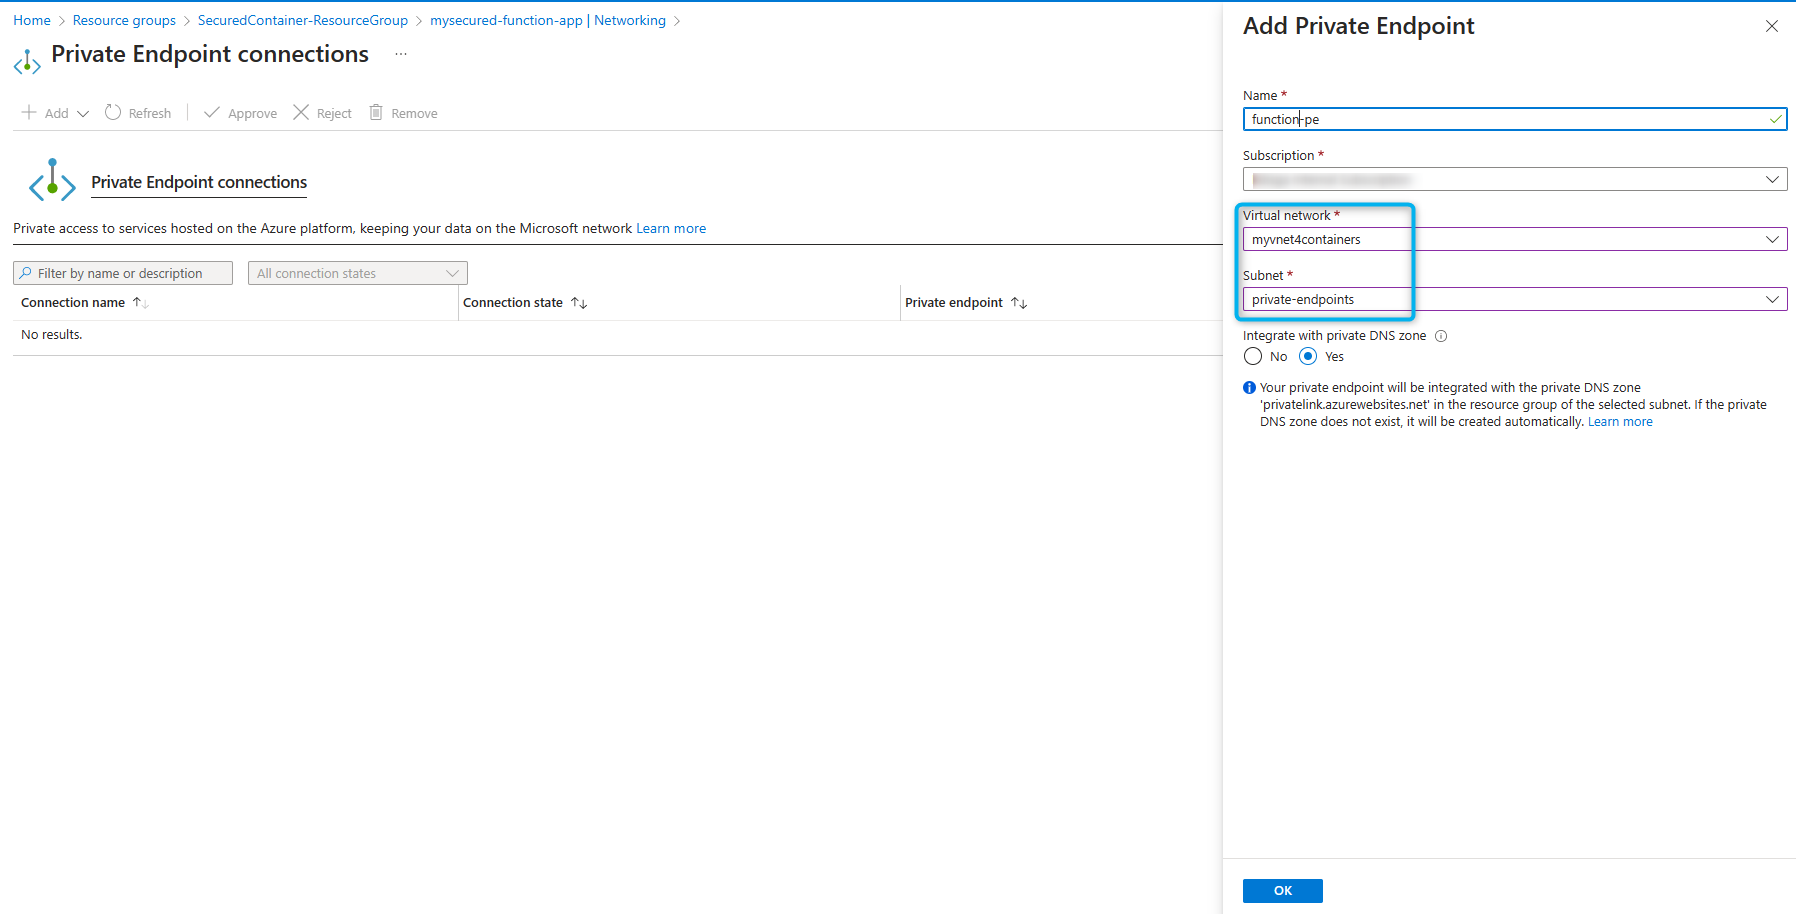
-
Under
Inbound Traffic, selectAccess restrictionand uncheckAllow public access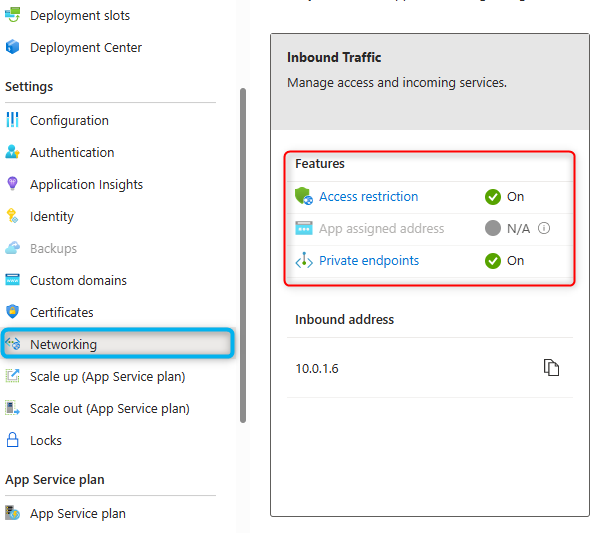
-
You can use the same VM that is linked to the VNET or any other computer on the same VNET.
Troubleshooting
First thing is to identify what type of issue you are troubleshooting. Is this a deployment issue or post-deployment issue? Here is a list of the most common scenarios deploying from Azure DevOps to Linux SKU.
Deployment issues
400 errors
- Error:
Failed to patch App Service '<function_name>' configuration. Error: BadRequest - The parameter LinuxFxVersion has an invalid value. (CODE: 400)
- Action Plan:
- Review for syntax on the image name, if you are using ACR, it needs to follow
<container_registry_name>.azurecr.io/<image_name>:<tag>
- Review for syntax on the image name, if you are using ACR, it needs to follow
- Other possible scenarios when ocurring 400 errors are due to several reasons:
- High density, too many applications hosted in the same SKU (App Service Plan). Split your apps into several SKUs.
- High resource consumption (CPU, Memory, High latency, etc) that can be affecting the deployment process.
403 errors
- Errors:
Failed to fetch Kudu App Settings. Error: Ip Forbidden (CODE: 403)Failed to patch App Service '<function_name>' configuration. Error: BadRequest - The parameter DOCKER_REGISTRY_SERVER_URL has an invalid value. Unexpected error when connecting to the registry. Cannot find available registry. https://<acr_name>.azurecr.io (CODE: 400) Error: Failed to update deployment history. Error: Ip Forbidden (CODE: 403)
- Action Plan:
- Mainly reason is that Azure DevOps Agent can’t access Kudu endpoint.
- Validate if there is any IP Restrictions rules under scm site.
- Using VNET and private endpoint?
409 errors
- Usually when you get 409 errors means that there is a deployment in progress or after swapping slots the container is not startup up and timing out, or a restart was ocurring in between Azure DevOps with multiple requests.
- Action Plan:
- If you are swapping check this reference.
- Validate any restart in between your deployment process. (E.g. App Settings update)
Post deployment issues (Startup)
- You can check the following references for most common scenarios when pulling and starting up containers on App Service Linux, which applies the same for Function Apps Custom Containers:


