NextJS deployment on App Service Windows
This blog post will cover deploying a Next.js application to Azure App Service on Windows.
Local Development
Create a Next app
- Create a new Next project with
npx. The installation process will prompt for a project name - this same name will dictate the directory it creates for your Next.js application.
npx create-next-app@latest
- Follow the prompts, choose what makes sense for your project. Below is an example:
 npx create-next-app@latest
√ What is your project named? ... azure-webapp-windows-node-nextjs-basic
√ Would you like to use TypeScript? ... No / Yes
√ Would you like to use ESLint? ... No / Yes
√ Would you like to use Tailwind CSS? ... No / Yes
√ Would you like to use `src/` directory? ... No / Yes
√ Would you like to use App Router? (recommended) ... No / Yes
√ Would you like to customize the default import alias (@/*)? ... No / Yes
Creating a new Next.js app in C:\Users\user\azure-webapp-windows-node-nextjs-basic.
- Run
npm run devto run the development server. Or, build the application first to generate a production build, this will create a.nextfolder, and then run the application locally:
npm run build
npm run start
NOTE: If using
yarn, useyarn run buildandyarn start
NOTE: Running without building first may show
Error: ENOENT: no such file or directory, open 'C:\path\to\project\.next\BUILD_ID'
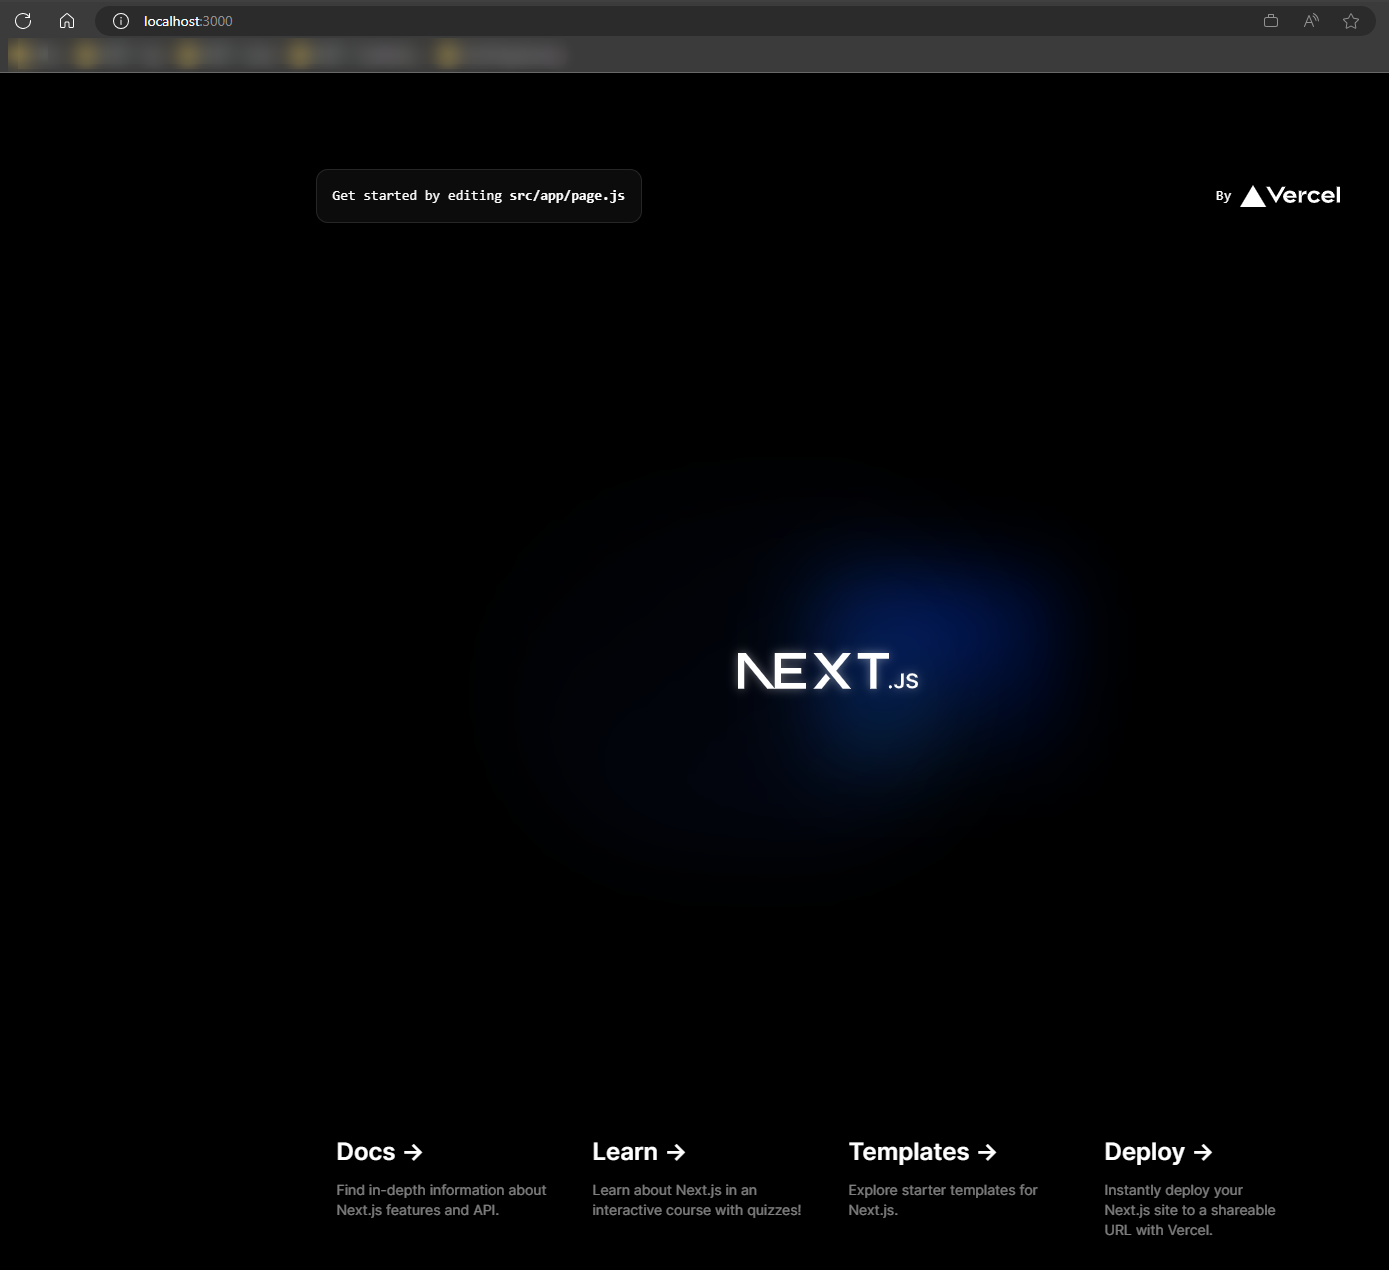
- You should now be able to see the application running locally under
http://localhost:3000:
Important prerequisites
Adding a .js entrypoint
Compared to App Service Linux (eg., NextJS Deployment on App Service Linux), you can just package.json commands directly, or by invoking the full path to next to use the CLI. On Windows App Service, we can’t do this - as Node applications on Windows run with iisnode in IIS, whereas with Linux App Service, applications run as Containers.
To make this work on Windows, we need to define a .js entrypoint. This can be server.js, index.js, etc. In our case, this will be called server.js. The content in here will be what is generally defined in Next.js’s custom server documentation
Create a server.js and add the following:
const { createServer } = require('http')
const { parse } = require('url')
const next = require('next')

const dev = process.env.NODE_ENV !== 'production'
const hostname = '0.0.0.0'
const port = process.env.PORT || 3000
// when using middleware `hostname` and `port` must be provided below
const app = next({ dev, hostname, port })
const handle = app.getRequestHandler()

app.prepare().then(() => {
  createServer(async (req, res) => {
    try {
      // Be sure to pass `true` as the second argument to `url.parse`.
      // This tells it to parse the query portion of the URL.
      const parsedUrl = parse(req.url, true)
      await handle(req, res, parsedUrl)
    } catch (err) {
      console.error('Error occurred handling', req.url, err)
      res.statusCode = 500
      res.end('internal server error')
    }
  })
    .once('error', (err) => {
      console.error(err)
      process.exit(1)
    })
    .listen(port, () => {
      console.log(`> Ready on http://${hostname}:${port}`)
    })
})
The logic regarding pathnamein Next.js’s custom server documentation example should be changed as fit by your application. These changes can and should be tested locally first. At a minimum, you need to include await handle(req, res, parsedUrl) (above) or else the application will never return an HTTP response. This will also cause an application to fail when starting up on App Service.
A few important points:
hostnameis changed to0.0.0.0since we need to listen on all addresses. You can set the value tolocalhostif you want to test this locally, but do not set this tolocalhoston App Service - the application will fail to recieve the request since it’s only listening for local connections and not external ones.- Do not hard code the
portvariable.PORTon App Service Windows (for node applications) is actually a named piped - if you hardcode this, the application will fail to start. You can setportto something likeprocess.env.PORT || 3000if wanting to test locally.
NOTE: If
NODE_ENVis set todevelopment, this will enable hot reloading. This will cause adverse issues when deployed. Ensure thatNODE_ENVis set toproduction.
Do not hardcode ports
As example above, it’s imperative that the port variable either is just set to process.env.PORT or process.env.PORT || 3000 (or a port of your choosing for local development). This will cause the application to not return a HTTP response to warmup pings and ultimately fail to start.
Add a web.config
Since IIS (and iisnode) is used on App Service Windows with Node applications, we’ll need to bring a web.config. Sometimes, in a application deployment to App Service Windows, a web.config will be auto generated. However, we need to ensure this targets our server.js entrypoint. To avoid the site failing immediately after deploying and having to change this file later to correct this, let’s add one now.
Add the following web.config to your project root:
<?xml version="1.0" encoding="utf-8"?>
<!--
     This configuration file is required if iisnode is used to run node processes behind
     IIS or IIS Express.  For more information, visit:
    https://github.com/tjanczuk/iisnode/blob/master/src/samples/configuration/web.config
-->
<configuration>
    <system.webServer>
        <!-- Visit http://blogs.msdn.com/b/windowsazure/archive/2013/11/14/introduction-to-websockets-on-windows-azure-web-sites.aspx for more information on WebSocket support -->
        <webSocket enabled="false" />
        <handlers>
            <!-- Indicates that the server.js file is a node.js site to be handled by the iisnode module -->
            <add name="iisnode" path="server.js" verb="*" modules="iisnode" />
        </handlers>
        <rewrite>
            <rules>
                <!-- Do not interfere with requests for node-inspector debugging -->
                <rule name="NodeInspector" patternSyntax="ECMAScript" stopProcessing="true">
                    <match url="^server.js\/debug[\/]?" />
                </rule>

                <!-- First we consider whether the incoming URL matches a physical file in the /public folder -->
                <rule name="StaticContent">
                    <action type="Rewrite" url="public{REQUEST_URI}" />
                </rule>

                <!-- All other URLs are mapped to the node.js site entry point -->
                <rule name="DynamicContent">
                    <conditions>
                        <add input="{REQUEST_FILENAME}" matchType="IsFile" negate="True" />
                    </conditions>
                    <action type="Rewrite" url="server.js" />
                </rule>
            </rules>
        </rewrite>

        <!-- 'bin' directory has no special meaning in node.js and apps can be placed in it -->
        <security>
            <requestFiltering>
                <hiddenSegments>
                    <remove segment="bin" />
                </hiddenSegments>
            </requestFiltering>
        </security>

        <!-- Make sure error responses are left untouched -->
        <httpErrors existingResponse="PassThrough" />
        <!--
      You can control how Node is hosted within IIS using the following options:
        * watchedFiles: semi-colon separated list of files that will be watched for changes to restart the server
        * node_env: will be propagated to node as NODE_ENV environment variable
        * debuggingEnabled - controls whether the built-in debugger is enabled
     See https://github.com/tjanczuk/iisnode/blob/master/src/samples/configuration/web.config for a full list of options
    -->
        <!--<iisnode watchedFiles="web.config;*.js"/>-->
    </system.webServer>
</configuration>
This should be placed relative to your package.json. Example:
|-- .next
| -- <other production build files>
|   public
| -- <public assets>
|-- src
|   | -- <application .js files>
|-- .eslintrc.json
|-- jsconfig.json
|-- next.config.mjs
|-- package-lock.json
|-- package.json
|-- postcss.config.js
|-- README.md
|-- server.js
|-- tailwind.config.js
|-- web.config
Deployment Options
Below are a few ways that we can deploy this application to Azure.
Local Git
Note, if using the VSCode extension to deploy to App Service, the concept of including the build folder and using the custom deployment script also applies.
Including the build folder
If deploying with Local Git, VSCode, or other methods that build against the Kudu site directly, we’ll want to ensure our .next folder gets deployed as well. This is in .gitignore by default, which is fine, since ideally we want to run npm run build during our deployment phase - which will recreate this folder on each deployment, which is the ideal method, in case there are application changes.
However, a caveat on App Service Windows with node.js applications is that npm build is not ran - only npm install is. Therefor, we need to use a custom deployment script.
You can generate a custom deployment script with kuduscript. Run the following command in the root of your project:
$ kuduscript -y --node
Generating deployment script for node.js Web Site
Generated deployment script files
This will create a .deployment and deploy.cmd file. Don’t edit the .deployment file. Any changes we make will be in the deploy.cmd file. When deploying with Local Git, and having the .deployment file - it will automatically detect that we’re using a custom deployment script and execute what we have here instead.
Use the following script in this repo - with some changes from the default script. Copy this into the deploy.cmd that was generated in your project and redeploy to the site. The only major difference between the one we generated versus the one in the example repository is the additional of npm run build in our custom deployment script. This is the key to get production builds generated with Local Git and VSCode deployments.
Set up
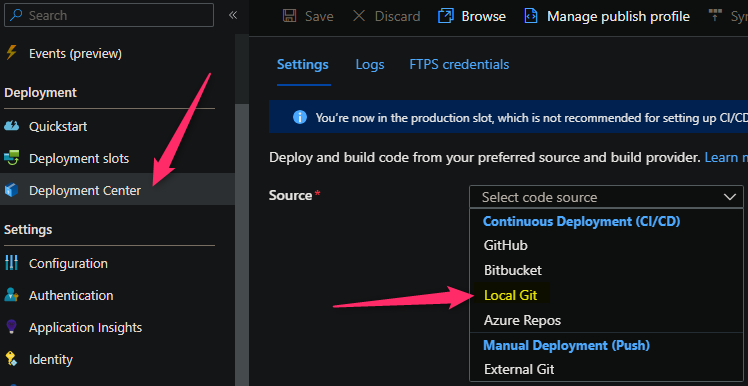
To setup Local Git as a deployment option, follow these steps:
- Navigate to your web app and select Deployment Center -> Local Git and then click on Save.
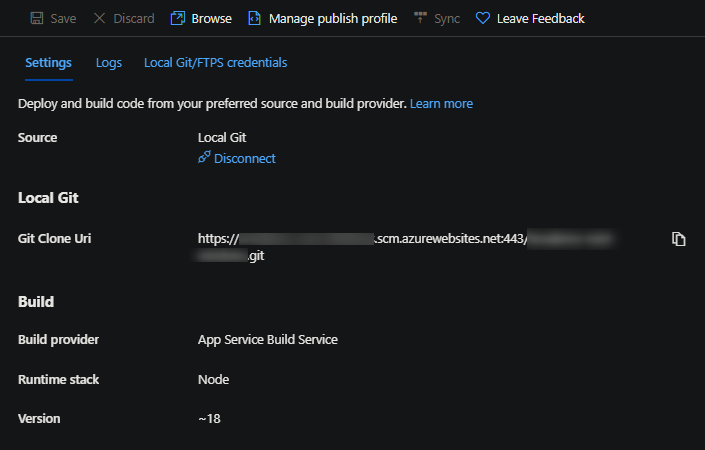
- Copy the remote git repository from Azure Portal.
- In your local terminal run the following commands in order:
git add .
git commit -m "initial Commit"
git remote add azure https://<sitename>.scm.azurewebsites.net:443/<sitename>.git
- You should see some output like the below:
remote: Updating branch 'master'.
remote: Updating submodules.
remote: Preparing deployment for commit id '5f50a51ad1'.
remote: Running custom deployment command...
remote: Running deployment command...
remote: Handling node.js deployment.
remote: Creating app_offline.htm
remote: KuduSync.NET from: 'C:\home\site\repository' to: 'C:\home\site\wwwroot'
remote: Copying file: 'package-lock.json'
remote: Copying file: 'package.json'
remote: Copying file: 'server.js'
remote: Deleting app_offline.htm
remote: Looking for app.js/server.js under site root.
remote: Using start-up script server.js
remote: The package.json file does not specify node.js engine version constraints.
remote: The node.js application will run with the default node.js version 20.9.0.
remote: Selected npm version 10.1.0
remote: Running npm install..
remote: ...........
remote:
remote: added 1 package, and audited 356 packages in 16s
remote:
remote: 129 packages are looking for funding
remote:   run `npm fund` for details
remote:
remote: found 0 vulnerabilities
remote: Creating a production build, running npm run build..
remote:
remote: > azure-webapp-windows-node-nextjs-basic@0.1.0 build
remote: > next build
remote:
remote: .............
remote:  ? Disabling SWC Minifer will not be an option in the next major version. Please report any issues you may be experiencing to https://github.com/vercel/next.js/issues
remote:    ? Next.js 14.1.0
remote:
remote:    Creating an optimized production build ...
remote: .................................................................................................................................................
remote:  ? Compiled successfully
remote:    Linting and checking validity of types ...
remote: ....................................
remote:    Collecting page data ...
remote: .......
remote:    Generating static pages (0/6) ...
remote:
remote:    Generating static pages (1/6)
remote:
remote:    Generating static pages (2/6)
remote:
remote:    Generating static pages (4/6)
remote:
remote:  ? Generating static pages (6/6)
remote: ...
remote:    Finalizing page optimization ...
remote:    Collecting build traces ...
remote: .........................................
remote:
remote: Route (app)                               Size     First Load JS
remote: + ? /                                     5.19 kB          90 kB
remote: + ? /_not-found                           901 B          85.7 kB
remote: + First Load JS shared by all             84.8 kB
remote:   + chunks/69-1b6d135f94ac0e36.js         29.2 kB
remote:   + chunks/fd9d1056-cc48c28d170fddc2.js   53.7 kB
remote:   + other shared chunks (total)           1.89 kB
remote:
remote: Route (pages)                             Size     First Load JS
remote: - ? /about (1205 ms)                      271 B          79.4 kB
remote: + First Load JS shared by all             79.1 kB
remote:   + chunks/framework-56343d6ce4928a14.js  45.2 kB
remote:   + chunks/main-3574ac84065612ad.js       32 kB
remote:   + other shared chunks (total)           1.87 kB
remote:
remote: ?  (Static)  prerendered as static content
remote:
remote: Finished successfully.
remote: Running post deployment command(s)...
remote: Triggering recycle (preview mode disabled).
remote: Deployment successful.
If you see a message stating remote: Invalid start-up command "next start" in package.json. Please use the format "node <script relative path>". - in Next.js’s case, shouldn’t be fatal and is more of a warning. To correct this, set the start script in your package.json to node server.js.
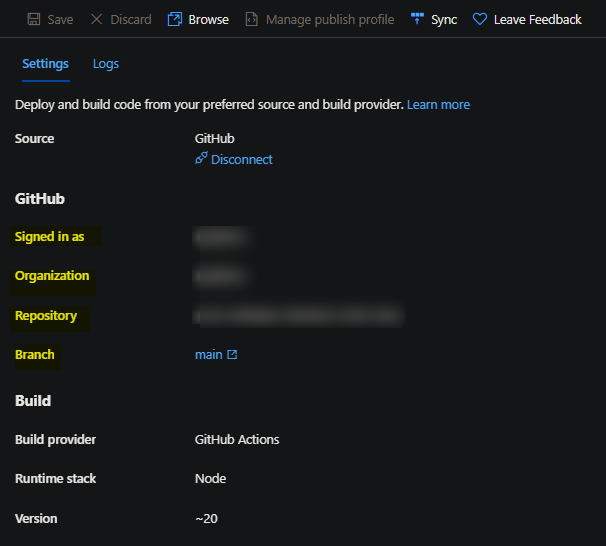
GitHub Actions
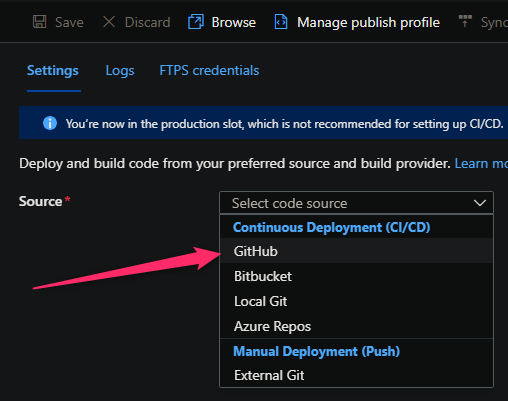
- You can quickly get started with GitHub Actions by using the App Service Deployment Center. This will automatically generate a workflow file based on your application stack and commit it to your GitHub repository under
.github/workflows
- Next, select the GitHub Account, Organization, Repository and Branch you want to use.
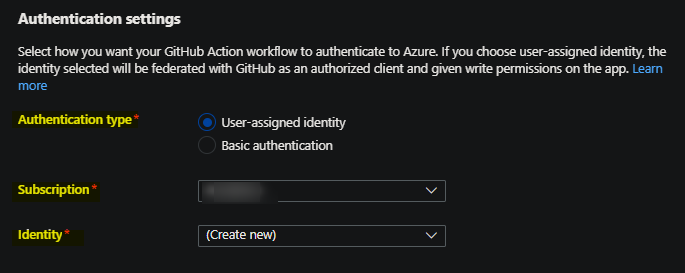
- Lastly, choose your authentication type.
- “Basic Authentication” uses a publish profile and requires the “SCM Basic Auth Publishing” property under the Configuration blade to be anbled.
- Choosing User-assigned identity will create a Service Principal and automatically add required environment variables to your GitHub Repository under Settings -> Secrets and variables -> Actions
You can find more details about these steps documented here:
For Next deployments it is recommended to modify the default template with the following recommendations - this is due to the time it takes overwise to copy over files between deployment stages (eg., actions/upload-artifact@v2) - without these changes, it may take 15 minutes to easily over an hour(s) since node_modules contains thousands of files, or more, depending on the project.
Below is an example of zipping the source code contents and moving it between stages. Under the hood, ZipDeploy is used to deploy the zip artifact to Kudu.
This uses the “Publish Profile” method:
name: Build and deploy Node.js app to Azure Web App - myapp

on:
  push:
    branches:
      - main
  workflow_dispatch:

jobs:
  build:
    runs-on: windows-latest

    steps:
      - uses: actions/checkout@v2

      - name: Set up Node.js version
        uses: actions/setup-node@v1
        with:
          node-version: '20.x'

      - name: npm install, build, and test
        run: |
          npm install
          npm run build --if-present

      - name: Zip all files for upload between jobs
        run: Compress-Archive -Path .\* -DestinationPath next.zip

      - name: Upload artifact for deployment job
        uses: actions/upload-artifact@v2
        with:
          name: node-app
          path: next.zip

  deploy:
    runs-on: ubuntu-latest
    needs: build
    environment:
      name: 'Production'
      url: $

    steps:
      - name: Download artifact from build job
        uses: actions/download-artifact@v2
        with:
          name: node-app

      - name: 'Deploy to Azure Web App'
        uses: azure/webapps-deploy@v2
        id: deploy-to-webapp
        with:
          app-name: 'myapp'
          slot-name: 'Production'
          publish-profile: $
          package: next.zip

      - name: Delete zip file
        run: rm next.zip
This uses a Service Principal for authentication, which is now an option in the portal upon creation to use which will automatically create one for your deployment, when creating a new workload. Alternatively, your own Service Principal (with the correct scope and RBAC) can be used as a drop in replacement:
name: Build and deploy Node.js app to Azure Web App - somesite

on:
  push:
    branches:
      - main
  workflow_dispatch:

jobs:
  build:
    runs-on: windows-latest

    steps:
      - uses: actions/checkout@v4

      - name: Set up Node.js version
        uses: actions/setup-node@v3
        with:
          node-version: '~20'

      - name: npm install and build
        run: |
          npm install
          npm run build --if-present

      - name: Zip all files for upload between jobs
        run: Compress-Archive -Path .\* -DestinationPath next.zip

      - name: Upload artifact for deployment job
        uses: actions/upload-artifact@v2
        with:
          name: node-app
          path: next.zip

  deploy:
    runs-on: windows-latest
    needs: build
    environment:
      name: 'Production'
      url: $
    permissions:
      id-token: write # This is required for requesting the JWT

    steps:
      - name: Download artifact from build job
        uses: actions/download-artifact@v3
        with:
          name: node-app

      - name: Login to Azure
        uses: azure/login@v1
        with:
          client-id: $
          tenant-id: $
          subscription-id: $

      - name: 'Deploy to Azure Web App'
        uses: azure/webapps-deploy@v2
        id: deploy-to-webapp
        with:
          app-name: 'somesite'
          slot-name: 'Production'
          package: next.zip
NOTE: If you want to use
yarnyou can drop in theyarncommand where need be. This will be a part of theactions/setup-node@v3action.
Azure Pipelines
You can use Azure Pipelines to build your Next application. For Next apps, you can use npm or yarn to install application dependencies and create a production build through the .next folder. You can review more details here: Implement JavaScript frameworks.
The below will be creating a pipeline through .yaml based creation.
- Go to your Azure DevOps organzation and project - then go to Pipelines and create New pipeline.
- Select where your repository is stored (GitHub, Azure Repos, etc.)
- Select your code repository.
- Create an empty template template or use the “Starter Pipepine” and override it with the below. To make it easier to authenticate for deployment, when adding the below tasks, use the “Tasks Assistant” on the right-hand side. This will give an option in the UI for the deployment task to Authorize the Service Connection needed for deployment.
trigger:
- main

variables:
  # Agent VM image name
  vmImageName: 'windows-latest'
  environmentName: 'appname'

stages:
- stage: Build
  displayName: Build stage
  jobs:
  - job: Build
    displayName: Build
    pool:
      vmImage: $(vmImageName)

    steps:
    - task: NodeTool@0
      inputs:
        versionSpec: '20.x'
      displayName: 'Install Node.js'

    - script: |
        npm install
      displayName: 'npm install'

    - script: |
        npm run build
      displayName: 'npm run build'

    - task: ArchiveFiles@2
      inputs:
        rootFolderOrFile: '$(System.DefaultWorkingDirectory)'
        includeRootFolder: false
        archiveType: 'zip'
        archiveFile: '$(Build.ArtifactStagingDirectory)/$(Build.BuildId).zip'
        replaceExistingArchive: true

    - task: PublishBuildArtifacts@1
      inputs:
        PathtoPublish: '$(Build.ArtifactStagingDirectory)/$(Build.BuildId).zip'
        ArtifactName: 'drop'

- stage: Deploy
  displayName: Deploy stage
  dependsOn: Build
  condition: succeeded()
  jobs:
  - deployment: Deploy
    displayName: Deploy
    environment: $(environmentName)
    pool:
      vmImage: $(vmImageName)
    strategy:
      runOnce:
        deploy:
          steps:
          - task: AzureWebApp@1
            inputs:
              azureSubscription: 'subscriptionName(00000000-0000-0000-0000-000000000000)'
              appType: 'webApp'
              appName: 'appname'
              package: '$(Pipeline.Workspace)/drop/$(Build.BuildId).zip'
This approach, like with GitHub Actions, will build for production in the pipeline and deploy the .next folder required. Under the hood, ZipDeploy is used to deploy the zip artifact to Kudu.
Troubleshooting
HTTP 500.1xxx errors after deployments
Review this post for common iisnode-based issues - Troubleshooting Common iisnode Issues
A table of iisnode substatus codes can be found here - this can be used to track down what may be occurring. This usual indicates that node.exe is crashing. A logging-errors.txt file will be created (assuming that App Service Logs are enabled). If an uncaught exception is occurring, it will be logged into this file.
Common scenarios for this directly after a deployment may be:
- Forgetting to add a package into your
package.jsonbut referencing the missing package as an import in code - Forgetting needed environment variables that may otherwise cause the application to crash
- Targeting a version of Node that may not support features Nest or underlying libraries use (ex., outdated Node version - if the App Setting
WEBSITE_NODE_DEFAULT_VERSIONis not set, this falls back to a v0.x version.)
You do not have permission to view this directory or page.
You may have forgetten to deploy your web.config, or this is misconfigured. Review the web.config mentioned earlier in this article for comparison. Ensure this is also pointing to the correct .js entrypoint file in the production build.
Additionally, a web.config in an incorrect location may cause this as well. Eg., placing this in a subfolder outside of the project root.
EBADENGINE / unsupported node.js version
Currently, Next 14.x requires Node.js >= 18.17.0. You may see something like this if you’re running a lesser Node version:
remote: npm WARN EBADENGINE Unsupported engine {
remote: npm WARN EBADENGINE   package: 'next@14.1.0',
remote: npm WARN EBADENGINE   required: { node: '>=18.17.0' },
remote: npm WARN EBADENGINE   current: { node: 'v18.12.1', npm: '8.19.2' }
remote: npm WARN EBADENGINE }
You are using Node.js 18.12.1. For Next.js, Node.js version >= v18.17.0 is required.
Some potential mitigations:
- You can either Next to a version which supports Node <= 18.12.1
- You can change the App Setting
WEBSITE_DEFAULT_NODE_VERSIONto~20, which targets the latest running version of major 20.x, this is the latest running Node major on App Servince Windows as of this blog post
Error: ENOENT: no such file or directory, open ‘C:\home\site\wwwroot.next\BUILD_ID’
In Log Stream or home\LogFiles\Application\logging-errors.txt (if App Service Logs are enabled) an error like the below may show:
Mon Feb 05 2024 18:25:25 GMT+0000 (Coordinated Universal Time): Application has thrown an uncaught exception and is terminated:
Error: ENOENT: no such file or directory, open 'C:\home\site\wwwroot\.next\BUILD_ID'
Just like earlier in this post - if npm run build or yarn build was never ran, then .next was never generated, assuming this is still in your .gitignore. Ensure that the build command for your package manager is being ran. For instance, if using Local Git or Visual Studio code deployments - you need to use a custom deployment script as mentioned above.
If using CI/CD like GitHub Actions or Azure Pipelines, then the build command needs to be ran on the pipeline and the .next folder contained in the zip being deployed to Kudu.
Failed to load SWC binary for win32/ia32
| Next.js uses a Rust-based compiler for faster compilation times - however this requires certain dependencies that may not be available on the machine. In [SWC Failed to load | Next.js](https://nextjs.org/docs/messages/failed-loading-swc) it gives a few workarounds, one regarding a C++ installation - this in particular cannot be altered with Windows App Service. |
The full build error message will appear at build time and look like the below:
remote:  ? Attempted to load @next/swc-win32-ia32-msvc, but an error occurred: A dynamic link library (DLL) initialization routine failed.
remote: \\?\C:\home\site\wwwroot\node_modules\@next\swc-win32-ia32-msvc\next-swc.win32-ia32-msvc.node
remote:  ? Failed to load SWC binary for win32/ia32, see more info here: https://nextjs.org/docs/messages/failed-loading-swc
remote: Compiler server unexpectedly exited with code: 3221225477 and signal: null
remote: Failed exitCode=-1073741819, command="C:\Program Files (x86)\nodejs\20.9.0\node.exe" "C:\Program Files (x86)\npm\10.1.0\node_modules\npm\bin\npm-cli.js" run build
remote: An error has occurred during web site deployment
Additioanlly, Node on App Service Windows is ran in 32bit by default. Attempting the most relevant workarounds in the above link (using .babelrc and changing next.config.js) does not work. For these workarounds to take effect, you need to switch to using a 64bit node version - which then SWC can be opted out of. You can then either do:
- Create a
.babelrcin your project root with the following:
{
    "presets": ["next/babel"]
}
- Or, use add the following to your
next.config.js(ornext.config.mjs):
const nextConfig = {
    swcMinify : false,
};
NOTE: This property has the following mentioned: @deprecated — will be enabled by default and removed in Next.js 15
This currently happens when building against the Kudu site (local git, VSCode, etc.) - but may or may not happen with CI/CD agents - this completely depends on the machine and set up used. The same workarounds in that link can be attempted.
For more information, see the Next.js/Vercel GitHub thread on this: https://github.com/vercel/next.js/discussions/30468
‘tailwind’ not found
If you’re deploying with NODE_ENV to production and devDependencies containing tailwind (or other dependencies required during next build) - then you may see this message. A workaround is to move the devDependencies into your dependencies section or to set NODE_ENV during the build or deployment phase to development.
Note, if you’re using a CI/CD deployment process but also have a .deployment file and a custom deployment script, this will cause the deployment (eg., npm install/npm build) to be re-ran on Kudu, and can have adverse side effects since it’s a different environment than a CI/CD agent - this will also extend deployment time since it’s essentially two builds occuring (one on the agent, one on Kudu). Ensure these files are removed or renamed prior to deployment.
A note on hardcoded ports
As opposed to Linux, where if hardcoding the listening port for a Node application on App Service Linux will result in a HTTP 502 and a container time out on start up, doing this on Windows App Service will likely introduce a HTTP 500.1001 (or closely related substatus code). Follow the steps in the prerequisites portion of this post to avoid encountering this situation.
Parking/default page is showing
If the default hosting page still shows after a deployment, then likely one of the following is happening:
- A nested zip is being deployed (when using CI/CD)
- If using Local Git or VSCode (Azure App Service extension), you may be deploying outside of the project root
In either case, you can connect to your applications site contents with FTP or through the Kudu site to validate what exists under home\site\wwwroot.