Deploying your own virtual environment with Python and App Service Linux
This post will go over deploying a virtual environment without build automation (Oryx) for Python applications on App Service Linux
Overview
Although it’s covered in various places on how to deploy Python applications - such as in Quickstart: Deploy a Python (Django or Flask) web app to Azure App Service or in various other places like this blog, listed in the Deployment - Python section - this post will go briefly into how to deploy a virtual environment from your build or local environment to Python on App Service Linux.
IMPORTANT: Be aware this is not a typical use case. The ideal method is to typically let Oryx build your application for you - which handles automatic virtual environment creation and activation. It is recomended to use Oryx where possible instead.
Virtual Environments
Oryx and build automation logic
On App Service Linux and Python deployments for “Blessed” images - the typical deployment logic utilizes Oryx. Implicit examples would be local git and VSCode. Additionally, GitHub Actions (if enabled via Azure Portal) also uses this by default. Explicit examples would be AZ CLI usage with az webapp deploy where OneDeploy/ZipDeploy is used and the App Setting SCM_DO_BUILD_DURING_DEPLOYMENT = true is added - or doing the same when using Azure Pipelines. Although, this can be added for any deployment method aside from FTP.
When Oryx is used, it handles virtual environment creation and activation. This is important since it’ll later run pip install against our requirements.txt to install these packages into the activated virtual environment - which the application will reference the antenv/lib/python[majorversion].[minorversion]/site-packages directory at runtime for various dependencies in this environment later on, to be able to properly run.
If this doesn’t happen - which commonly is because Oryx is not used - or - a specific virtual environment directory structure is not provided, you’ll very likely have the application fail with a ModuleNotFoundError, like this:
ModuleNotFoundError: No module named 'fastapi'
Which is because it can’t find the expected site-packages directory (or the dependency was never installed or never in requirements.txt)
This message would also appear in your default_docker.log file under /home/LogFiles upon startup.
NOTE: Always ensure App Service Logs are enabled
WARNING: Could not find virtual environment directory /home/site/wwwroot/antenv.
WARNING: Could not find package directory /home/site/wwwroot/__oryx_packages__.
By design, these Python images look for a virtual environment named antenv to activate.
Expected structure and differences between Linux and Windows
Virtual environments (without a startup command)
If you want to deploy your own virtual environment without any need for a startup script to use site-packages from it, it needs two hard requirements:
- It needs to be named
antenv - It needs to be created from a Linux-type filesystem.
- It would need to be created with the same Python major and minor version as your Python application on App Service
The logic in the current Python “Blessed” images on Azure App Service expect a virtual environment path that is created from a Linux filesystem. This is in the format of antenv/lib/python[majorversion].[minorversion]/site-packages, eg. antenv/lib/python3.12/site-packages. This can be created by running python -m venv antenv
On Windows, if you create a virtual environment using something like python -m venv antenv, it’ll instead create a directory structure like antenv/Lib/site-packages. Obviously this doesn’t match the expected path, so if you disable Oryx with SCM_DO_BUILD_DURING_DEPLOYMENT = false and deploy the application, such as with a .zip, you’ll end up seeing this:
Using packages from virtual environment antenv located at /home/site/wwwroot/antenv.
Updated PYTHONPATH to '/opt/startup/app_logs:/home/site/wwwroot/antenv/lib/python3.12/site-packages'

....
ModuleNotFoundError: No module named 'fastapi'
While technically the virtual environment is of the correct name - the structure is not. So activation of this doesn’t work due to the incorrect folder structure - and therefor ModuleNotFound occurs.
Where as opposed to a correct directory structure like on a Linux-based system, you’ll see the below upon startup in default_docker.log:
Using packages from virtual environment antenv located at /home/site/wwwroot/antenv.
Updated PYTHONPATH to '/opt/startup/app_logs:/home/site/wwwroot/antenv/lib/python3.12/site-packages'

....
[68] [INFO] Starting gunicorn 22.0.0
[68] [INFO] Listening at: http://0.0.0.0:8000 (68)
[68] [INFO] Using worker: uvicorn.workers.UvicornWorker
[74] [INFO] Booting worker with pid: 74
[74] [INFO] Started server process [74]
[74] [INFO] Waiting for application startup.
[74] [INFO] Application startup complete.
Virtual environments (with a startup command)
As opposed to not using a startup command, this method has a bit more flexibility. You can deploy a virtual environment of any name and use either a Windows or Linux based directory naming structure. Although, if you have packages that are built for specific architecture - and are not cross-compatable, you’re going to see ModuleNotFoundErrors again. It’s advised to still build in a Linux environment.
Add a custom startup file with the following content - this example assumes our virtual environment is named localvirtualenvironment:
#!/bin/bash

echo "Using virtual environment named 'localvirtualenvironment'..

export PYTHONPATH=$PYTHONPATH:"/home/site/wwwroot/localvirtualenvironment/lib/python3.12/site-packages"

gunicorn --worker-class uvicorn.workers.UvicornWorker --timeout 600 --access-logfile '-' --error-logfile '-' app:app
You’ll notice that since this virtual environment is not named antenv - you’ll see the below again in default_docker.log. This is expected (assuming the correct steps were followed for a working application)
WARNING: Could not find virtual environment directory /home/site/wwwroot/antenv.
WARNING: Could not find package directory /home/site/wwwroot/__oryx_packages__.
If you go into SSH for the container, you’ll also see:
-bash: antenv/bin/activate: No such file or directory
Both of these are expected in this scenario.
Quick start
To explain this further, we’ll deploy a quick Fast API application, packaged as a zip, via the Azure CLI az webapp deploy command. This will not use Oryx and by default uses OneDeploy.
We’ll also be deploying from WSL2 - the reasoning is explained in the Virtual environments (without a startup command) section above. Creating a virtual environment on a Linux filesystem is a bit easier than manually creating these directories to match the expected structure each time.
Deployment (no startup command)
- Create a folder in WSL2 to house your application. For example,
mkdir python-fastapi && cd python-fastapi. - Create and activate your virtual environment -
python -m venv antenv - Install FastAPI. In the below example, we’ll also use
numpyjust to further prove this works. Runpip install fastapi numpyand thenpip freeze > requirements.txt. - Add the following code:
from fastapi import FastAPI

import json
import numpy as np

app = FastAPI()


@app.get("/")
def read_root():
    return {"msg": "python-fastapi"}


@app.get("/api/array")
def get_date():
    a = np.array([[1, 2, 3],[4, 5, 6]])

    return {"msg": json.dumps(a.tolist())}
-
Next, zip your project. You’ll likely need to install
zipfirst which can be done with:sudo apt-get update sudo apt-get install zipThen run
sudo zip app.zip -r antenv app.py requirements.txt -
At this point, your project structure would look something like this:
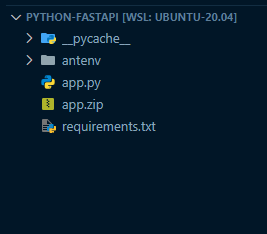
-
Add an App Setting of
SCM_DO_BUILD_DURING_DEPLOYMENT=false. For the below command, you don’t need to do this. But for other deployment types, it may be best to avoid Oryx accidentally being used. -
Deploy the project with
az webapp deploy -g "your-rg-name" -n "yourappname" --src-path ./app.zip --type zip --async trueNote, you’ll need to either add
uvicornor agunicornwith auvicorn.workers.UvicornWorkerclass to avoid an issue with startup since FastAPI is aSGI based. You can addgunicorn --worker-class uvicorn.workers.UvicornWorker --timeout 600 --access-logfile '-' --error-logfile '-' app:appAt this point, the application should work. If you look in
default_docker.log- you should see the same message as earlier that it was able to pick up the virtual environment we deployed namedantenv.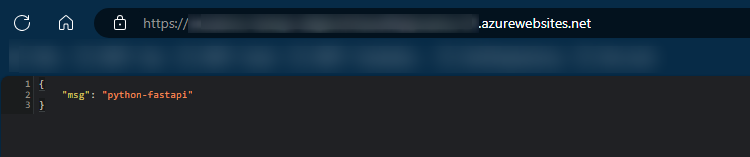
If we check the container filesystem through SSH - we’ll notice it’s activated (denoted by
(antenv)in the terminal):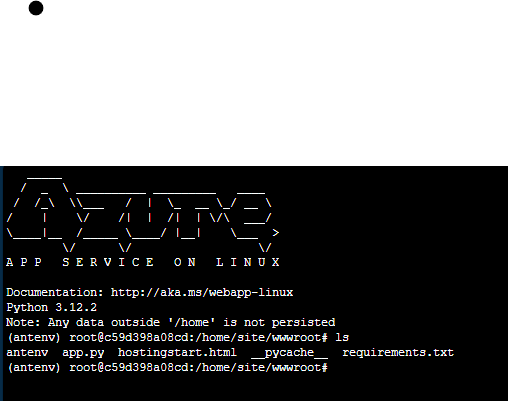
This small test proves that the virtual environment we “brought” was correctly used.
Note: You can further confirm Oryx is not used by going to deployment files under
/home/LogFiles/kudu/traceand look for ones containingBackground_POST.xml. This will either showbuilderasOryxBuilder,BasicBuilder, orOneDeploy. This may also show in your terminal, depending on how you’re deploying.
Deployment (startup command)
If using a startup command - simply follow the other Deployment section above.
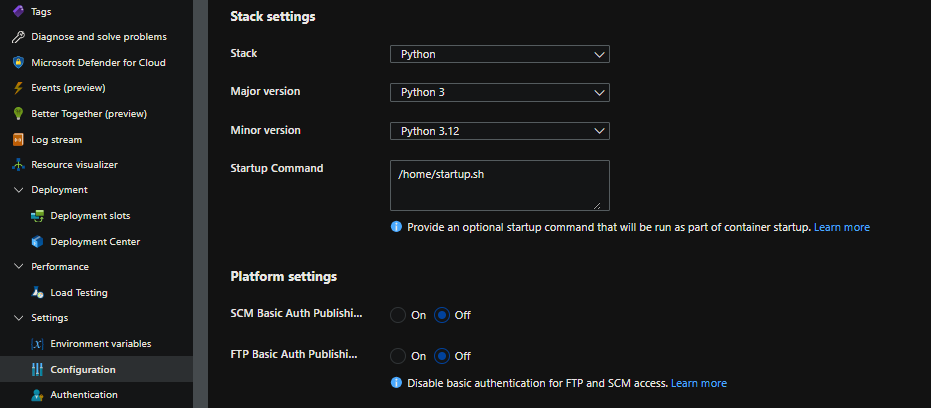
Make sure to add a custom startup file - such as startup.sh to /home. Add the contents from the Virtual environments (with a startup command) section earlier. You can use something like FTP or create the file directly on the filesystem. After doing this, go to Configuration -> Startup Command on the application and add the following:
Other usage
You can use this approach with other implementations like GitHub Action and Azure Pipelines.
GitHub Actions:
...
- name: Create and activate virtual environment - run pip install
  run: |
    python -m venv antenv
    source antenv/bin/activate
    pip install -r requirements.txt


- name: Zip artifact for deployment
  run: zip release.zip ./* -r

- name: Upload artifact for deployment jobs
  uses: actions/upload-artifact@v4
  with:
    name: python-app
    path: |
    release.zip
...
..
Azure Pipelines:
...
    - script: |
        python -m venv antenv
        source antenv/bin/activate
        python -m pip install --upgrade pip
        pip install setup
        pip install -r requirements.txt
      workingDirectory: $(projectRoot)
      displayName: "Install requirements"

    - task: ArchiveFiles@2
      displayName: 'Archive files'
      inputs:
        rootFolderOrFile: '$(projectRoot)'
        includeRootFolder: false
        archiveType: zip
        archiveFile: $(Build.ArtifactStagingDirectory)/$(Build.BuildId).zip
        replaceExistingArchive: true
...
..
Both examples should include the virtual environment in the .zip.
An important note to this. If you do not use pip install in the same script that you’re activating your virtual environment in - then dependencies in requirements.txt will not be installed into the site-packages folder.
This will subsequentially cause ModuleNotFoundError even though it seems like you’re following the correct approach.
An example of this not installing packages into the virtual environment would be:
- name: Create and activate virtual environment - run pip install
  run: |
    python -m venv antenv
    source antenv/bin/activate


- name: Install packages
  run: |
    pip install -r requirements.txt
Note: You can review the pipeline run logs and look at the zip / archive portion, which you’ll notice that packages end up not in the zip. Or, you can download the artifact directly (from Azure Pipelines)
If you wanted to use a different virtual environment name, then simply change it from antenv to your intended name - but ensure the application is being started with your custom startup script and the reference to that new virtual environment(above)
Takeaway
Even though this is not a typically recommended approach - and instead you should use Oryx when possible. You can still “bring” your own virtual environment. As long as the following requirements are met:
- If not using a startup command to add
site-packagesto$PYTHONPATH- It must conform toantenv/lib/python[majorversion].[minorversion]/site-packages, eg. antenv/lib/python3.12/site-packages- Packages are installed into
site-packages
- Packages are installed into
- If using a startup command - you must add the
site-packagesdirectory of your virtual environment to$PATH - If not using a startup command - The Python major.minor version in your virtual env matches the major.minor on App Service
- Otherwise, if you change versions on App Service - this will break the application
- This is another reason why it’s instead recommended to use build automation as this may be deemed a brittle approach
- In all cases, it’s best to build against Linux architecture/x64 AMD. If you’re cross building on Windows - there may be a decent chance you run into issues with certain packages.


